Any Kitchen Will Do

Give me a kitchen and I will cook.

Archive for the category “Mom’s Kitchen”

Rolled Chicken Breasts

stuffed chicken rolls

Big D does not prefer fowl white meat. Whether it is turkey or chicken or other, more exotic birds, he goes for the dark meat as much as possible. He will eat the white stuff, but only out of necessity. When he has to resort to a chicken topped salad when dining out he will eat it, but begrudgingly and with thoughts of thighs dancing in his head.  I have similar preferences, but they do not run as deep, so when I was visiting my mom I took advantage of white fowl connoisseurs and made a recipe I have long pondered. Besides the satisfaction of pounding flesh into oblivion, the balance of flavors was supreme, with the mildness of white chicken meat and kick of the stuffing. Since the chicken was thin, the cooking time was kept short and the dish was moist, in a good way. Never hesitate to pound the meat just a little bit more, for it won’t hurt the chicken, and it can’t help but release anything lingering and seething in you. I almost called this recipe ‘stuffed’, but since I did such a good job of pounding the ‘rolled’ version of the name seemed appropriate. I served the rolls with some baked spaghetti squash and viola! Dinner!

Rolled Chicken Breasts

6 boneless chicken breasts
2 cups baby spinach leaves
1 1/2 cup crumbled feta cheese
6 pieces bacon, cooked crisp
1 tsp dried basil leaves
2 cups mozzarella, shredded
4 ounces tomato sauce
12.5 ounces diced tomatoes
1 tsp garlic powder
1 tsp onion powder
Salt and pepper to taste

Preheat oven to 350 degrees. Pound chicken breasts with kitchen mallet until no thicker than 1/4 inch. Chop spinach finely, crumble bacon and combine them with feta and basil in medium bowl. Season both sides of chicken with salt and pepper. Lay a breast flat on your work surface with the longest section going left to right. Place 1/4 to 1/3 cup (divided equally among the breasts) of filling in the middle of the flat meat. Starting from the left or right carefully roll the breast until it overlaps with the chicken on the opposite side of the filling. Place stuffed breast in a 9×9 (snugly) or 10x 10 (close but not so snug) or similar sized baking dish. Repeat with the other five breasts and place them in the dish. Place in preheated oven, covered. Bake for about 20 minutes. While chicken is baking combine tomatoes, tomato sauce, garlic powder and onion powder in a medium sauce pan over medium high heat. When the mixture begins to bubble turn the heat down and summer uncovered for about 15 minutes. Add salt to sauce if needed. When chicken finishes cooking for 20 minutes remove it from the oven. Sprinkle half the cheese on the chicken, top with the tomato sauce and then the rest of the cheese. Return the pan to the oven uncovered and cook for 15 – 20 more minutes, until the edges begin to brown. Remove from oven and let sit for five minutes before serving.

Peruvian-ish Posole

posole

Posole. A basic, comforting soup I have enjoyed at restaurants across America that touted Central and South American cuisine. Not having made it before, I dug around to try and identify the when and where of it’s origin. To no avail, I might add. I have most often found it in Mexican and Peruvian restaurants, so then my goal was to figure out the differences between the two versions. I also recently watched a documentary about it being a dish prepared and served in New Mexico hundreds of years ago. Was there a difference? Not much. Peruvian leans more towards tomatillos and green or serrano chiles to give it depth and spice, while the Mexican versions rely on the red chile. New Mexico, of course, relied on their extra special (read Hatch) chiles and local meats. Other variations I discovered switched between the use of pork and chicken. Finally, I decided to come up with my own, since everyone else seems to be doing the very same thing. My goal was to make it similar to the bowl of posole I had in a little, Peruvian restaurant we stumbled upon in a Las Vegas strip mall. No, not on The Strip, but in a mall that is strip like where multiple business share a parking lot. The place was decorated very basically, with varnished plywood walls, folding tables and beat up stackable banquet chairs. The decor accommodated large crowds to watch soccer games or have big parties. We were surrounded by bright posters advertising Peruvian beer, and inundated with loud, quick-paced dance music. The food was amazing and I could only imagine a pre-Colombian Incan family cooking something similar over a fire, in the shadow of Machu Picchu. They may have used alpaca instead of pig, but I am not going there, except in the wearing of a sweater. One thing I love about all my posole experiences is the fresh, raw toppings traditionally served on the side. They give a spark to the otherwise flavorful, yet basic soup. Since I was making the soup for a dinner party I wanted to make sure it was good (duh), and that the topping variety accommodated all the eating habits of guests. I love my friends dearly, but if their diet evolution is anything similar to mine, there is a need for variety in meal preparation. Here is what I came up with, and I must say it was delicious. My dear friends enjoyed it, including Little B. As you can see from the picture, the toppings were many and everyone got to make their own special soup. As usual, the leftovers got better and better a few days later. And as usual, the fun and memories of the people involved in the evening will last even longer.
Peruvian Posole
1 1/2 – 2 pounds pork shoulder
2 Tbsp high heat fat (lard or coconut oil recommended)
2 cups roughly chopped white onion
1 cup roughly chopped carrot
1 Tbsp paprika
1 tsp ground cumin
1/2 tsp ground coriander
2 tsp dried oregano leaves
4 garlic cloves, minced
8 cups pork broth (if there is not enough from cooking the pork, add water)
1 cup dark beer (suggest Negro Modelo or a porter)
4 – 6 cups hominy, canned or prepared fresh (simmered in water for two hours, drained)
1 pound tomatillos, shucked, rinsed and roughly chopped
4 large green chiles, roughly chopped
2 limes, juiced with meat included
Salt to taste
Toppings

1 small red onion, chopped
2 avocados, chopped
2 limes, cut into 1/8 wedges
1 bunch radish, halved and thinly sliced
1/2 head cabbage, shredded
1 cup sour cream
1 cup cheddar cheese, grated
1 cup cotija cheese, crumbled
1/2 cup pico de gallo or salsa

In 8 – 10 quart stock pot place pork shoulder over high heat. Turn shoulder as each side browns, until all sides have color. Add water and scrape bottom of pan to release browning tidbits.  Cook pork over medium heat until pork easily shreds, about two hours. Remove pork and liquid from pot and set aside, retaining the liquid separately. When meat is cool enough to handle, shred it into bite-sized pieces. Set heat under the now empty stock pot to medium high and add lard or coconut oil. When it is melted add the onions and garlic. When they start to sweat add the carrots. Add paprika, coriander, oregano and cumin. Stir and cook longer until you can smell the spices. Add broth and beer. Cook until it begins to boil softly. Add pork, hominy, tomatillos and chiles. Stir and cook until a soft boil begins. Taste test to see if you can taste the flavors. If not, sprinkle liberally with salt and stir, then taste again. There should be a difference. if not, add more salt. Turn heat down to simmer, making sure there is still a very soft boil. Cook for an additional two hours. Place toppings in separate bowls with spoons right before serving. Serve spoon in large soup bowls and pass around the toppings!


Fondue Feast

Is it French or Swiss in origin? I don’t know. The evolution in America of fondue is such a different animal compared to the simple cheese fondue I found to be served in Europe. Way back in the ’80s my family would join forces with other families and have fondue parties. At the time it was a throwback to the 1960s, when my parents stocked up on fondue sets. Regardless of when it peaked in popularity or where it first happened, it is still a fun time with abundant and delicious food.

I learned a number of things from those fondue parties when I was growing up. The first was you must commit to any dip you take with your loaded fondue forks, for double dipping in a pot of cheese or chocolate is frowned on in the fondue world. If you do such a thing there may be nothing said, but the vibes of the fondue tribe may change toward you. Those fondue forks can be lethal when stabbed into a hand guilty of double dipping! The second thing I learned was there is never enough room on the little divided plates for all the sauces. With divided fondue plates you need to commit to, like, four of the ten or so available sauces. Another option is to do a lot of dollop dropping on individual pieces you cook. The third thing was that it took a while to get full from fondue, and since the process took a while to cook and eat and reload and cook and eat…there was plenty of time to talk and sip wine and laugh and, especially, try and sneak other people’s forks when they are not looking so you get to double up on your pile of cooked bites. The trick to sneaking forks is to not have any of your own on your plate. Have your own forks cooking away before stealthily stealing your neighbor’s fork while they are gesturing dramatically during the telling of a story. Don’t forget to reload their fork with the same stuff. A bonus is their quizzical look when they check their fork and wonder why the chicken is still raw after their story about Uncle Festus at the family reunion.

Although it may take a while to fill up on fondue that full stomach will sneak up on you. Before the chocolate fondue is served you wonder if you have any room left in your belly. But it is just fruit, right? There is always room for fruit! Maybe not fruit covered with chocolate, but it is very much worth trying. And it will fit!

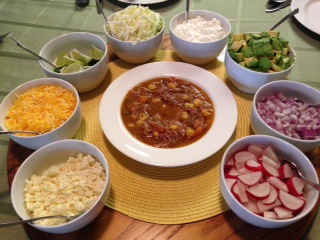
For our fondue feast we did a sample of four different fondues – cheese, oil, broth and chocolate. In the future I will probably limit myself to one fondue for a meal, surrounding it with non-fondue dishes. This particular meal was a chaotic mess of food and fun, and a great way to sample the different fondue types. Everyone had a blast.

The following recipes account for feeding seven people, since our fondue party included as many guests. After digging through the closets mom found four – count ’em – four fondue pots. We chose not to use the small one from France meant for chocolate fondue, but only because the sheer number of people, all that dipping would have overwhelmed the little thing. The meal called for a lot of preparation, but it can be spaced out in small chunks, mostly as early as the day before, and makes for quick set up when it is actually time to eat. I pulled everything out of the refrigerator (yes, even the meats) about 45 minutes to an hour before serving so things were cool but not chilly.

Everyone should scour their parents’ pantry, estate sales and thrift stores for fondue sets and be ready to pull them out for some fun eats. If you are short of cash the fondue feast can be turned into a pot luck where everyone brings a little bit but eats a lot. Have fun with it and be sure to make a mess!

I served the cheese fondue when people were first arriving and standing around in the kitchen, then served the oil and broth fondues at the table with all the sauces. In addition to the sauces I made, shown in the recipes below, I provided tartar sauce, BBQ sauce and creamy horseradish, all served simply in their pre-made states in bottles from the grocery. I did not even start preparing and melting the chocolate fondue until the table was cleared of the oil and broth. It was quick to do and a fun dessert. I remembered a lot of the recipes from when I was younger, but found a lot of helpful reminders here.

FONDUES

Cheese Fondue

2 garlic cloves, cut in half

1 cup dry white wine
8 ounces Gruyere cheese, shredded
8 ounces Havarti cheese, shredded
2 ounces Dubliner cheese, shredded
1 Tbsp lemon juice
1 Tbsp cornstarch
1 Tbsp Kirsch or brandy
½ tsp nutmeg
½ tsp paprika
Black Pepper (optional)

Handful of Cubed bread per person
Vegetables also used with Broth Fondue

The measurements for wine and cheese should be enough, but you may want to have a little more on hand to adjust the consistency if needed. Add more cheese if it’s too liquid, add more wine if it’s too thick. I have found that if you mix the cheese fondue on the stove top or electric fondue pot about an hour before serving, then turn it off, but then start to reheat about ½ hour before serving it makes for quick set up when guests first arrive. To begin preparation, rub the garlic inside the fondue pot then discard. Pour the white wine and lemon juice into the pot and turn on the burner. Let the wine and lemon juice warm up without boiling. Reduce heat and add the shredded cheese. With a wooden spoon, mix well and stir regularly. Dilute the cornstarch in the Kirsch or brandy, and add remaining ingredients to the pot. Add pepper to taste. Adjust consistency with additional wine or cheese. Dip bite size pieces of bread or vegetables. Let the freshly dipped pieces cool off for a few seconds before enjoying. You may have to twirl the cheesy bits on your fondue fork until it cools and stops drizzling long strings of cheese before you eat them. Also, extra liquid may be needed after the fondue is half gone because it thickens as time passes.

Hot Oil Fondue

2 – 4 cups peanut or canola oil
4 ounces beef per person, cut in bite-sized cubes
2 – 4 ounces chicken breast per person, cut into thin strips
2 ounces per person medium size shrimp (cooked or uncooked), tails intact

Heat oil to 325 – 350F, either in the fondue pot if electric, which is best for oil, or on the stove top for flame pots. If using a flame pot carefully transfer the hot oil to the fondue pot. Do not fill the pot more than 2/3 full, to reduce splashing over the rim of the pot while cooking. Pierce the raw meat or seafood with fondue forks and submerge in hot oil for about a minute. Remove and let cool briefly before dipping.

Broth Fondue

4 – 6 cups chicken stock
2 Tbsp dry white wine
1 garlic clove, thinly sliced
1 Tbsp fresh ginger, grated
3 Tbsp Worcestershire or soy sauce
Salt and Pepper to taste

2 – 4 mushrooms per person, whole or halved, depending on size
4 – 6 broccoli crowns per person, blanched
2 – 4 cauliflower crowns per person, blanched
4 – 6 snow peas per person, blanched
2 – 3 mini carrots per person, blanched

Combine all ingredients (salt and pepper optional) into electric fondue pot or on a stove top pot if using flame pot. Bring liquid to a simmer (liquid is moving and steam coming off surface) and begin dipping. For flame pots bring liquid to a boil on the stove then carefully transfer to the flame fondue pot. Dip vegetables into broth until cooked to your liking, warm but still crisp, or soft and mushy. If you really want the vegetables cooked quickly, I recommend blanching all the vegetables (drop them for 2 – 5 minutes in boiling water, then stop the cooking process by dropping them in cold water, then drain) before cooking them in the broth. The blanching can be done in advance and then refrigerated until serving time.

Chocolate Fondue

½ pound semi-sweet chocolate
1/2 cup Light Cream
1/8 cup brown Sugar
2 Tbsp Butter
2 tsp Vanilla Extract

Combine all ingredients in pot on stove top or in a microwave-proof glass bowl. Melt on low heat until liquid and well combined. If using the microwave heat for 30 seconds and stir until mostly melted, then stir until all lumps are gone. Whether prepared on the stove top or in the microwave, transfer to fondue pot for serving and dip dip dip (but don’t double dip!).

SAUCES

Lemon Teriyaki Sauce

1/2 cup Soy Sauce
1/2 tsp Ground Ginger
1/4 cup Sugar
2 tbs Lemon Juice

Add all ingredients to a pot on the stove top. Heat until ingredients come to a boil. Let cool.

Hollandaise Sauce

4 oz Butter
2 Egg Yolks
1 tbs Lemon Juice
1 tbs Water
1/4 tsp salt

Melt butter and let cool briefly. While butter is cooling mix the rest of ingredients in a blender but do not blend them yet. When butter has cooled a bit spoon out the foamy, bubbly top from butter, leaving the clear, yellow clarified portion. Begin blending the mixed ingredients and gradually and steadily add the butter. Let blend for about a minute. Leave at room temperature until served.

Spicy Oriental Sauce

2 Tbsp soy sauce
1 ½ Tbsp lemon juice
1 4.5 ounce can mild green chiles
1 clove garlic, crushed
2 tsp Sesame Oil

Combine all ingredients in tall bowl. With hand blender combine ingredients to a uniform, slightly thick texture. Serve chilled or at room temperature.

Garlic Lemon Dip

1 ½ cups mayonnaise
1 ½ Tbsp lemon juice
1 Tbsp garlic, crushed
½ tsp hot sauce
Salt and Pepper to taste

Mix all the ingredients until well blended. Keep refrigerated until served.

Curry Sauce

1 cup plain yogurt
2 tsp ground curry
1 ½ tsp lime juice
Salt and Pepper to taste

Mix all ingredients until well combined. Refrigerate until served.

Dill Dip

1 ½ cup low fat sour cream
½ shallot, finely chopped
2 Tbsp dill, finely chopped
1 Tbsp lemon juice
Salt and Pepper to taste

Combine all ingredients well. Refrigerate until served.

Guacamole Dip

1 rip avocado, mashed
1 Tbsp lemon juice
½ cup plain low fat yogurt
½ cup low fat sour cream
¼ cup finely chopped pine nuts, walnuts or pecans
1 leek, white and light green part finely chopped
½ tsp hot sauce
Salt and Pepper to taste

Mix the avocado flesh with the lemon juice. Mix avocado mixture with the rest of the ingredients. Add salt and pepper to taste. If prepared ahead of time of serving, keep refrigerated.

Pizza Pizza Pizza!

I returned home yesterday after visiting my in-laws and my mom. My brother was there too! What a treat! To commemorate our last evening together we made a total mess of the kitchen making pizza. One obstacle regarding the pizza crust was a lack of a recipe. The one I have relied on for years was at home (what I get for having not yet scanned all my old recipes), and the one my brother usually used was not at mom’s place either, so my brother dug around online and found this one, which worked great. Mom’s pizza stone got a good workout making FIVE pizzas and Grandma Heflin’s 80 year old cedar rolling pin did a darned good job on rolling out the dough. When the dough was ready and the toppings prepared we stuck Little B on a stool and had her help us with topping the pizzas. She loved throwing, er, placing the vegetables and pepperoni all over the place, especially in big piles. We had to make a couple of adjustments before they went in the oven, like reducing the pile of five cheese slices, but we all had blast. My brother was the work horse for the evening, watching the baking times, transferring the pizzas from the stone, and making sure everyone got what they wanted, or didn’t want, on the pizzas. Here is what we did. These things are fun and fun is good, to quote Dr. Seuss.

Pizza Pizza

2 batches pizza dough (makes about five 12-inch pizzas)

1 large can diced tomatoes

1 small can tomato paste

2 Tbsp plus ½ cup olive oil

1 clove garlic, crushed

Salt and Pepper to taste

2 bell peppers, cut into strips

10 baby portabello mushrooms, sliced about ½ cm thick

1 bunch basil, washed with stems removed

1 large can black olives, sliced into rings

½ large white onion, sliced thin julienne

5 ounces turkey pepperoni (or the fatty kind if you are not trying as hard as I am to justify eating pizza)

2 pounds buffalo mozzarella, sliced about ½ cm thick

1 cup corn meal

1 cup flour

Place pizza stone in cold oven. Turn oven on to 450-475F, depending on your oven. In a bowl mix together diced tomatoes, tomato paste, garlic, olive oil, and salt and pepper to taste. Smush some of the tomatoes, but leave some chunky. Roll out on floured surface 1/5 the dough into a 12 inch round. Transfer the round to a pizza peel (or the back of a cookie sheet) that has been sprinkled with corn meal. Spread a thin layer of olive oil (about 2 Tbsp) on the crust. Add about 1/5 of the tomato sauce*. Layer other toppings (mushrooms, pepperoni, olives, onions, basil) as desired, topping with 1/5 of the cheese. When oven and stone are hot, sprinkle the stone with corn meal then slide the pizza on to stone and cook for 14-16 minutes. If the first pizza does not brown on top you may need to raise the oven temperature.

While the first pizza is cooking, make sure you have transition stations set up (this is where the dishes and clean up time increased exponentially) – one platter for setting on the table, one surface for receiving a pizza just out of the oven, and one for a prepared pizza ready to go in the oven. If you have a pizza peel the pizza transfer from oven to cutting board is a breeze. If you don’t have a peel (like us), make sure you have the thickest oven mitts you can find, or check your grilling/fire pit supplies to see if you have at least one high temperature glove to help handle the stone. We had to remove it from the oven to slide it onto the cutting surface. It is really hot! If you don’t have a pizza stone the whole cooking time and transfer issue is completely different than what is described here, and I have faith you can figure it out. Good luck!

This baking method and timing melts the cheese, browns the surface a bit and cooks the crust, but it does not completely cook the vegetables until limp. We like ours a bit crispy. If you want your vegetables cooked a little more it may help to blanch or saute them before you start making the pizzas.

*On one of the pizzas we used a wonderful pesto instead of the tomato sauce. It was from Humble House Foods who sell at the Pearl Farmers Market. Amazing pizza results and the most delicious pesto ever!

Greek Salad On A Stick

I will start by saying these toothpick-mounted wonders are the closest I got to making football shaped food this year. I actually watched quite a bit of the Super Bowl today. Good game, considering I did not feel strongly about one team or the other winning. I don’t watch much professional American Football these days; mostly because I don’t have a TV at home, but even more because any attempt I make to do something for hours at a time is frequently interrupted by a lively 2 1/2 year old daughter. When I weigh time with Little B against watching football, Little B always wins.

Greek salads are things I can just eat and eat, especially with some hot grilled kebabs on top. My favorite of all time is at Papouli’s in San Antonio – they have a killer dressing. The tanginess of the dressing, olives and feta just pull me in, and are much less bad for me health-wise than my other salad love, blue cheese dressing. Yes, I know blue cheese dressing is not a salad – I need the lettuce and tomato and cucumber to hold the dressing – but the calorie and fat load of blue cheese dressing can wreak havoc on almost any diet.

I saw this idea somewhere last year but for the life of me cannot remember where. I think it was here, but it was a while back. I tried to give credit where it is due, so I get kudos for trying, right? I have made these wonderful little appetizers a number of times and love the juiciness with the dressing added. The whole stick of salad can fit in one bite. Whoa! Heaven! I sometimes include onion, but usually not because some of my nearest and dearest have a hard time with raw onion, so I present the recipe without. I most recently served these along with my smorgastarta and they were a great compliment.

Greek Salad On A Stick

24 toothpicks

1 block feta cheese, cut into 24 cubes

24 grape tomatoes

24 kalamata olives, pitted

1 English cucumber or 3 mini cucumbers

¼ cup olive oil

1/8 cup red wine or balsamic vinegar

1 tsp lemon juice

½ tsp salt

¼ tsp pepper

1 tsp dried oregano

Whisk together the last six ingredients. Set aside. Slice cucumbers into thick slices, about ½ inch in length, then again in half or quarters, depending on cucumber size. I have found that all four elements fitting on the toothpicks is directly related to the size of the cucumber pieces (or the squishiness of the olives, but that can only go so far), so do a test ‘pick before cutting up all the cucumber. Start with putting on toothpicks the tomato, followed by an olive and cucumber, ending with the feta. Place all the filled toothpicks in a deep plate or bowl that will just hold the completed ‘picks. Drizzle dressing over the ‘picks. Refrigerate for at least an hour. Before serving move the ‘picks to a serving dish and again drizzle the dressing over the ‘picks. If you use fancy decorated ‘picks, the top of which won’t look good slimed with dressing, you may need to spoon the dressing over them with a spoon.

Smorgastarta…sorta

I prepared food for a party this weekend. It was far from the many Super Bowl parties going on – this one was a bunch of ladies getting together to have fun at a private home. Television off. Music and conversation on. They wanted some filling food without loading up on the calories, and nix the seafood. I have reliable recipes I’ve made for years, but also like the thrill (geez I need to get a life!) of trying a new recipe for the first time and serving it at a party. The centerpiece I made was a cake…sort of. It was a spin off of a smorgastarta. If you have never heard of such a thing, it is basically a layered sandwich frosted like a cake. The original version is popular in Sweden and served at parties – bread, herring mousse, cucumber, bread, smoked salmon, sauce, lettuce, bread, then frosted with a cream cheese/sour cream ‘frosting’. A beautiful version is described and presented at Panini Happy. Since the party would include people who are not partial to seafood, I came up with a version that is about as friendly to the masses as possible. How can I go wrong with chicken, ham and turkey? It was really fun to make, much prettier than an old fashioned sandwich tray and deeeelicious! The leftover bits and pieces from the garnish made a great salad. Heh. My garnish ended up looking a little different than I originally planned (and described below in the directions), but I just went with the flow and I like my results. Let them eat cake…

Smorgastarta…sorta

24 slices large whole wheat bread
1/2 cup Butter (room temperature)
4 ounces thin sliced ham (about 15 slices)
4 ounces thin sliced turkey (about 15 slices)
8 ounces thin sliced cheese
1 English cucumber, peeled and sliced thin
7 cups diced chicken (about seven chicken breasts)
1 cup mayonnaise
1 cup diced dill pickle
1/4 cup shredded onion
1 tsp curry
24 ounces cream cheese (room temperature)
16 ounces sour cream (room temperature)
1 large round tomato
10-14 leaves of green/purple lettuce or flat leaf parsley sprigs
3 boiled eggs (10 minute boil)
1 tall red or yellow bell pepper
1 bunch green onions
1 large carrot

Make sandwich decorations and chill them while constructing cake:
-use peeler to make long thin ribbons from the carrot
-trim green onions until there is only 2″ of green above the white portion, then slice the green parts in quarters lengthwise, not cutting into the white
-make vertical cuts in radishes almost to the bottom four time around the radish
-place carrots, onions and radishes in ice water and set in fridge for at least an hour. The carrots will curl, the onion greens will curl and the radishes should open up and become ‘roses’.
-remove chilled vegetables from water and set on towel to dry (radishes and onions should be done in an hour, but carrots may take two hours to curl if thick)
-core bell pepper and slice horizontally, making rings

Peel tomato skin in one long ribbon to make a tomato rose. Lay it flat for about 30 minutes so it can relax and flatten out. It needs to be flat so you can roll it, otherwise it will try to keep the shape of the tomato and not roll tightly enough. When ready to decorate the cake, roll the skin like a roll of tape. One side of it will naturally form a rose. Garnish with some mint or basil leaves.

To make chicken salad combine chicken, mayonnaise, pickle, shredded onion and curry. Set aside.

Remove crust from all slices of bread. Butter one side of eight pieces of bread and place them butter side up in a rectangular shape on a serving tray. Spread chicken salad on bread, bringing as close to the edges as possible. Place a layer of cucumber on top of salad.

Butter both sides of eight pieces of bread and place on top of the cucumber. Arrange ham and turkey in loose rolls on bread, making sure slices are not pressed flat. Drizzle mustard over meat. Add a layer of cheese. Butter one side of eight pieces of bread and place butter side down on top of cheese.

Thoroughly blend together the cream cheese and sour cream until smooth. Use the mixture like frosting and cover the sandwich on top and all sides.

Press parsley sprigs or lettuce fans on side of frosted sandwich. Arrange egg slices, radishes, carrots, green onions, tomato roses and bell pepper rings on top to decorate. Chill sandwich for at least three hours before serving.

Potato Leek Salad

I am on a quest to eat food I love while reducing the fat and calories of said food. It is difficult because I love bread and butter and beef and pasta and cheese. Oh the cheese! I understand the concept of moderation, and practice it as much as possible, but when food is good it is so easy to be bad. Where potato salad is concerned I like the kind dressed with mayonnaise and mustard, complimenting a pile of smoked brisket or ribs. The other night I could not sleep and craved the not-so-good-for-me potato salad my dad made in big batches for years. He would smoke meats for hours and hours. When the meat was a few hours from being done he would make the potato salad so it could chill and allow the flavors to meet each other. I say he made the salad, but it was actually a group effort. My mom and I would boil the potatoes and eggs, chop the onions, bell pepper, celery and herbs. Dad would inspect our work and let us know if the chop size and quantities were just right, or we needed to work on them a little more. He would pull out the huge green glass bowl from the cabinet and put all the ingredients together, taste testing to see if it needed a little more of this, a little more of that. When he was done with his part it was again time for mom and I to swoop in and decorate the top with bell pepper and egg slices, finishing with sprinkle of paprika. I loved my dad’s potato salad, but it was far from healthy. In my desire to eat healthier and not fade away from complications of diabetes, which took his life last year, I offer the following dish. It appeases my potato salad craving without as much in the way of fat and calories. Enjoy!

Potato Leek Salad

5 lbs red potatoes*
2 leeks
2 Tbsp olive oil
Salt and pepper to taste
14 oz nonfat Greek yogurt
¼ cup parsley, chopped
1 lime, juiced
2 cloves garlic, crushed
8 ounces mushrooms, diced
2 tsp dried tarragon

Cook red potatoes in gently boiling salted water until tender, about 15 minutes, depending on their size. Drain out the water, letting the potatoes cool and dry out (in the refrigerator for faster results). Separate white and green portions of the leeks, discarding the tough outer and upper dark green potions. Thinly slice white/light green sections to form rings. Heat large sauté pan to medium high. Add oil. When oil is hot add leeks. Stir regularly to prevent burning, but not so much that the leeks are prevented from browning. Sprinkle with salt and pepper to your liking. After about 10 minutes add the mushrooms and cook for 5 – 10 more minutes. Set aside to cool. Cut potatoes into bite sized pieces. In a large bowl combine yogurt, juice, garlic, tarragon, parsley and a dash of salt. If the dressing tastes a little salty do not worry – it will be spread among the potatoes which will absorb it. Add leeks and mushrooms to the dressing. Toss potatoes with dressing until coated. Refrigerate until chilled through before serving, at least two hours.

*I prefer to leave the skin on red potatoes for this recipe, but of course if you prefer they can be peeled without significantly affecting the final product. Go ahead – reject the most nutritious part of our root friends. I’m sure they won’t mind…


Beer Bread

Last night I made an eight hour road trip with the Little Girl. We finally landed at my mom’s house about 10pm. She had made a wonderful smelling chicken vegetable soup that would just not fit in my stomach that late (yes, 10pm is now late for me). To make up for delaying her planned soup dinner I used her kitchen for making of beer bread, to go along with the soup for tonight’s dinner. Mom loves the stuff and it is really easy to make. She has a huge, well stocked kitchen. She loves sitting by and watching my brother and I invade it to create all types of delectable dishes. As a result mom has bread pans. I can make an actual rectangular loafy looking, well, loaf of bread! I have no such pans at home. I just don’t think about buying them until I am ready to make bread, so I end up with strange shaped loaves or rolls or muffins. Is it really that hard to run to the store and get pans? No, but the challenge of doing without while still succeeding is something that intrigues me. And where bread pans are concerned, totally doable. Not this time, though. I used chives and garlic tonight, but it can be made with just about any combination of herbs or flavors to compliment the meal being served.

Beer Bread

3 cups self-rising flour*

¼ cup sugar

12 ounces beer

2 tsp diced garlic

½ bunch fresh chives, chopped (about 1/3 cup)

Preheat oven to 375F. Grease rectangular bread pan. Stir together flour and sugar until blended. Add beer and stir. When beer is partially blended add garlic and chives. Finish stirring until dry ingredient are combined. Drop dough into pan, press down to fill corners, and cook for 50-60 minutes.

*If you do not have pre-packaged self-rising flour in your pantry you can substitute it with the following proportion of ingredients: 1 cup all purpose or whole wheat flour, 1 tsp baking powder, ½ tsp salt.

Post Navigation