Any Kitchen Will Do

Give me a kitchen and I will cook.

Archive for the category “side dish”

Buttered Leeks

buttered leeks

March is fun in our household. We are big on celebrating St. Patrick’s Day, and up here in Alaska the daylight stretches further and further, making up for the dark winter days we are quickly forgetting. I don’t want to focus on the fact that this is a traditional Scottish dish. I want to focus on the fact it is very green! Can you do that with me? The ground is turning green, the trees are shooting out little green leaves, the flowering plants are shooting up and begging to bloom. Even the moss around here is turning from wintery dull brown to a dozen shades of green. Buttered leeks do the same for our dinner. I really like how they brighten up a plate and uses the whole leek. So many recipes involving leeks focus on the white part and pretend the green parts don’t exist. Where do they think the white parts would be without the green? Never disrespect the green.

Buttered Leeks

2 leeks
1/2 cup butter
1 Tbsp dried thyme leaves
1/2 tsp sea salt
1/8 tsp ground black pepper

Trim off dried leek tips of green portion and roots of white portion. Slice entirety of leek (yes, green and white sections) in thin diagonal pieces. In a large frying pan, over medium high heat, melt the butter. Add thyme, salt and pepper. Stir. Add leeks. Toss until butter mixture coats all pieces of leek. Continue stirring for five minutes. Reduce heat to low and cover pan, cooking for an additional 15 minutes. Leeks should still be bright green but tender. Remove top and salt more to taste. Stir again and serve immediately.

Fennel and Olives

photo (2)

I was at a loss for words. The frondy green topped vegetables with the fat white bases? What the heck are they called? Why can’t I remember? I rushed to the store after work to begin the hunt. Yes, I could look it up online and get an immediate answer, but was enjoying the wonder and the wait. After getting to the store my eyes were hungrily searching the mass of green in the produce department. There they were! And they were actually labeled! Ahhh. Satisfaction – fennel! My mind was sated and my mouth was watering. We were making some crispy oven chicken for dinner and could do with a strong side dish. The fennel, with it’s hint of anise I thought would go well with some tapenade and cheese. The more subtle taste of the chicken went well with the powerful fennel with briny olives.

Fennel and Olives

2 large fennel
2 Tbsp avocado oil
Salt and pepper, to taste
1/2 cup tapenade
2 Tbsp parmesan cheese

Remove green stalks from fennel bulbs. Slice bulbs in a large julienne. In a medium sauté pan over medium high heat add the oil. When oil is hot add the fennel. Sprinkle with salt and pepper. Toss every two minutes until fennel is browned and softening. Add tapenade and cheese, stirring until it coats the fennel. Cover pan and lower heat to medium. Cook for another five minutes, until preferred tenderness. Remove from pan and serve immediately.

Broccoli Cauli Mash

broccaulimash

If you are looking for a quick, different, single pot, green side dish then your search is over. It really stands out from the ones that leave the vegetables all whole and overly recognizable. I first got the idea for this dish from my mother in law. We started making straight mashed cauliflower a few years ago, and I would like to think that it was contagious and soon after crept into the kitchen of the in laws. During one of our visits to Texas this broccoli cauliflower mash appeared and was delicious! I don’t know exactly what she put in her dish for seasoning, but I did ours the way we like it – buttery with a little help from garlic and thyme. When I first saw it sitting on my plate it reminded me of mushed peas. When I put it in my mouth it was definitely not made of peas, was light, dreamy, and very much complimented the tender smoked salmon Big D cooked up. A weeknight dinner was on the table in no time!

Broccoli Cauli Mash

2 pounds fresh broccoli florets
1 pound fresh cauliflower florets
1/2 small onion, diced
1/2 cup butter, sliced into eight pieces
2 tsp dried thyme leaves
3 cloves garlic, crushed
1 tsp sea salt

In a medium pot pour 1 cup water and add broccoli, cauliflower and onion. Cook over medium-high heat until vegetables are soft, 8-10 minutes. Drain and retain water from pot. Add thyme, garlic, salt and butter slices, stirring until mostly melted. Using an immersion stick blender, puree until vegetables are smooth. If puree is too thick for your taste add a small amount of the retained water, from boiling the vegetables, to thin it out. Mash can be served immediately, but flavors will combine more thoroughly after resting for an hour or more.

Baked Parmesean Mushrooms

image

I will start by saying this recipe was not made with Little B in mind, except that I did not expect her to eat any of it. After happily snacking on mushrooms as a toddler she summarily spurned them during the 4th and 5th years of her life. That does not deter me from putting them in meals. She has often eaten them, unbeknownst to her. Sure, they are sometimes chunky, making it possible for her to remove them and make a point of expressing her distaste for them on the edge of her plate. Other times there is not way to differentiate them from pieces of meat or other veggies and they are happily consumed. When I have made stuffed mushrooms she eats the stuffing but not the cap (but there is mushroom in the stuffing Bwahahahaha!). I hope someday she changes her mind, again, about the shrooms, but for now I am just glad she has an interest in new foods and ones that are healthy for her. There is no mistaking the mushroom-ness of this side dish. It went well with some ribeye steaks Big D smoked up for a very satisfying dinner.

Baked Mushrooms

12-18 mini portabello or white mushrooms
1/2 cup dry red wine
1/4 cup lemon juice
2 tsp garlic powder
1 1/2 tsp sea salt
1 Tbsp dehydrated chopped onion
1 cup finely grated parmesean cheese
1/2 cup almond flour

Trim mushroom stems until they are flush with the bottom of the cap. In a shallow dish or resealable bag add the marinade ingredients – wine, lemon juice, 1 tsp garlic powder, 1 tsp sea salt and onion. Stir until salt dissolves. Add mushrooms and toss in marinade until they are all coated. Leave mushrooms to marinate at room temperature for about two hours. Preheat oven to 400 degrees. Remove mushrooms from marinate and pat dry with towels. In a medium bowl combine parmesean cheese, almond flour, 1 tsp garlic powder and 1/2 tsp sea salt. Stir dry mixture until combined. One at a time coat each mushroom with the dry mixture – it should stick well to the wet mushrooms. Place each mushroom stem side down on a shallow baking sheet, evenly spaced. Bake for 20-25 minutes, until mushrooms shrink a bit and coating begins to brown. Remove from oven and let sit for about five minutes before serving.

Rebellious Ratattouille

image

I think this is ratatouille but some people may find it lacking. What I love about it is the combination of flavors I get from the alternating, thinly sliced vegetables in a single bite. I like bell peppers in general, which are usually included in this dish, but I don’t like the taste and texture they add to the other veggies used here, so I left them out. Look at me being a ratattouille rebel. A neat thing about this recipe is it can be doubled and tripled easily by adding more sliced vegetables and a larger pan. It also makes for a lovely presentation in a serving dish or on your plate.
Rebellious Ratattouille
1 medium zucchini
1 medium yellow squash
1 medium onion
3 large Roma tomatoes
1 14.5 ounce can diced tomatoes
2 cloves garlic, crushed
1 Tbsp dried oregano leaves
1 Tbsp dried parsley leaves
1/2 tsp sea salt
1/4 tsp ground black pepper
In a medium pot over medium heat add the canned tomatoes, garlic, oregano, parsley, salt and pepper. Simmer for about ten minutes, until heated through and bubbly. Remove from heat to let cool. Preheat oven to 375 degrees. While sauce simmers prepare the vegetables by slicing them thinly, less than 1/8 inch thick. Sprinkle slices with salt and pepper. Removing seeds from tomatoes is optional. Using a stand or stick blender purée the tomatoes ito a smooth sauce. In a loaf pan pour a thin layer of tomato sauce (you will probably have leftover sauce). Alternate the slices of zucchini, yellow squash, tomatoes and onion, placing them in two long rows in the pan. Bake for 30 minutes, cover pan with foil and bake for an additional 15 minutes. Remove from oven and let sit for 5 minutes before serving.

Kelley’s Killer Stuffed Mushrooms

image
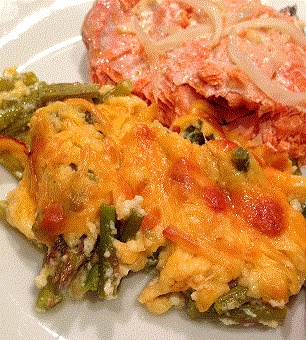
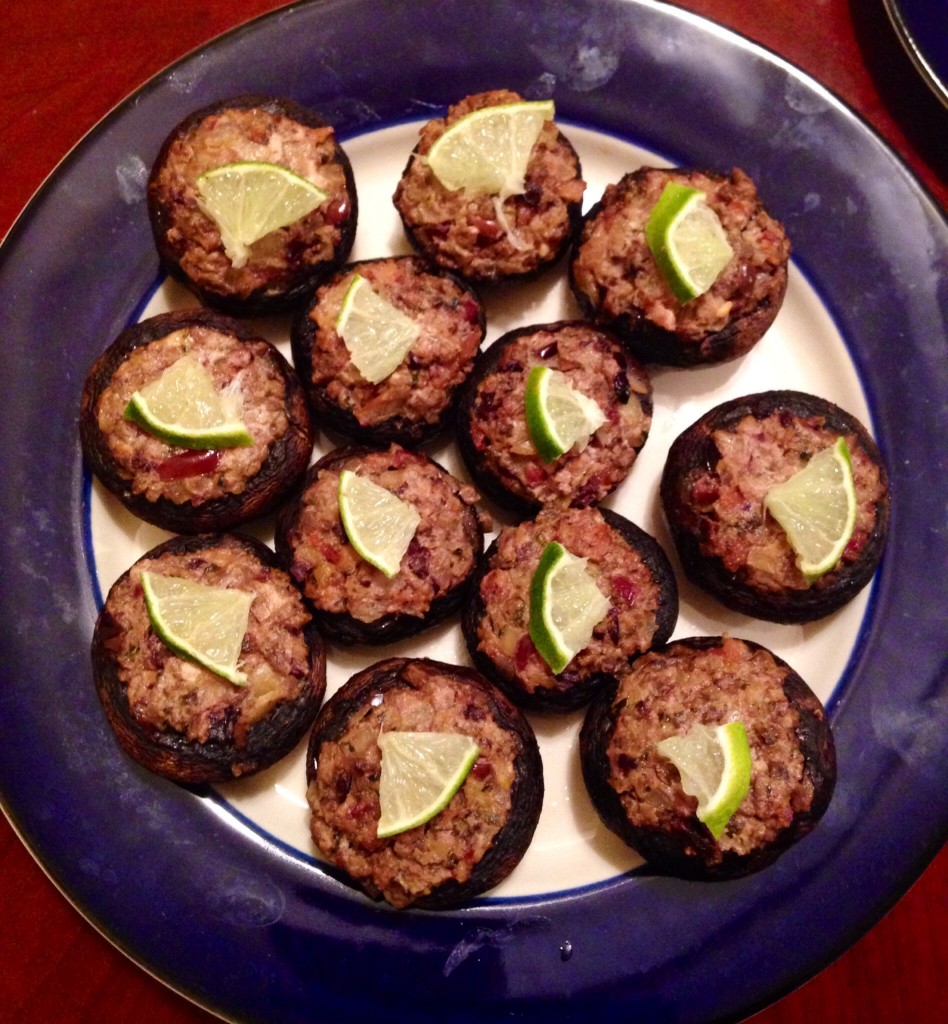
Have you ever felt like you are being watched? I did just the other day. I was sitting on my mom’s patio and suddenly felt like I was being observed, with the strong need to figure out what was doing it. No people. No pets. A few birds were out there, but they were busy with the feeders. In the end I decided it was the basil. Tall, healthy stalks rising out of a huge pot, with big, bright green leaves soaking up the morning sun. They were leaning slightly in my direction, so the little leaves at the very tips of the stalks worked like cyclop eyes…I decided the only way to rid myself of the paranoia was to use some basil. It wants me to, right? A functional plant that just happens to be pretty, too? I was sure mom’s well stocked fridge would reveal a wealth of ingredients to go with the stalking stalks. As you can see from the list of ingredients I was right. I called them Kelley’s Stuffed Mushrooms because Kelley likes all things Greek, and these have a leaning in the Greek direction, and they would be consumed at her house. Besides all that, she is one of the most awesome people on the planet. This is not my first Greek themed dish, but it is the first time I remember splitting kitchens when making a dish – prepared in one kitchen and cooked in another. These lovely ‘shrooms went stuffed but uncooked with us to a dinner party, and were baked in S&K’s kitchen right before serving. I do think transporting the broth separate from the dish was a good idea, though. Adding the little lime wedges helped add a bit of color, and squeezing a bit on right before enjoying them brought out the lovely flavors of the cheese and olives.
Kelley’s Killer Stuffed Mushrooms

12 baby Portabello mushrooms
2 garlic cloves, finely diced
1/4 medium white onion, finely diced
12 kalamata olives, pitted and finely chopped
3 slices of bacon, cooked crisp and crumbled
4 quarters marinated artichoke hearts, finely chopped
1 cup crumbled feta cheese
8-10 fresh basil leaves, chopped
1/2 tsp ground oregano
1/2 lime, juiced
2 Tbsp extra virgin olive oil
1/2 cup chicken broth
Salt to taste
Lime, thinly cut into small slices (garnish)
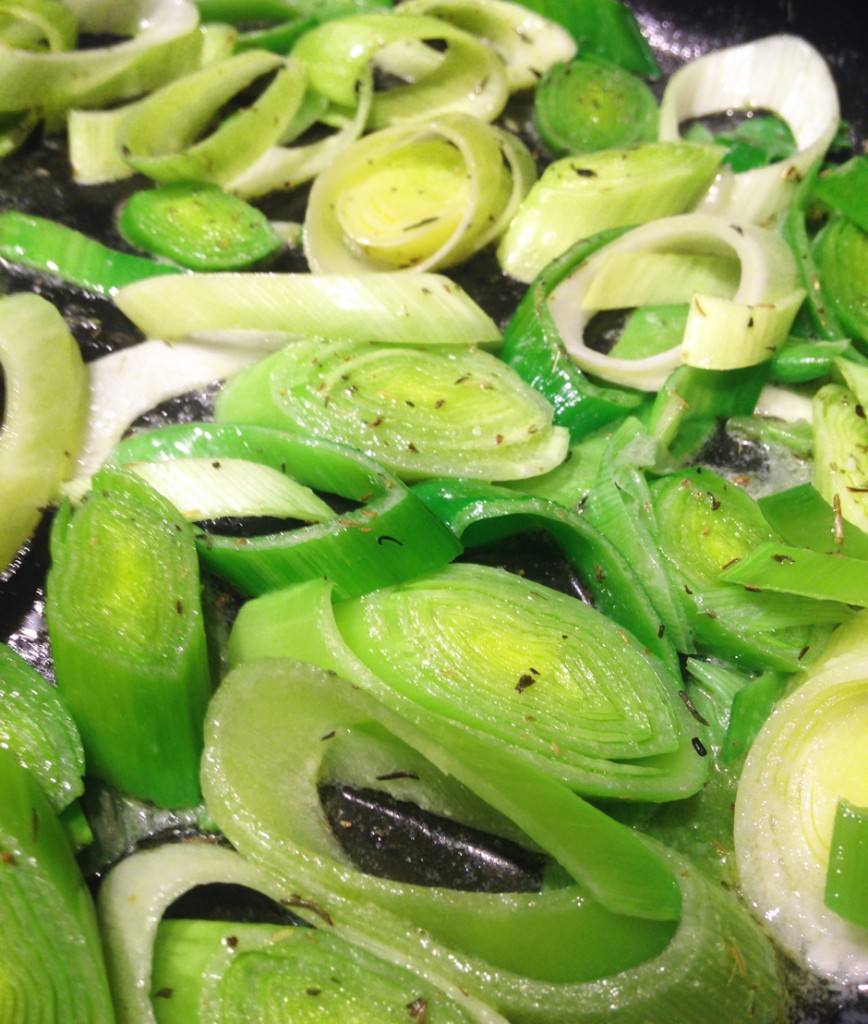
Remove stems from mushrooms. With a small spoon scrape out brown gills from each mushroom cap, making more room for the stuffing. Finely chop the stems and scrapings. In a large skillet over medium high heat add the oil. When oil is hot add onion and garlic. Cook until soft. Before onions and garlic begins to brown add the chopped stems, olives, bacon, artichoke hearts, basil and oregano. Stir occasionally until stems are soft and combined with the other ingredients. Add feta to the pan and stir until it is melted and combined. Remove pan from heat, add juice from the half lime and stir. Preheat oven to 375 degrees. Divide stuffing among the mushroom caps, placing them, spaced evenly, in a 9×12 inch baking dish. Slowly pour the broth in the pan, making a shallow pool under the caps. Place pan in oven and bake for 30 minutes, until mushrooms sweat and shrink. Remove from oven and let sit for about five minutes. Garnish with small lime slices and serve.

German Potato Salad

20141108-103935.jpg

I am a bit evil on this one. The good thing is, I can blame Little B. We were doing a multi-day lesson with her about Germany, leading up to local Wurstfest celebrations. Believe me, she was absolutely adorable in her uncle’s old lederhosen! As always, if there is a slim chance that food can be included in a learning experience I will find it. There was cabbage at bratwurst and apples flying all over the kitchen. For this salad I was sorely tempted to find a substitute for the starchy new potatoes, but in the end went with the real thing. My big excuse was that I was trying to make as authentic a German dinner as I could, with guests coming over for it to boot. I had already tweaked a dessert to be less than authentic, and got store bought saurkraut, so I caved and went pure with the salad. This by no means prevents me from making a less starchy, lower carb version in the future, but I can definitely say that I know how to make an absolutely delicious German potato salad now! I really don’t see why turnips or parsnips (and maybe a little cauliflour) can’t be substituted for the taters. If you try a version of this recipe with them let me know how it goes! Back to behaving now…

German Potato Salad

2 pounds small new potatoes
4 quarts water
1 Tbsp sea salt
8 thick cut slices of bacon
1 medium white onion, roughly chopped
1/2 cup chicken stock
1/3 cup apple cider vinegar
1/4 cup chopped fresh chives
Salt to taste

Place the water and salt in a large stock pot. Add potatoes. Bring water to a boil and continue cooking for about twenty minutes, until potatoes are tender. Drain water and set aside potatoes to cool. While potatoes boil prepare the bacon. In a large skillet over medium high heat cook the bacon until crisp. Remove the bacon and crumble, then set it aside, retaining the bacon grease in the pan. Lower heat under the grease to medium and add onions. Cook onions until soft. While onions cook slice the potatoes into halves or quarters so they are bite-sized. Return crumbled bacon to the pan with onions, along with the stock and vinegar. Continue cooking until mixture is hot. Add potatoes to onion mixture, tossing gently until they are coated and hot. Sprinkle with salt if needed to enhance flavors. Add chives and toss again. Serve immediately or reheat to serve warm.

Adapted from http://www.foodnetwork.com/recipes/anne-burrell/german-potato-salad-recipe.html#!

Fire Pit Vegetables

fire pit cooking

fire pit carrotsfire pit zucchini

Sometimes when we cook over fire pits we are lazy – impaling sausages and hot dogs on sharpened stick and holding them over the flames until they sizzle. It is pleasant, relaxing, and an easy prep – open sausage package, remove sausages, impale. Other times we get a bit more elaborate. Pretty much any meat can be cooked over a pit fire. Same for vegetables, but some veggies are more cooperative than others. I would not try this with greens or other stuff that shrinks substantially, but most vegetables cook up great, anywhere from root vegetables to asparagus and squash. I have also done corn, tomatoes and cabbage. Little B is usually on the side of sausage impaling, because she can be more involved – we are not yet ready to have her reaching in and fiddling with foil packets an inch from hot coals, or leaning over the fire itself to manipulate stuff on a grill grate. Her turn will come in time, but now is not the time. I typically start baking the vegetables an hour or more in advance of cooking meats, so they are ready to serve on time and out of the way. We are sitting around the fire long before eating anyway, so why not let the fire do some work for us? Also, it does not hurt to let the cooked vegetables rest and allow flavors to settle together. Seasoning is simple, because the wood smoke adds an element that does not need much help.

Fire Pit Vegetables

2 cups mini carrots, 2 – 4 turnips or 3 – 4 zucchini/yellow squash
1/4 cup butter
Fresh yarrow or parsley
Salt to taste
Aluminum foil

Tear aluminum foil into sheets, ensuring they are of a length that will wrap around the vegetables – ideally not to exceed 8×8 inch pouches. Some larger vegetables can be individually or group wrapped, like turnips and corn on the cob. Prepare vegetables in bite-sized pieces, or halved/quartered in equal sized pieces. Place vegetables in the middle of foil sheets in a single layer. Spread butter on vegetables, sprinkle them with salt and place yarrow or parsley on top of the pieces. Wrap foil around vegetables, making sure it wraps around twice and roll the foil at seams to prevent leaking. Follow one of these methods: 1) Place packets around the edges of a pit fire. Rotate pouches every 15-20 minutes, changing the side closest to the heat. After 40 – 60 minutes cooking time remove from pit, open pouches and check for doneness. Return to heat if not done. 2) Place pouches on grill grate suspended above fire, flip packets upside down after about 20 minutes, to help even cooking. Check doneness after about 45 minutes, depending on fire size and heat. When cooked to desired doneness, reseal and set aside until time to serve.


Creamy Baked Asparagus

cremy asparagus

The other day Big D brought home some slim, tender asparagus. They looked wonderful, but were not the best candidates for making our favorite bacon wrapped version. I grabbed some of our pantry staples and created this easy side dish. It ended up very rich, and almost overpowered the smokes salmon we served it with. Not quite, but I will seriously consider serving it with roast pork or beef next time. This would probably work just as well with green beans. Let’s see if Big D comes home with some soon…

Creamy Baked Asparagus

1 bunch slender asparagus
1/2 cup heavy whipping cream
1 egg
1 tsp garlic powder
1/2 tsp onion powder
1 tsp sea salt
1 cup cheddar cheese, grated

Preheat oven to 375 degrees. Chop rough ends off of asparagus spears. Chop the asparagus into 1/2 inch pieces, leaving the tip pieces a little bit longer – makes about three cups of chopped pieces. In a small bowl whisk the egg. Add the cream, garlic powder, onion powder and salt. Whisk until egg is fully incorporated. Place asparagus in 9×11 or 9×9 baking dish. Pour cream mixture over the top and stir slightly to make sure all pieces are coated. Sprinkle cheese on top. Bake uncovered for 30-35 minutes, until cheese is gold and bubbly. Remove from oven and let sit for about ten minutes, until cream mixture is set.


Jalapeno Cheddar Muffins

jalapeno bread

Holy guacamole these things are good! They also go well with guacamole. Or just butter. Or split and used for a sandwich. Or sliced thinly and toasted and used for tea sandwiches…. You probably get that they are very versatile. They are also savory and flavorful. They remind us a lot of the garlic cheddar biscuits a soon-to-be-defunct restaurant chain serves. I don’t actually like their seafood, but love their salads and (used to) adore eating the biscuits. When reheating them just brush on some melted garlic butter and you will see what I mean.

Jalapeno Cheddar Muffins

2/3 cup coconut flour
1/2 cup butter
8 large eggs
1/2 – 3/4 tsp sea salt
1/2 tsp garlic powder
1/2 tsp baking powder
1 1/2 cups cheddar cheese, shredded
3 Tbsp fresh jalapeno, chopped

Preheat the oven to 400 degrees. Whisk together the coconut flour, salt, and baking powder. In another bowl, beat the eggs. Whisk in the melted butter. Add the coconut flour mixture to the egg/butter mixture and stir to combine until it forms a wet dough mixture. Add jalapenos and 1 cup of shredded cheese. Stir until cheese is well distributed. Divide the batter among 12 greased muffin tins or eight mini loaf tins. Sprinkle the remaining cheese on top of the muffins/loaves. Bake for 20 – 25 minutes or until cheese turns golden brown. Let cool slightly before removing from pan.

Post Navigation