Any Kitchen Will Do

Give me a kitchen and I will cook.

Archive for the category “tomato”

Peruvian-ish Posole

posole

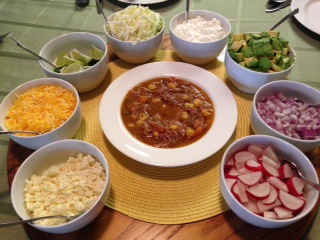
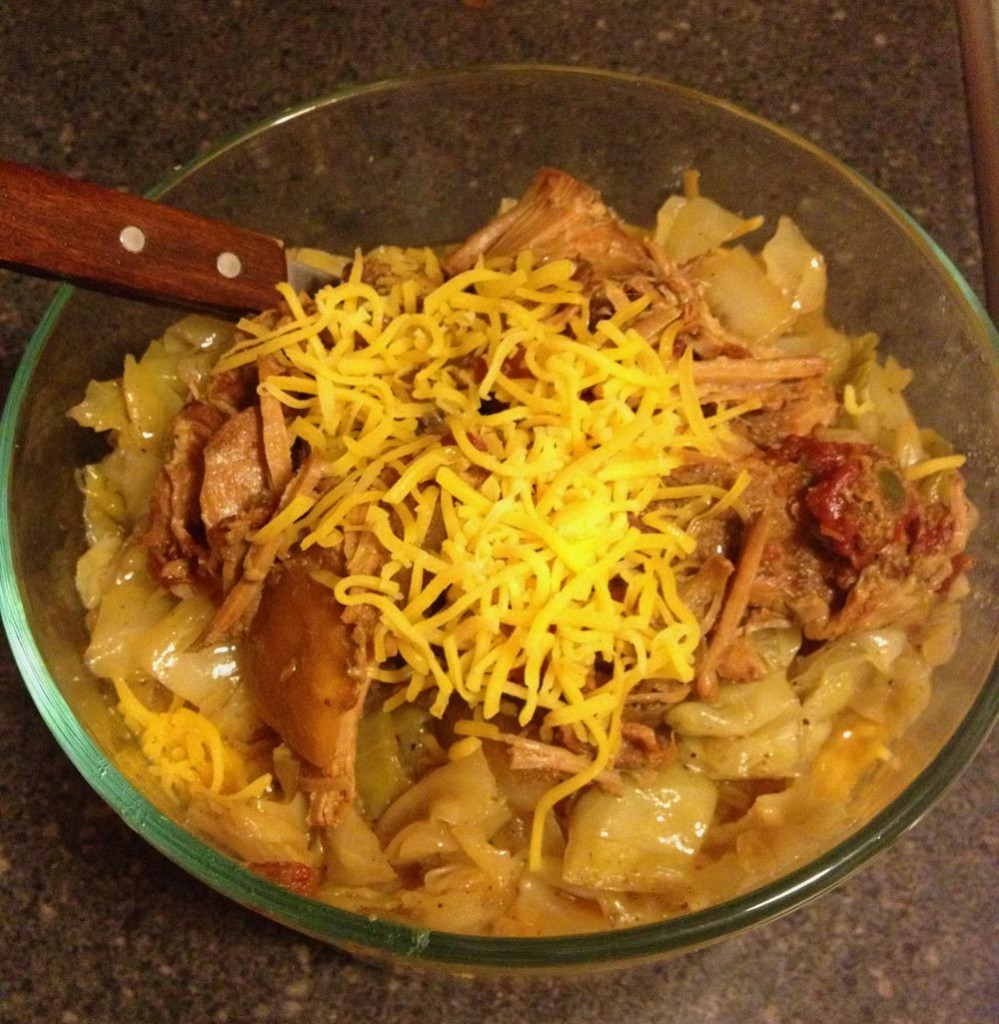
Posole. A basic, comforting soup I have enjoyed at restaurants across America that touted Central and South American cuisine. Not having made it before, I dug around to try and identify the when and where of it’s origin. To no avail, I might add. I have most often found it in Mexican and Peruvian restaurants, so then my goal was to figure out the differences between the two versions. I also recently watched a documentary about it being a dish prepared and served in New Mexico hundreds of years ago. Was there a difference? Not much. Peruvian leans more towards tomatillos and green or serrano chiles to give it depth and spice, while the Mexican versions rely on the red chile. New Mexico, of course, relied on their extra special (read Hatch) chiles and local meats. Other variations I discovered switched between the use of pork and chicken. Finally, I decided to come up with my own, since everyone else seems to be doing the very same thing. My goal was to make it similar to the bowl of posole I had in a little, Peruvian restaurant we stumbled upon in a Las Vegas strip mall. No, not on The Strip, but in a mall that is strip like where multiple business share a parking lot. The place was decorated very basically, with varnished plywood walls, folding tables and beat up stackable banquet chairs. The decor accommodated large crowds to watch soccer games or have big parties. We were surrounded by bright posters advertising Peruvian beer, and inundated with loud, quick-paced dance music. The food was amazing and I could only imagine a pre-Colombian Incan family cooking something similar over a fire, in the shadow of Machu Picchu. They may have used alpaca instead of pig, but I am not going there, except in the wearing of a sweater. One thing I love about all my posole experiences is the fresh, raw toppings traditionally served on the side. They give a spark to the otherwise flavorful, yet basic soup. Since I was making the soup for a dinner party I wanted to make sure it was good (duh), and that the topping variety accommodated all the eating habits of guests. I love my friends dearly, but if their diet evolution is anything similar to mine, there is a need for variety in meal preparation. Here is what I came up with, and I must say it was delicious. My dear friends enjoyed it, including Little B. As you can see from the picture, the toppings were many and everyone got to make their own special soup. As usual, the leftovers got better and better a few days later. And as usual, the fun and memories of the people involved in the evening will last even longer.
Peruvian Posole
1 1/2 – 2 pounds pork shoulder
2 Tbsp high heat fat (lard or coconut oil recommended)
2 cups roughly chopped white onion
1 cup roughly chopped carrot
1 Tbsp paprika
1 tsp ground cumin
1/2 tsp ground coriander
2 tsp dried oregano leaves
4 garlic cloves, minced
8 cups pork broth (if there is not enough from cooking the pork, add water)
1 cup dark beer (suggest Negro Modelo or a porter)
4 – 6 cups hominy, canned or prepared fresh (simmered in water for two hours, drained)
1 pound tomatillos, shucked, rinsed and roughly chopped
4 large green chiles, roughly chopped
2 limes, juiced with meat included
Salt to taste
Toppings

1 small red onion, chopped
2 avocados, chopped
2 limes, cut into 1/8 wedges
1 bunch radish, halved and thinly sliced
1/2 head cabbage, shredded
1 cup sour cream
1 cup cheddar cheese, grated
1 cup cotija cheese, crumbled
1/2 cup pico de gallo or salsa

In 8 – 10 quart stock pot place pork shoulder over high heat. Turn shoulder as each side browns, until all sides have color. Add water and scrape bottom of pan to release browning tidbits.  Cook pork over medium heat until pork easily shreds, about two hours. Remove pork and liquid from pot and set aside, retaining the liquid separately. When meat is cool enough to handle, shred it into bite-sized pieces. Set heat under the now empty stock pot to medium high and add lard or coconut oil. When it is melted add the onions and garlic. When they start to sweat add the carrots. Add paprika, coriander, oregano and cumin. Stir and cook longer until you can smell the spices. Add broth and beer. Cook until it begins to boil softly. Add pork, hominy, tomatillos and chiles. Stir and cook until a soft boil begins. Taste test to see if you can taste the flavors. If not, sprinkle liberally with salt and stir, then taste again. There should be a difference. if not, add more salt. Turn heat down to simmer, making sure there is still a very soft boil. Cook for an additional two hours. Place toppings in separate bowls with spoons right before serving. Serve spoon in large soup bowls and pass around the toppings!


Smoked Salmon Spread Crudite

sss crudite celery smallsss crudite tomato smallsss crudite cheese small

With the holiday season upon us, I find there are three versions of being a guest. The first is the kind where you just show up with a host(ess) gift and enjoy the evening, offering to help, but getting the expected, “oh no, I got it, you just relax”. Sometimes I just relax, and other times I relax by helping. The second is when you are expected to arrive with a side dish or appetizer. There is always the wondering about who can and cannot eat the ingredients you use, much less whether or not it will come out right. You cannot even taste the results of say, a pie, because the pretty presentation would be ruined! Yes, you might have made two, but what if you didn’t? How dare you even think of cutting into the puffy, browned top of sweet potato casserole or lattice topped cherry pie! I have been pretty lucky in the past, but I have also been known to accidentally mix up salt and sugar – yowza! The third version is the grand American tradition of potluck. If it is laid back and you can bring anything, go crazy! Make what you want, cut it into portions and taste a bit to make sure it is perfect; bring it hot, bring it cold, whatever! I like all three versions because they all involve two things I love – cooking and enjoying the company of people I care about. This year has been busy with our family being in limbo, then moving, then having complications with moving, then a new job. Through it all we had a wonderful little girl who hung in there with us through all the changes. For all these reasons we are keeping our holidays simple this year, focusing on enjoying the company of our little family and of our new friends. We are planning cooking marathons, as usual, for the holidays, but they will be a little smaller, including simple appetizers. This simple recipe for crudité can be adjusted to accommodate all types of diets and give variety to a meal, either before or during – even make them a meal on their own. They can fit any version of being a guest, or as a host(ess). Change up the vegetables and cheeses – pretty much anything you can cut in half and fill or top (carrots, cucumbers, olives, pickles). Of course, crisped bread or crackers would work too! I hope you enjoy the holidays and spend more time with your loved ones than you do in the stores, because when it is all said and done, the people are what give you purpose.

Smoked Salmon Spread Crudité

1 cup cream cheese, room temperature
½ cup sour cream
4 ounces smoked salmon, roughly chopped
1 garlic clove, crushed
1 tsp fresh dill, chopped (and a bit more for optional garnish)
2 celery stalks
5 large cherry tomatoes
5 – 10 slices sharp white cheddar cheese

Whisk together cream cheese and sour cream. Add salmon and garlic, folding it into the cheese mixture until well combined. Chill for about an hour. While it chills prepare the serving bases. Clean celery stalks, peel off tough strings and cut into 1 – 2 inch sticks. Clean tomatoes and slice in half lengthwise, scoop out the seeds and meat and pat dry. Slice cheese into 1 – 2 inch squares, making them thick enough to pick up and take a few bites out of, but thin enough not to over cheese the bites – a bit thicker than sandwich slices. Spread the spread (heh) on all the bases, taking time to form it to compliment the shape of the base – round like a tomato, within the crevice of the celery, and a bit random to soften the edges of the cheese slices. Top with dill if you please. Serve immediately or chill until time to serve/leave for the party.

Chorizo Burgers

chorizo burgers
We eat a lot of burgers. A lot. They are our go to meal when we can’t think of anything else, or are running late, or are bored, or end up at a quick serve restaurant. The quick serve restaurant is always  a challenge. You cannot imagine the number of blank looks I get when ordering and tell them I don’t want buns. “No, I do not want buns.” “No, no buns.” “You can use salad containers and just put the condiments, meat and cheese in it. It will work fine. I promise you.” “Do I need to go in the back and talk the food prep team on how to do it?” “No, I don’t want the combo/meal. Just the burgers. I know the meal is a better deal compared to buying separately the fries and burger and drink, but I don’t want the fries. And don’t forget, I don’t want the bun either.” What usually happens is Little B and Big D will go find the perfect table and I do the ordering. Not because Big D can’t order. He is extremely articulate. The advantage to to me ordering is my patience – I soooo beat him in that arena when it comes to dealing with ordering food and other people are involved. In contrast, he is most awesome in the patience arena when dealing with me. I tend to be passive aggressive and get stuff pent up until the straw that breaks the camel’s back, and not everyone can deal with it, but he is a magician with me. Okay, on with the dish. Since we avoid traditional buns, and I rarely make low carb buns, the variety in our burger-ness relies on combining meats and the toppings. I was longing for a Tex-Mex feast, but our current situation does not allow for expansive storing of leftovers, which rules out some more bulk preparations of the guacamole, salsa and chile con queso I usually prepare. I did mini versions of the sides, so we ate most of them and storage was not an issue (phew). Also, with my previous exploration into creative meats in burgers, I wanted to do something a little different. Here are my results, which gave me the Tex Mex element, while also giving variety to our burgers with a spicy flair. It may be hard to find good jalapenos in Alaska, but when I do, they are pretty potent. Between the pepper and the ancho chile the burgers definitely left a slow burn in my mouth, and on my lips, and under my fingernails felt the heat to. I was also reminded of those little webbed parts between my fingers that have dry skin but I don’t realize it until I chop up a jalapeno. Ouch but yum!

Chorizo Burgers

Burgers
2 pounds ground beef
1 pound chorizo sausage
2 eggs
½ cup fresh cilantro, chopped
3 garlic cloves, crushed
½ tsp ancho chile powder
½ tsp sea salt
1 tsp ground cumin

Condiments
1 batch chile con queso (melt processed cheese block with a can of tomatoes and chiles, add some chopped fresh tomatoes and jalapenos if you like)
1 batch salsa
1 batch guacamole

Prepare all condiments in advance. I did 1/3 batches and they were enough for these burgers, but do full batches if you have the fridge space – they are great the day after! For the burgers combine the eggs, cilantro, garlic, chile powder, salt and cumin. Whisk together until eggs are scrambled. In a large bowl smush together beef and sausage until there are no recognizable chunks of sausage. Add egg mixture and smush some more until eggs, herbs and spices are well combined. Form meat mixture into six or eight large patties. In a large frying pan over medium high heat sear one side of the burgers, about five minutes. Flip burgers and sear other side. Reduce heat by half, cover burgers and cook until done, about eight minutes. When done cooking immediately place a burger on a serving plate and top with queso and guacamole. Sprinkle with salsa and serve. If you have leftover burgers I recommend storing them separate from the condiments.

Asparagus Saute

asparagus-saute_edited-1

I just adore brightly colored fruits and vegetables. Such adoration inspired this side dish. Big D cooked an absolutely lovely lamb roast for dinner. I can’t get him to guest post his cooking, so you will have to check out his other types of most awesome writing here. The roast sat and simmered all day, so when I walked through the door I was surrounded by lemony, oregano-y, minty bliss. To balance the strong, Greek flavors of the roast I came up with this bright, sharp side dish. We found a huge collection of asparagus at the store – it was a nice medium size with moist tips that begged to be prepared and enjoyed. We also had a collection of small tomatoes – some red, some orange, some green and some purple. I cut up a few and threw them in. They wilted and balanced the enjoyable bitterness of the asparagus. The meal tasted wonderful on a chilly, wet Juneau evening. We have many more such evenings to come, and I will definitely be making this quick side dish again. It is too early in the season, but I will say it anyway – what a colorful combination of green and red! Looking forward to the fun of the upcoming holiday season!

Asparagus Saute

2 Tbsp extra virgin olive oil
2 bunches asparagus
2 cups small tomatoes
1 tsp garlic powder
Salt and pepper to taste

Arrange the asparagus so the thick ends are lined up together. Slice off the last one to two inches of the the thick ends of the asparagus and discard. Cut the remaining asparagus stalks into bite-sized pieces, about one inch each. Slice tomatoes in half or thirds, making sure they are bite-sized. Heat oil in a large saute pan over medium high heat. Add asparagus and stir until slightly softened, about five minutes. Add tomatoes and stir for one more minute. Sprinkle with garlic, salt and pepper to taste. Stir so as to spread out the spices. Turn down heat, cover and simmer, cooking for about five more minutes, until the asparagus is softened as desired. Turn off heat and leave covered until time to serve. Serve immediately.

Ghoulish Meatballs

ghoulish meatballs

In honor of Halloween I made some quite delicious, ghoulish meatballs! They are massive and arrogant and a little scary. I maxed out my hands trying to form them into balls, but it worked! I have made meatballs before, but they were little and gooey and cheesy. All of those things I consider good, but a huge, ghoulish meatball is awesome! I originally planned on baking the balls, but we are still lacking in the shallow baking pan department as part of our reliance on a hotel room kitchenette. The stove top worked pretty well, allowing for browning on all sides, so all was good good good! The stove top was busy though, with making the sauce and onions and meatballs! It came together in low carb loveliness and is a new comfort food for me. The sweet of the sauteed onions balanced out the bite of the meatballs and tartness of the tomatoes. Today was a crazy busy day with much good news (we officially found a place to live in our new town), much fun, and a humongous amount of candy for Little B. Usually off limits, we let her eat and eat and eat candy with sugar all over and in it. Her glazed eyes and erratic, hyper behavior reminds us why we avoid it the rest of the year. I am writing a last line before bed, and look forward to Samhain tomorrow, the beginning our spiritual new year. Sweet, ghoulish dreams everyone!

Ultimate Meatballs

Balls
1 pound 15 -20 % fat ground beef
3/4 pound ground hot Italian sausage
2 eggs, lightly whisked
1 Tbsp dried oregano leaves
2 tsp dried basil leaves
1 tsp dried parsley leaves
2 tsp garlic powder
1 tsp sea salt
1/2 – 3/4 cup Parmesan cheese, finely grated, plus more for serving

Sauce
1  14.5 ounce can diced Tomatos with sauce
1 tsp dried oregano leaves
1 tsp dried basil leaves
1/2 tsp garlic powder
Salt and pepper to taste

Onions
1 large sweet onion, sliced into thin rings

SAUCE: In a small sauce pan over medium heat combine tomatoes, oregano, basil, garlic, salt and pepper. Stir. When bubbly, turn temperature down to low and simmer, covered, for at least 30 minutes. ONIONS: To prepare the onions, heat a deep pan over medium high heat until hot. It should be dry. Add the onion rings and let sit for a minute without stirring until they begin to brown and sweat. Stir them every minute or two, allowing the onions to brown more. When onions are about half browned add 1/2 cup water and scrape the bottom of the Pan. Stir and continue cooking until the liquid cooks away. Sprinkle with salt to taste. Turn off the heat and cover until time to serve. MEATBALLS: In a small bowl combine the spices – oregano, basil, parsley, garlic, salt and cheese. Set aside. In a large bowl squish together the ground beef and sausage until mixed up well. Add the eggs and make sure all the meat is coated. Pour in spice mixture and knead meat until spices are well distributed. Refrigerate until sauce and onions are ready. When time to cook the meatballs remove meat mixture from refrigerator (can be prepared the day before). Heat large frying pan to medium high heat. Form meat into six huge meatballs, placing them immediately into the hot pan. When forming the balls make sure to press the meat together firmly and roll it around in your hands to make them as round as possible. As one side of each meatball browns, gently turn them to another side. Repeat this a few times so three or four sides are a bit brown. Lower heat, Cover and cook until meatballs are cooked through, about 20 minutes. Depending on your stove you may need to move them around during the cooking time to prevent the outside from overcooking. To serve, arrange a layer of onion on the plate, add a meatball or two, and top with the tomato sauce and more Parmesan cheese. Serve immediately.


Low Carb Layered Enchiladas

lc layered chicken enchiladas

As I have stated many times before, we are hard pressed to find good Tex-Mex food north of Austin. Actually, north of the south of Austin. Enchiladas are a dish where I find it very important to have perfect bites. If you just get tortilla and sauce, it is just off. A bite full of only filling and there is something lacking. I need filling AND tortilla AND sauce AND cheese in every bite. Otherwise, it is just a pile of stuff on a plate. A good Tex-Mex combination platter has the enchiladas perfectly rolled with just enough sauce, sandwiched between refried beans and rice. A chance of leftovers is not favorable to a combination platter. It is nearly impossible to transfer the enchiladas in a way that allows the perfect bites to be experienced in leftovers. The easy way to ensure many perfect bites when I anticipate leftovers or reheating is to approach them in layers.  One of the comfort foods from my childhood was layered enchiladas. Rolled enchiladas are good, but when you want to reheat them after playing in a late high school soccer game, the layered version has been sitting in the fridge after mom made them earlier, or even a day or two earlier. Trust me, they are much better later than the first day. Now, to make my mom’s masterpiece low carb seemed overwhelming. My approach to layered enchiladas came out so very much better than I expected! Not only was it good hot, but the leftovers were good cold, too! The texture of the coconut flatbread gave a similar effect as corn tortillas and soaked up the sauce just right, just like mom’s. I am experimenting with low carb tortillas, most recently with coconut flatbread versions. I used them for this recipe, so serving these layered enchiladas was done right before serving, as opposed to layering a casserole then baking it. I am now convinced a baked version would work, but this recipe is a quicker version without a long baking period. I hope you enjoy it, for it is filling, satisfying and has a bit of a bite that remind me of mom.

Low Carb Layered Enchiladas

1 Tbsp extra virgin olive oil
11/2 small yellow onion, finely diced
15-ounce can tomato sauce
1 to 2 4-ounce cans green chiles
1 Tbsp paprika
1 tsp ground cumin
1/4 to 1/2 cup water or chicken broth
4 – 6 cups cooked, shredded chicken (pre-cooked in a crock pot or strip a roasted chicken from the grocery store)
1 to 2 batches coconut flatbread or corn tortillas
2 – 4 cups shredded cheddar cheese
1/2 cup sour cream (optional)

In a medium sauce pan over medium high heat add oil. When oil is hot add the onion and cook until translucent. Add tomato sauce, green chiles, paprika and cumin. Stir until combined and lower temperature to simmer. Cover and cook for about twenty minutes. Add water or chicken broth to thin out to the consistency of thin gravy. Let simmer for about ten more minutes, then set aside until time to serve. While the sauce simmers make the coconut flatbread, or rely on your personal preference of corn tortillas. When you are ready to serve make sure the flatbread is made and the chicken is hot. Start layering on serving plates with flatbread/tortillas. Next pour some sauce, followed by cheese and chicken. Repeat layers again, topping with more cheese. Serve immediately with sour cream.

Spicy Pork over Cabbage Saute

spicy pork over cabbage

I’ve been having some of THOSE days recently. You know, days when I look at my work and personal schedules and cannot seem to imagine getting everything done. Or, a day when the schedule seems pretty light, but then a crisis or four surface and I long for an overly scheduled day. I cannot always see such days coming, but after I have had seven or eight in a row, like recently, I have to make sure I take a breaks. Every day. My breaks often involve cooking or exercise. I need a break for a few reasons: 1) to remind myself that a crisis is only a crisis because I chose to make it so, 2) I get tired and exercise helps get rid of it, 3) clearing my mind helps reduce said crises, and 4) I get hungry, as does my family. Sometimes THOSE days are few and far between. This time of year, pretty much every year, there is a concentration of THOSE days. Here is a dish that can be made in pieces when you have spurts of time to prep, and then thrown together quickly at meal time, regardless of what type of day I have.

Spicy Pork over Cabbage Saute

2 – 3 pounds pork roast
1 14 ounce can tomatoes and chiles
1 red onion, roughly chopped
2 limes, juiced with meat
1 cup water
Cabbage Saute for serving

First thing in the morning (or the night before if planning to eat it for lunch) toss into a crock pot the roast cut up into three or four chunks, after seasoning it with salt and pepper. Pour over the top the tomatoes and chiles, lime juice, water and onion. Move stuff around so all the meat and veggies are mixed up. Set the crock to low and leave it for eight hours or so. Serve over cabbage saute. The cabbage can be made right before serving or make in advance and reheat – it may depend on whether the day is planned to be busy or not planned.

Portabello Pizza

portabello pizzaThe first time I ever cooked with portabello mushrooms was about 15 years ago. At the time I was making a lot of pizzas closely following my discovery of pizza stones. They make the crust crispy all around and are  great for even cooking. I got into the habit of topping each pizza with two to three veggies and a meat. On some occasions my dinner guests were vegetarians, so minus the meat, but what to add to make the pizza hearty? I explored the produce section of the grocery store and came upon the portabellos – huge caps sitting over a sign that described them as meaty. Well, why not? If they don’t eat meat, why not serve them meaty mushrooms? The pizza with portabellos turned out great, and marinating the mushrooms added an extra layer of flavor. Since my last pizza stone broke and I started leaning toward low carb, I never replaced it. One recent tendency has been to make pizzas with low carb crust, and another is to reach back into my pizza past and snatch up the portabellos. This time I used them as the crust. They are quick and of course Little B can help with every step. Using tomato paste adds a spike of tomato flavor without adding much liquid. The one flaw, but not really, in this recipe is the wetness of the mushrooms. I will continue to explore how to dry out the mushrooms, because they soaked up a bit of liquid and the result is not what I would call hand pizza, but it tasted great. Grab a fork and knife for this flavorful rounds and dig in!

Portabello Pizza

4 large Portabello mushrooms, stems removed
1 Tbsp lime juice
1 small can Italian herb tomato paste (or plain past mixed with 1 Tbsp Italian herbs)
2 tsp dried oregano leaves
2 tsp dried parsley leaves
2 tsp dried basil leaves
2 tsp garlic powder
8 ounces pepperoni, sliced thick
2 cups grated mozzarella cheese
½ cup Parmesan cheese
Salt and pepper to taste

Preheat oven to 350F. Place caps stem side up on baking sheet, then sprinkle with lime juice, salt and pepper. Spread tomato paste on mushrooms, followed by a layer of basil, oregano, parsley and basil leaves, along with garlic powder. Place a layer of pepperoni slices and top with mozzarella and Parmesan cheeses. Bake for 20-25 minutes, until mushrooms are tender and cheese is melted and browning.

Non Vodka Chicken

non vodka chicken

I have been absent for a bit, and so has chicken from my blog. I am always trying to find variety, because chicken is always chicken, and absence makes the heart grow fonder, right? Busy work and busy weekends made for a quiet kitchen lately, and the repeating of old, reliable recipes. Also, Big D has been on a culinary swing while I go about other things. Work is busy, and spending a bunch of time outside in the heat makes me groggy, so hanging out reading books to Little B is much more appealing than a hot oven or stove. This recipe I almost called pizza chicken, because when Big D first took a bite he said it reminded him of pizza. Did the same for me! I was inspired by my hankering to inhale a bowl full of pasta with vodka sauce. The thing about vodka sauce is not necessarily the vodka, but what it does to the flavor of the tomatoes. The vodka, when used, actually soaks into the tomatoes and enhances their flavor with a tart tanginess. The alcohol itself evaporates. If you have had the sauce before you know what I mean. If not, then imagine a mild bloody mary – a skidge of pepper and hot sauce – not to ferocious, but an extra bite beyond plain tomato. I decided to try to find the same flavor as the vodka sauce, but without the vodka. What else could I do with a hankering for vodka sauce while experiencing an absence of vodka? It was my own fault. I used the last of it from our stash to make a Greyhound (vodka and grapefruit juice with a twist). A little bit of this, a little bit of that resulted in the sauce taste I was looking for to go on top of chicken, and then I made it chunky, a la pizza. Yum!

Non Vodka Chicken

1 Tbsp butter
8 ounces mushrooms, roughly chopped
1/2 tsp sea salt
1/4 onion, finely diced
4 ounces chopped black olives
3 cloves garlic, minced
1 – 14.5 ounce can fire roasted diced tomatoes
1 – 15 ounce can tomato sauce
1 Tbsp dried parsley leaves
2 tsp dried oregano leaves
6 – 8 chicken thighs, skin trimmed, but some left on meat
4 ounces cream cheese
2 – 3 tsp Crystal hot sauce

In medium sauce pan over medium high heat melt butter. Add mushrooms, salt, olives and garlic. Saute for about five minutes until mushrooms and garlic soften and butter browns a bit. Add tomatoes and tomato sauce, parsley and oregano. Stir and lower heat. Let simmer for about 15 minutes. While sauce simmers place chicken thighs in frying pan over medium high heat, skin side down. When skin is crispy flip thighs, turn down heat to medium and cover. While chicken cooks finish the sauce. Add cream cheese to the sauce and stir occasionally until cheese is melted and sauce is smooth (except for vegetable chunks, of course). Sprinkle one to two teaspoons hot sauce and stir. Taste to confirm there is a tang in the sauce, but not necessarily a bite. If no tang, then add more hot sauce. Simmer for about 15 more minutes. When chicken is cooked through and juices run clear, remove from heat and let rest. Remove chicken from pan and place on serving dish. Pour sauce over chicken and serve immediately.

Chef Salad

chef salad

I am avoiding a serious subject. A hot oven. I try to avoid it as much as possible in the Takoma Kitchen.  For one, it is an electric oven, which heats up very differently than gas, and regardless of electric or gas, it also makes our little place pretty warm. Here is one of the concoctions I do that does not take much stove or oven heat. The original chef salad is very American, originating in Pennsylvania or New York, depending on which claims you believe, first created in the 1930s or ’40s. Throw a few types of meat and cheese on a plate with a boiled egg and dressing and there you have it, a salad with a bunch of stuff on it so you don’t have to make a bunch of choices. I like the approach on a hot summer evening, and the reduced exposure to even more heat is a plus. Technically, the bacon and eggs require heat to prepare, but they are often left over and already in the fridge. That, or I send a heads up message to Big D and he takes a break from work and cooks up a pan of rashers while boiling some eggs ‘the way grandma did them’, with the shells practically falling off in the pan. Dinner can be custom made on each plate and put together pretty quickly – Little B gets eggs, bacon, cucumber and tomato, while Big D gets an extra pile of meat with ranch dressing, and I get a little bit of everything, especially the pepper jack cheese.

Chef Salad

6 ounces thin cut roast beef
6 ounces thin cut roast turkey
6 ounces thin cut virginia baked ham
4 ounces sliced swiss cheese
4 ounces sliced medium cheddar cheese
4 ounces sliced pepper jack cheese
8 ounces grape tomatoes
2 ounces baby portabello mushrooms, sliced
2 mini cucumbers, sliced into coins
2 – 4 medium boiled eggs, sliced in half
6 slices bacon, cooked and chopped
8 ounces raw baby spinach leaves, rinsed and dried
4 – 6 ounces salad dressing (traditionally French or Thousand Islands)

On two large dinner plates divide the spinach and spread evenly. Slice cheese into ¼ inch wide strips. Roll each slice of meat individually. Alternate cheese strips and meat rolls in a circle on top of the spinach bed.  Arrange the mushrooms, tomatoes and cucumber coins between the cheese and meat. In the center of the salad place the egg halves. Sprinkle bacon over top of salad. Serve immediately after drizzling with preferred dressing.

Post Navigation