Any Kitchen Will Do

Give me a kitchen and I will cook.

Archive for the category “Takoma Park Kitchen”

Broccoli Beer Cheese Soup

beer cheese soup
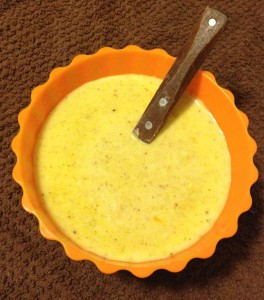
As the weather cooled in Maryland before we moved, I had an immediate urge to start the making of soup. I am particular about the temperature of my food liquids – cold stuff in warm weather and warm stuff in cold weather. Any other combination just feels wrong to me. I am often made fun of about my idiosyncrasy (insert Big D laughing here), which I believe is pretty common. Am I really alone on this? A hot cup of coffee in the heat of July makes me feel as if I am burning up from the inside. A cold smoothie in December makes me shiver for an hour. That is why my gazpacho happened in June and iced coffee in July, but then I delved into warm drink mixes in October and here today I offer soup with two of my favorite ingredients – beer and cheese. A challenge I often have when making a liquid dish with cheese is ensuring the cheese is well combined, and is balanced with the liquid. I think I found a good balance here. Your results may vary, but taking time to gradually add and fully incorporate the cheese seems to be the secret. This soup has a strong flavor because of the strong beer, so if you want a more mild soup, then vary the beer, for it will be your guide. And make sure you make it during cooler weather because that is the only reasonable time to eat hot soup, right?

Broccoli Beer Cheese Soup

1 Tbsp butter
1 garlic clove, crushed
½ small onion, finely chopped
1 small head broccoli, roughly chopped
12 ounces hoppy beer (suggest India Pale Ale)
2 cups sharp cheddar cheese, grated
1 cup mozzarella cheese, grated
½ cup heavy whipping cream
¼ cup Parmesan cheese (optional)

In a medium sauce pan combine over medium high heat melt the butter. Add the garlic and onion, cooking until transparent. Add the broccoli and toss, letting it cook for a minute or two. When the broccoli begins to sweat a bit, about two minutes, add the beer. Bring mixture to a boil and turn down temperature to low. Cover and let simmer for about ten minutes, until onion and broccoli is very soft. Remove from heat and let cool for a few minutes, until it is safe to puree. With a stand blender or hand blender in the sauce pan, puree liquid and vegetables until all the pieces are very small and uniform. Return mixture to the stove top over medium high heat and make sure it returns to a boil. When hot, gradually add cheddar and mozzarella cheeses, about 1/3 cup at a time, and stir until each portion is completely melted and combined. After all the cheese is combined, turn down temperature to low and let simmer for about ten minutes, stirring after five minutes. Add the whipping cream and stir some more. If you want the soup smoother, again use the blender to achieve desired smoothness, but remember that it will always be a little bumpy because of the broccoli. Serve immediately, sprinkled with Parmesan cheese.

Topped Oatmeal Cookies

oatmeal cookies no wheat

We made these for Santa last year, topped with blueberries. We decided our house was the only one in the whole wide world where he would get blueberry oatmeal cookies. In the morning the cookies and milk were all gone! He must have liked them. I forgot to take pictures then, but recently made a batch with Little B and she wanted to top them with sugar free chocolate chips instead of blueberries. Wheat free and sugar free, these went with Little B to her last day with her daycare group in Maryland before we moved. The group gets so excited just being around each without any stimulation, why the heck would I put wheat or sugar in the treats?! They were soft and chewy and seemed to be a hit. We may make them for Santa again this year, and try again to make them memorable. Involving Little B in deciding the topping and standing back so she can stir stir stir makes for a great opportunity to practice measuring, mixing and creativity. Go crazy with the toppings – she was so proud to share her creations. I got the original idea here, but tweaked to my liking. Thanks Alton!

Toasted Oatmeal Cookies (no wheat)

4 cups old fashioned rolled oats
1 tsp baking powder
½ tsp baking soda
1 tsp cinnamon
½ tsp sea salt
1 tsp unsweetened cocoa powder
1 cup butter, room temperature
1 cup granulated stevia in the raw
3 large eggs
2 tsp vanilla extract
1 cup optional toppers (raisins, blueberries, sugar free chocolate chips, etc)

Heat the oven to 375 degrees F. Spread oats in a single layer on half-sheet pans and bake until lightly toasted, about 20 minutes. Watch carefully to avoid burning. Remove the oats from the oven and let cool for 2 to 3 minutes. Grind half the toasted oats in a food processor until they are the consistency of whole wheat flour. Add the baking powder, baking soda, cinnamon, cocoa, stevia and salt, then pulse to combine. Combine the butter, egg and vanilla in a mixer and mix on medium speed for about a minute. Slowly add the oat mixture and the remaining oats until just combined. Let batter sit and thicken if it is soupy and will not hold shape if scooped. Using a teaspoon, scoop batter and drop onto baking sheets lined with parchment paper. If adding a topping gently push into the middle of each cookie. Bake the cookies for about 12 minutes until they begin to brown around the edges. Remove the pans from the oven and let the cookies cool on the pans for 2 minutes. Transfer the cookies to a cooling rack until cooled completely – they should remain soft and chewy. Store in airtight container.


Poached Salmon

poached salmon

As we head towards our new home in Alaska I ponder the loveliness of the salmon we can get up there. The salmon season is coming to an end as I type, but the bounty will be enjoyed all year. I get a serious craving about once a week for salmon. I have been trying to appreciate Atlantic salmon, but the taste is a bit too mild for me, compared to Alaskan and Pacific versions. Depending on my craving, I vary the preparation – do I want tart, or sweet and spicy, or maybe traditional dill with citrus? I should have called this post ‘variations on a salmon’ because each time I make it the ingredients vary. I am going to discipline myself for the time being and make sure you have a good base recipe, then list some variations that give the salmon a subtly different flavor. I am all kinds of in the mood for salmon lately, because thoughts of Alaska remind me of it so! We are excited to return to the most awesome state ever, and the home of the bestest salmon ever. Even if you can’t find the freshest or never frozen salmon, this recipe still works on any piece, as long as it is completely thawed. As you see, we like our salmon warm but still pink in the middle – to each his/her own…

Poached Salmon

Basic
1 – 2 pound fresh salmon fillet
1 lemon
4 Tbsp vinegar (champagne, red wine or white wine)
2 Tbsp butter or extra virgin olive oil
Salt to taste
Additional ingredients from the variations below

Preheat oven to 350 degrees. On a shallow baking sheet place a piece of aluminum foil – twice the length plus about four inches – with the center of the foil in the center of the pan. Place the salmon fillet skin side down in the middle of the foil and bend up the foil edges, so the liquid does not leak out. Drizzle juice from half the lemon over the fish, followed by drizzling vinegar. Sprinkle salt over fillet lightly. Add any additional ingredients from the variations below. For variations with liquid ingredients I recommend mixing them all together before adding to the fish. Fold over the edges of the foil and seal into a pouch so no fish is exposed. Bake for 15 – 25 minutes until desired doneness. It is better to under cook than over cook, then let it set outside the oven covered up – it will still cook and reduce the risk of it overcooking and getting dry.

Variations

1 Tbsp fresh dill
1 clove garlic, finely minced

or

2 tsp ginger, freshly grated
2 Tbsp soy sauce (gluten free if you are sensitive, because regular soy sauce has wheat in it)

or

3 Tbsp fresh cilantro leaves
1/2 tsp chili powder
1 tsp ground cumin

or

1 Tbsp honey
1 tsp ground cinnamon
2 Tsp ginger, freshly grated

or

1/2 cup mayonnaise
1 tsp garlic powder
1tsp onion powder

Coconut Macaroons

coconut macaroons

Big D is all about things coconut. Well, maybe not ALL things, like blue coconut sno cones, but definitely macaroons. I have discovered recently that my longstanding disregard for coconut was primarily based on exposure to sweetened strips of coconut. You know, the stuff in bags from the baking aisle of the store that is oft used for cookies and cakes? It is just too, pitchy and string for my taste. It always made me pucker. Our discovery of coconut flour as a low carb thickener and baking ingredient has changed my mind. Along with coconut oil I have found the coconut flour and unsweetened coconut meat are great conduits for baking – wheat free, high fiber, low carb tasty treats have come out of our kitchens over the past year. I am finally getting around to making this Big D favorite treat. These macaroons are a little too coconut-y for my taste but Big D and Little B scarfed them right down – almost the whole batch before lunch! Big D said that after they sat for a day and were chilled they had the chewy middle he loves about such macaroons, do double yay me. I looked through a bunch of recipes to figure out a good coconut/liquid ratio, but not sure there is a single source to credit, so thanks all you low carb macaroon makers out there! I plan to make a big batch right before our big move so we can nibble on them as we toodle across the country, or at least into the next state. By the way,
I promised credit to Litte B – I had a pile of macaroon for a picture, but Little B insisted on nestling each one carefully in mini muffin papers – after half an hour of manipulation she came up with the wonderful presentation you see above. Beautiful!

Coconut Macaroons

1 1/4 cup unsweetened minced coconut
1/4 cup coconut oil
1 cup granulated erythritol
2 egg whites
2 Tbsp heavy whipping cream
2 Tbsp water

In a medium sauce pan combine coconut, coconut oil, erythritol, cream and water. Stir over medium heat until erythritol is dissolved – if you use finely minced coconut the mixture should be rough and not soupy at all. Remove from heat and let cool for about twenty minutes, so the mixture won’t cook the egg whites. Preheat oven to 350F. Whisk egg whites until they hold shape, but stop before stiff peaks form. Fold egg whites into coconut mixture. With your hands gently form dough into balls no larger than 1″ in diameter. Place on baking sheet lined with parchment paper – one batch should make 16-20 macaroons. Bake for 12-15 minutes, until bottoms begin to brown and tops get brown edges. Let cool before removing from parchment. Store in refrigerator or room temperature in air tight container.

Low Carb Layered Enchiladas

lc layered chicken enchiladas

As I have stated many times before, we are hard pressed to find good Tex-Mex food north of Austin. Actually, north of the south of Austin. Enchiladas are a dish where I find it very important to have perfect bites. If you just get tortilla and sauce, it is just off. A bite full of only filling and there is something lacking. I need filling AND tortilla AND sauce AND cheese in every bite. Otherwise, it is just a pile of stuff on a plate. A good Tex-Mex combination platter has the enchiladas perfectly rolled with just enough sauce, sandwiched between refried beans and rice. A chance of leftovers is not favorable to a combination platter. It is nearly impossible to transfer the enchiladas in a way that allows the perfect bites to be experienced in leftovers. The easy way to ensure many perfect bites when I anticipate leftovers or reheating is to approach them in layers.  One of the comfort foods from my childhood was layered enchiladas. Rolled enchiladas are good, but when you want to reheat them after playing in a late high school soccer game, the layered version has been sitting in the fridge after mom made them earlier, or even a day or two earlier. Trust me, they are much better later than the first day. Now, to make my mom’s masterpiece low carb seemed overwhelming. My approach to layered enchiladas came out so very much better than I expected! Not only was it good hot, but the leftovers were good cold, too! The texture of the coconut flatbread gave a similar effect as corn tortillas and soaked up the sauce just right, just like mom’s. I am experimenting with low carb tortillas, most recently with coconut flatbread versions. I used them for this recipe, so serving these layered enchiladas was done right before serving, as opposed to layering a casserole then baking it. I am now convinced a baked version would work, but this recipe is a quicker version without a long baking period. I hope you enjoy it, for it is filling, satisfying and has a bit of a bite that remind me of mom.

Low Carb Layered Enchiladas

1 Tbsp extra virgin olive oil
11/2 small yellow onion, finely diced
15-ounce can tomato sauce
1 to 2 4-ounce cans green chiles
1 Tbsp paprika
1 tsp ground cumin
1/4 to 1/2 cup water or chicken broth
4 – 6 cups cooked, shredded chicken (pre-cooked in a crock pot or strip a roasted chicken from the grocery store)
1 to 2 batches coconut flatbread or corn tortillas
2 – 4 cups shredded cheddar cheese
1/2 cup sour cream (optional)

In a medium sauce pan over medium high heat add oil. When oil is hot add the onion and cook until translucent. Add tomato sauce, green chiles, paprika and cumin. Stir until combined and lower temperature to simmer. Cover and cook for about twenty minutes. Add water or chicken broth to thin out to the consistency of thin gravy. Let simmer for about ten more minutes, then set aside until time to serve. While the sauce simmers make the coconut flatbread, or rely on your personal preference of corn tortillas. When you are ready to serve make sure the flatbread is made and the chicken is hot. Start layering on serving plates with flatbread/tortillas. Next pour some sauce, followed by cheese and chicken. Repeat layers again, topping with more cheese. Serve immediately with sour cream.

Peanut Butter Yogurt Dip

peanut butter yogurt dip

Double duty yogurt stuff! This works as an awesome dip for fruit as well as a spoonable non-dip snack for Little B. Talk about protein and protein and some subtle sweetness from the apple sauce. The recipe is quick and dirty (but clean) so I will leave the intro the same. Make it and enjoy, even adding some extra cinnamon to make it spicier, if the apple sauce is not already enough. Yum yum! You can see Little B’s hand dipping a blurry strawberry in her eagerness – could not wait until the pics were taken….

Peanut Butter Yogurt Dip

1 cup creamy peanut butter
2 cups whole milk Greek yogurt
1/2 cup apple sauce

In medium bowl combine peanut butter, yogurt and apple sauce. Stir until completely combined. Store in covered dish and chill overnight. Serve with celery, apple slices, mango slices or other fruit. Also works plain as a snack for peanut butter lovers.

Fickle Coconut Flatbread

coconut flour flatbreadThe flatbread you see here is what I consider part one of an experiment. The goal is to find a quick, easy recipe to make tortilla-type rounds that are low carb and can hold stuff. I mean substantial stuff. Not a dainty piece of fish and a sprinkle of cheese, but a hefty strip or three of fajita meat along with guacamole, chimichurri, queso and sour cream. It is no small feat for a hearty flour tortilla to be able to contain such a pile, but for coconut flour recipe results that tend to be delicate, it is a bigger challenge. After doing a bit of research I came up with the following results. The recipe is a combination of the recipe found here and some of the input in the trailing comments connected to the recipe, so this is my best attempt at giving credit where due. The flatbread is useful for layering, or representing a polenta-type base, but not the ultimate tortilla I was looking for. I will keep this recipe handy, for it tastes really good and was useful and fit the quick and easy requirements I set out. A little fickle (aka delicate), but what is a good cooking experiment without a little fickle? I look forward to part two…

Fickle Coconut Flatbread

4 whole eggs
1/4 c coconut oil
2 pinches salt
1/2 c coconut flour
1/4 tsp baking powder
2/3 to 1/2 c coconut milk or water
1/2 – 3/4 cup butter or coconut oil for cooking

Combine the flour, oil, baking powder, salt and eggs in a food processor. process until a thick batter forms. Let sit until it thickens, about three minutes. Add enough liquid to make a somewhat loose batter. Pour 1/4 c of batter into a  well greased, well oiled frying pan over medium high heat. Cook on one side until the sides begin to brown and the middle starts to set, about three minutes. Gently flip the flatbread and cook for about three more minutes, until it is completely set.

Bacon Wrapped Asparagus

bacon asparagus final

These were fun! Not only were they easy to make, mostly by Little B, but no complication, even minor, of adding seasoning or flavors. Yes, I know. That is the magic of bacon! I was tempted to marinate the asparagus first, but decided to try simpler, and it worked wonderfully. We sat on the porch and rolled them while Big D set up the fire in the grill. Is it gas or charcoal, you ask? I won’t tell Big D yo said that. Of course it is charcoal. Although level and length of heat may vary compared to gas, there is no comparison when it comes to the flavors transferred to food from the charcoal fire. For the pictured batch of asparagus we (more precisely he) grilled it. They were a little dark, because of the high fire heat, but it gave the dish a wonderful crispiness and the asparagus was bright green and just tender enough. Although easy to serve as a side dish daintily cut up alongside a steak, we scarfed them down with our fingers, which made them more of an appetizer. In the future I plan on cooking them up in a pan on the stove or in the oven. I will update you on how it goes. For now, we have a quick side dish for an all-grilled meal. The accompanying steaks were to die for, by the way…

Bacon Wrapped Asparagus

1 pound asparagus spears, tough ends removed
1 pound sliced bacon, room temperature

Combine asparagus spears in multiple bundles so each one does not exceed 1/2 inch diameter (could be one to three spears). Wrap a strip of bacon around each bundle at a diagonal, so most of the asparagus is covered. Cooking approaches: 1) grill bundles over medium to high heat until bacon is crisp. Remove and let cool until warm enough to eat, or 2) heat the broiler to medium and place on broiling pan. When top side is crisp (three to five minutes) turn over to crisp on underside. Remove from broiler and let cool, or 3) heat large skillet to medium high heat. Place rolls in the pan and cook until bacon is crisp, like you would for breakfast. Remove from pan and let cool before serving.

Spicy Pork over Cabbage Saute

spicy pork over cabbage

I’ve been having some of THOSE days recently. You know, days when I look at my work and personal schedules and cannot seem to imagine getting everything done. Or, a day when the schedule seems pretty light, but then a crisis or four surface and I long for an overly scheduled day. I cannot always see such days coming, but after I have had seven or eight in a row, like recently, I have to make sure I take a breaks. Every day. My breaks often involve cooking or exercise. I need a break for a few reasons: 1) to remind myself that a crisis is only a crisis because I chose to make it so, 2) I get tired and exercise helps get rid of it, 3) clearing my mind helps reduce said crises, and 4) I get hungry, as does my family. Sometimes THOSE days are few and far between. This time of year, pretty much every year, there is a concentration of THOSE days. Here is a dish that can be made in pieces when you have spurts of time to prep, and then thrown together quickly at meal time, regardless of what type of day I have.

Spicy Pork over Cabbage Saute

2 – 3 pounds pork roast
1 14 ounce can tomatoes and chiles
1 red onion, roughly chopped
2 limes, juiced with meat
1 cup water
Cabbage Saute for serving

First thing in the morning (or the night before if planning to eat it for lunch) toss into a crock pot the roast cut up into three or four chunks, after seasoning it with salt and pepper. Pour over the top the tomatoes and chiles, lime juice, water and onion. Move stuff around so all the meat and veggies are mixed up. Set the crock to low and leave it for eight hours or so. Serve over cabbage saute. The cabbage can be made right before serving or make in advance and reheat – it may depend on whether the day is planned to be busy or not planned.

Cabbage Saute

sauteed cabbageI noticed that my entries are absent of side dishes. Lately I have been cooking some staples for meals, because it is a hectic time of year for us. Stuff that I posted already, likebaked spaghetti squash, taco meat or a fritatta. I have cooking and baking ideas, but a lack of time to implement. I am sure I am not the only one out there that has more project ideas than time to do them. You should see my Pinterest boards! So many things to do, so little time. This is a simple side dish that is easy, high in fiber, filling and my family loves it. Great as a base for many a dish as a substitute for rice, pasta or other grains. Don’t forget the nutmeg – it sounds odd, but works so very well with the cabbage.

Cabbage Saute

3 Tbsp olive oil, butter or bacon grease
1 small head green cabbage
1 tsp ground nutmeg
Salt and pepper

In large saute pan heat olive oil over medium high heat. Chop cabbage in 1/2-inch to 1-inch pieces. Toss cabbage in pan and stir to coat in oil. Sprinkle with salt, pepper and nutmeg. Continue cooking and stirring until about half of the cabbage begins to brown. Turn down heat by half and cover. Cook for another ten minutes or so, until all the larger chunks are softened. Keep covered until ready to serve, then do so immediately while it is hot. If preparing it in advance and chilled, it is easy to toss it in a hot saute pan and serve hot.

Post Navigation