Any Kitchen Will Do

Give me a kitchen and I will cook.

Author Archive

Nutty Chocolate Protein Bars

nutty chocolate protein bars

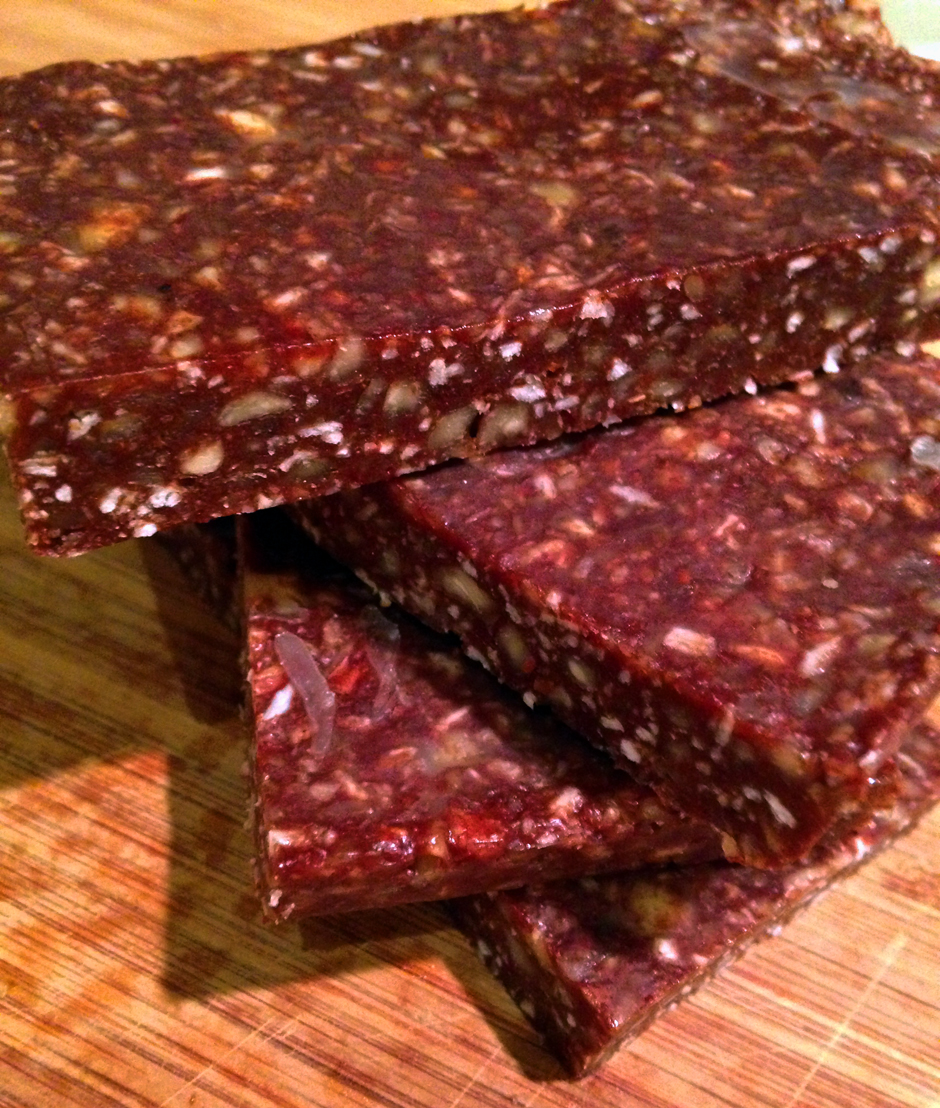
For months Little B took ballet lessons on Saturdays. They are now over, including the flashy, chaotic shows. It was quite an ‘experience’, but is now over. I will reserve my opinion about the experience, but suspect she has more enthusiasm for other activities. I personally am looking forward to getting back to more weekend hikes.  We have standard food we take on hikes and overnight trips – nuts, peanut butter, jerky, cheese, boiled eggs. They are convenient, energy-building and filling, but with all the summer hiking in our future I wanted to add some variety. The idea for these bars sprung from here. The chewiness and nuttiness reminds me of a candy bar you find at the store – rhymes with tickers. After sufficient bar chilling occured Little B tentatively took a small first bite, then proceeded to eat an entire bar and asked for some in her lunch the next day. Score! This is significant, because in her worldly 4 3/4 year old brain anything mommy suggests is immediately suspect. These bars are a tiny bit sticky at room temperature, but what protein bars aren’t? They hold together well when wrapped in foil or plastic wrap, so score again! It is easy to add them to the hiking food mix, and quite a treat when taking a break looking over water and mountains and whales. Yep. The whales are pretty spectacular. And so is everything else. I am going to experiment with less sticky bars, but these easy-to-make snacks are great for dealing with hunger when you want to spend your time focusing on life and love and nature. Even ballet.

Nutty Chocolate Protein Bars

1 ounce bittersweet chocolate
2 tablespoons butter
2 tablespoons heavy cream
2 tablespoons Da Vinci sugar free syrup, any flavor
1 Tbsp Nutiva Stevita
1 cup whey protein powder, vanilla flavor
1 tsp ground cinnamon
1 1/2 cup mixed raw nuts, finely chopped
1/2 cup unsweetened coconut

Line an 8×8″ baking pan with nonstick foil. In a medium microwaveable bowl, melt the chocolate and butter on half power about 1 minute or until melting and softened. Stir until smooth and blended. Add in the cream, syrup, sweetener and protein powder.The mixture will be stiff and sticky when well blended. Stir in the nuts and coconut – you may need to use your hands to get it all mixed in, but then they would already be ready for putting it in the pan. Firmly press the mixture into the bottom of the foil lined pan using the back of a spoon that is lightly coated with oil or butter, or just use your hands. Chill at least two hours or until firm. Cut into eight large bars or 16 snack squares. Store in refrigerator or freeze.

Tortilla Fun

tortilla pile

I cannot believe how freakingly awesome these tortillas are! Freakingly! Not a spec of wheat or corn, but the taste and texture reminds me of some delicious, substantial homemade corn tortillas made at a little restaurant in San Antonio, Taqueria Aguascalientes. As with a few other recipes recently, we are discovering that some quick cooking in a microwave makes for some satisfying low carb substitutes for otherwise carby buns and desserts.  Many of our living situations have included a distinct absence of microwaves, so when we actually have one we tend to forget to use it. They are convenient, but the unbalanced heating they do is either a result of the technology, or from an absence of experience we have from rarely using them. When I was tortilla prepa kid there was an ever present microwave. I relied on it heavily to reheat leftovers after soccer or volleyball practice, and to concoct a comfort food, which I will not reveal now, but maybe in the future. We have officially rediscovered the ’80s cooking phenomenon. Now, back to the tortillas! Big D has made dozens of them. We have spent many an evening experimenting with different thicknesses and cooking times. They can be smaller and thicker, like a gordita tortilla, thin like a corn tortilla or big and thick like a wheat flour tortilla. They have returned to our menu things like breakfast tacos, tostadas and the ever popular fajita tacos. Now, the recipe says to spread a thin layer of batter on a plate with wet hands, I really mean a thin layer, like you can see the plate through it. For thicker ones you just need to see less of the plate. Notice what I mean by thin in the picture to the right. THIN!!! One last note – these guys keep well in the fridge, so make a big batch and eat them all week. Or do what I do and sit googly-eyed while your hubby makes a batch that you can eat on all week…

Tortilla Fun

4 cups almond flour
4 Tbsp coconut flour
½ cup golden flaxseed meal
1 ½ tsp sea salt
8 eggs
2 Tbsp coconut oil or lard
½ tsp stevia/erythritol powder
4 Tbsp apple cider vinegar
Butter for cooking plates

Place almond four, coconut flour, flaxseed meal, salt, baking soda and erythritol in a bowl and stir until well mixed. Add eggs, vinegar and oil and stir until well combined, using your hands if necessary – it should be thin batter. Spread a thin layer of butter in the middle of a dinner plate. Drop about 3 level Tbsp of batter on the plate. Using wet hands spread batter from the middle to the outer edge until it is the desired size and very thin. Have nearby a flat bottomed bowl or plate nearby for when the tortilla comes out of the oven. Microwave for approximately 2 minutes, until the middle is cooked evenly as the outer portion. Immediately press down firmly for a few seconds with the bowl or plate on top of the warm tortilla. Slide off of the plate and let cool. Repeat process until all the batter is used up. Serve or refrigerate in an airtight container.

Almond Pizza Crust

no flaxseed pizza crust

A long time ago Big D and I started a tradition of pizzabeer. No, that is not a typo. We would go to a spot – whether it was in Alaska, Virginia, Nevada, Texas…wherever we were, we would sit and eat pizza, drink beer and have long, winding talks about where we were going together. Sometimes they were about short term goals, other times they were longer term. Regardless, they were talks over food and beverage. Without some effort it is difficult to have wheat free pizzabeer. When making pizza these days we do it at home and we regularly use a wheat free crust figured out a couple of years ago. It is delicious, but includes flaxseed meal and coconut flour, which gives it a nuttier taste than what we like for some pizzas. This version of a wheat free crust is made by relying on almond meal and cheese. It makes for a crust that can hold the excess of toppings we are wont to use, while not adding a ton of strong flavor. Just think about it – when you eat pizza are you tasting the crust, or is it the toppings? I realized when I was pondering pizza that what I missed most was the toppings, not the crust taste, and the ability to pick up a piece of pizza and take a big bite. There was a simple concept I realized a few years ago when trying to eat healthier – if I am craving a food it was important to figure out what I craved – was it taste, texture, occasion or appearance? The craving focus varies by dish, but it was easy to identify for pizza. Other examples include the creamy of ice cream, the crunch of chips, the heaviness and nuttiness of a piece of bread. Now, back to the crust. We stumbled upon this more subtle tasting version one night when we wanted pizza and were woefully short of coconut flour and flaxseed meal. Necessity is the mother of invention, right? Oh, and look at my new pretty! Big D got me a new pizza stone! It is all fancy with an enamel finish that does not stick and gets crazy hot. Works as well as the more porous versions I have had in the past, but much more versatile.

Almond Pizza Crust

4 cups shredded mozzarella cheese
6 Tbsp almond flour
1 tsp baking soda
2 tsp dried parsley flakes
1 tsp dried basil
1 tsp garlic powder
1/2 tsp onion powder
1 tsp sea salt
2 eggs, beaten

Toppings (Used in the picture)

1/2 cup pizza sauce or tomato paste
1 cup mozzarella cheese and cheddar cheese, grated and mixed
20-24 pepperoni slices
1/2 cup black olives, chopped
Sprinkling of finely chopped basil and oregano

Preheat oven to 450 degrees (if using a pizza stone prepare as directed). Combine together in a medium bowl all ingredients except the eggs. When well combined add the eggs and stir with a fork until a moist dough forms. Spread enough dough onto the pizza stone or baking dish to have a layer about 1/4 inch deep. The pizza stone in the picture needs about 1/2 the dough, and since it is preheated the dough begins to soften as soon as it touches the surface. A stone without an enamel finish may not work with this crust. Bake the crust for no more than five minutes, allowing it to set and just begin to brown. Lower oven temperature to 425 degrees. Remove crust from oven and add sauce, toppings and cheese. Return to oven and bake for 10 – 15 minutes, until top is browning. Let cool for about ten minutes, allowing crust to set and toppings to cool. Slice and serve.

Bred Bread

bred

What an adventurous effort this bread recipe has been! It is officially named Bred, just because, and as a homage to Big D’s tendency to play with words. Actually, the recipe has mostly been a result of Big D’s efforts, but Little B and I supervised, mixed, provided input (solicited and not) and were overall cheerleaders. We certainly ate a lot of the results. It all began with cravings. As we continue on our low carb journey we longed more and more for sandwiches and bread. We thought there must be a way to make a nutritious, low carb bread-like thing to sate our desires. Some gluten free breads on the market are okay, but have more carbs that we want to deal with, and include non-wheat grains that we prefer to avoid. They also tend to be a bit rubbery and tasteless, without the help of other flavors slathered all over. After my experimenting with various baked goods, we were already familiar with the impact of flaxseed meals, coconut flour, and almond meal – in muffins, pies, rolls, etc. Not only their impact on the end product, but on our personal weight management, which was not negatively.

Big D searched the interwebs and found this recipe from the wonderful Miss Elana. Our first batch using the recipe was okay, but did not have the texture and flavor we craved. We also did not have the dainty bread pan she recommended, so the first attempt was not as loafy as we wanted. It was a good launching pad for what you find below. This bread is substantial enough for deli sandwiches, garlic bread, and especially grilled cheese sandwiches. After mastering the basic Bred recipe we found that some slight variations make for different, yet still satisfying results. The ‘rye’ version has the tang of traditional rye bread, making for wonderful reuben sandwiches. The version using non-golden flaxseed meal gives the bread a much lighter, almost poppy seed flavor that lends itself to more delicate tea and fish sandwiches. If you miss the very obvious point here, we are so very excited to have bread back in our diet! It adds variety and convenience and helps in stretching out leftovers, which are always hanging out in our fridge.

A related and concurrent discovery was a source of Kerrygold Butter here in town! There is such a superior flavor and texture difference with Kerrygold when compared to other butters – a difference we fell in love with many years ago. We have been searching for it locally for many months now and dreaded the expense of getting it shipped directly. Of course we bought out the supply when we found it, but we don’t feel bad. I am pretty sure others did the same before us. Maybe since it sold out they will restock? We hope so, but that is not always how the bread crumbles…give our Bred recipe a try, and do so with Kerrygold. Yum!

Bred Bread

4 cups almond flour
1/4 cup coconut flour
½ cup golden flaxseed meal
1 ½ tsp sea salt
2 tsp baking soda
½ tsp stevita/erythritol powder
10 eggs
2 Tbsp coconut oil or lard
1/4 cup apple cider vinegar

Rye Version
When combining first six ingredients also add:
1 Tbsp caraway seeds
1 tsp ground turmeric
½ tsp ground mustard
¼ tsp ground black pepper

Lighter Version
Use regular instead of golden flaxseed meal

Place almond four, coconut flour, flaxseed meal, salt, baking soda and erythritol in a bowl and stir until well mixed. Add eggs and oil and stir until well combined, using your hands if necessary as the dough thickens. Add vinegar and stir until well combined. Place dough into a greased 9″x5″ bread pan. Bake at 325 degrees for 50  minutes – knife should come out clean from tallest point of the loaf. Bake for ten more minutes if knife is damp. Remove from pan immediately. Serve.

Pork Chops with Goat Cheese Crumbles

pork chops goat cheese crumbles

Sometimes when I cook I have a plan. Not all the time, but most of the time the results come out just the way I wanted. For these pork chops I had a plan, and the results were good, but not quite what was predicted. I planned on having delicately browned rounds of goat cheese, floating atop the baked pork chops. There ended up being no rounds and no floating. In the future I will again attempt making the floaty goat cheese rounds, but for the time being, here is the yummy, crunchy, unexpected results of the first attempt.

Pork Chops with Goat Cheese Crumbles

4 – 5 pork chops, medium thick cut, bone-in
1 cup salsa verde
1 tsp ground cumin
1 tsp garlic powder
Salt and pepper
4 ounces goat cheese

Preheat oven to 350 degrees. Season pork chops generously on both sides with cumin, garlic powder, salt and pepper. Place chops on large baking sheet. Spread salsa verde over the top of each chop. Place in oven and bake until pork is fully cooked, about 40 minutes. While the chops are cooking prepare the cheese. Heat a dry a frying pan over medium heat. Place thin slices of goat cheese in the pan, leaving about one inch of space around each slice (you should be able to get 8 – 10 slices out of a 4 ounce roll of cheese). After about one minute the goat cheese will soften and the bottom will be brown. Gently scrape off the soft, white cheese to reveal the bottom layer that is browning on the pan cooking surface. Place the white cheese in an empty place in the pan. Gently scrape the browned cheese off the pan and place the cheese ‘crisp’ on a piece of parchment paper or cutting board. Continue the scraping process until all the cheese has been crisped. Let the crisps cool for about five minutes, then roughly chop the crisps into bite sized pieces. Sprinkle the chops with cheese crumbles and serve.

Note: although all the crumbles were yummy, the lighter brown crumbles retained more of the goat cheese flavor.


Shrimp Hollandaise on Scrambled Eggs

shrimp hollandaise with eggs

We eat a lot of eggs. Not only are they good sources of protein, they are extremely versatile. Do you want to bake some cookies? Add an egg. Do you want a casserole type macaroni and cheese? Add an egg to thicken it. Do you want a shiny finish on your pie crust? Brush it with an egg wash. Do you want a fun appetizer or side dish? Devil some. Need to feed a crowd of overnight guests? Make a frittata. Do you want a breakfast that sticks to your ribs? Scramble some. You can always throw some meat and cheese into your scrambled egg, but there is always that occasional morning when you want something different. Here is a dish for one of those different days. My original craving was for Eggs Benedict, but I have not yet mastered the low carb English muffin, so I deviated. I figured out that what I was craving was the Hollandaise Sauce. Although not a traditional, more complicated version of the sauce, it was quick to make and ready in advance of the short cooking time needed for the shrimp and eggs. Little B was not very excited about the sauce – she is still young and naive, but she inhaled the eggs, shrimp and guacamole.

Shrimp Hollandaise on Scrambled Eggs

6 eggs
1/4 tsp sea salt
Dash of ground black pepper
1 Tbsp butter
1/2 pound medium shrimp, deveined, shells and tails removed
1/2 lemon
1 tsp sea salt
1 cup prepared guacamole

Hollandaise Sauce
4 oz Butter
2 Egg Yolks
1 Tbsp Lemon Juice
1 Tbsp Water
1/4 tsp salt

For the shrimp fill a medium pot half with water. Add salt, squeeze lemon juice into water and drop the lemon half into the water. Set pot over high heat. While waiting for water to boil for the shrimp, make Hollandaise Sauce. Melt 4 ounces of butter and let cool briefly. While butter is cooling add the rest of ingredients in a blender but do not blend them yet. When butter has cooled a bit spoon out the foamy, bubbly top from butter, leaving the clear, yellow clarified portion. Use only the clarified portion for the sauce. Begin blending the mixed ingredients on low and gradually and steadily add the butter. Let blend for about a minute. Stop the blender. Leave sauce at room temperature until served. If water is boiling add shrimp and cover. Let boil for three to five minutes, just until they turn pink all over. Remove from water and place on towel to drain. In a bowl crack the eggs and add salt and pepper. Whisk until combined. In a frying pan melt butter over medium high heat. Add eggs and stir in the pan until cooked to desired doneness (Big D likes soft so I take his out of the pan first – Little B and I like ours a little more firm). Divide eggs among individual serving plates. Top with shrimp, then drizzle them with Hollandaise sauce. Add a side scoop of guacamole and serve.

Simple Salmon Frittata

salmon frittata

I have shared a frittata recipe with you before, but the ingredients this time combined so nicely, and made such a great weekend breakfast that I decided to share another. Living in Southeast Alaska there is a year round craving for seafood, but it gets magnified as the spring days get longer, and the call to play outside with fewer layers on gets stronger. Our smoker has been busy flavoring meats, vegetables and cheeses for us all winter, but now we ask it to prepare our salmon. A local fish shop – and I mean a fish shop that sells catches from local fisherpeople – Pinkies, had some beautiful, fresh King Salmon. The smoker used alder wonderfully to compliment it, so we feasted on some wonderful marine life. The King Salmon is a big fish, so the leftovers were waiting on us the next morning. I get very used to tossing onion and garlic into many morning egg dishes, but I also leave them out sometimes, depending on the ingredients. This time I chose to let the salmon sing, and it did! I used smoked salmon, but any leftover cooked salmon would work.

Salmon Frittata

8 eggs
1/2 cup heavy cream
1 1/2 tsp dill weed
1/2 tsp sea salt
1/4 tsp ground black pepper
Dash dried red chili flakes
4 ounces smoked salmon, roughly chopped
3 slices cooked bacon, crumbled
1 cup Colby jack cheese, grated
1/2 cup mozzarella cheese, grated

Preheat oven to 350 degrees. Crack eggs into a medium bowl and whisk until slightly frothy. Whisk in cream salt, pepper, chili flakes and 1 tsp of dill. Grease a 9×9 baking or pie dish. Pour in egg mixture. Sprinkle salmon and bacon evenly into the egg mixture. It should sink down into the egg. Follow the fish and bacon with the Colby Jack cheese and then mozzarella cheese. Spread the last of the dill weed and a bit more salt on top. Bake for 30-40 minutes, until edges are browning, middle egg is set and middle cheese is slightly bubbly. Remove from oven and let sit for about ten minutes. Slice and serve.

Multi Minute Burger Buns

burbun1

I have seen a bunch of recipes all over the web for one minute muffins, cooked quickly in the microwave. Some are sweet, some are savory. Big D was smoking up some nice, thick burgers for dinner one night and we did not have any of our low carb bread anywhere nearby for them. The delish bread takes hours to make, bake and cool/set, so there was not enough time to make it. One minute is pretty quick, so I decided to try some savory ‘muffins’. I liked the recipe shared by DJFoodie. Not much happens around here in the microwave, sitting quietly above the stove staring at me all the time asking to be used. Here was its big chance for it to actually cook something! I tweaked DJ’s version a little bit to fit the contents of my pantry and our microwave performance (our oven took much longer to do the cooking), and they came out great! The one batch made plenty of bun pairs (four) for our meal, with leftovers. The buns can also be used for non-burger activities, like sandwiches and even eggs benedict, but what I can attest to here is they make for some satisfying, filling burger buns! 

Multi Minute Burger Buns

1 1/2 cups golden flaxseed meal
1 Tbsp baking powder
6 large whole eggs
1 Tbsp plus 1 1/2 tsp extra virgin olive oil
3/4 cup cheddar/colby jack cheese blend, shredded
2 tsp garlic powder
1/2 tsp ground thyme
Salt, fresh cracked pepper and chili flakes, to taste
Butter or other fat to grease dishes

Optional Burger Toppings
Hamburger patties, cooked to desired doneness
Red or white onion, thinly sliced
Dill pickles, thinly sliced
Ripe red tomatoes, thinly sliced
Mustard
Mayonnaise (we used chipotle flavored, but plain works, too)
Cheese, slices or finely grated

Grease eight (or four used twice) individual microwaveable dishes – I used four salad bowls, each about five inches in diameter. Combine all ingredients in a large bowl and whisk together until well combined. Divide the dough into eight equal parts. Place 1/8 of the dough into each bowl, spreading the top evenly, for the shape will not change much during the cooking process. Microwave on high for 90 seconds to three minutes, depending on the microwave – the middle should be spongy like the outer edges, not mushy. Cook in additional 45 second increments if not done. Remove from the oven after letting them sit in the closed oven for about two minutes after the last cooking time. With a knife gently pull the bun away from the bowl edges. Flip out the bread on a grate to cool and dry out. If using four bowls repeat the process. If you want thin buns slice one piece in half. If you want thicker buns (like in the picture) use two of the eight buns for each sandwich. Add your burger with toppings and eat up!

Spinach Soup

spinach soup

I like green veggies. Ever since I was a kid I especially liked spinach when the other kids thought ‘yech’! My mom once told me a story about spinach, my brother and I. We went to daycare when we were little, and one day when we came home we would not eat our spinach. Apparently we were told by other kids we were not supposed to like it, so we did not eat it. Talk about peer pressure! We eventually succumbed and joyfully continued to eat it, but we did have the blip. It is still my favorite vegetable, so here is a great soup that includes spinach and made with bits and pieces from the fridge. It turned out savory and filling, which is a wonderful thing. The soup freezes and reheats well, so is a great lunch addition. Another way the soup is helpful is as a supplement. There is a little cafeteria in the building where I work. They don’t have very exciting food, but they make a decent salad. I like the salad but sometimes find it lacking, so I like to bring along some soup to go with the salad. I get to sit in the cafeteria, nuke my soup and slurp it down, along with gnawing on salad, while watching the wind blow or rain fall outside. Simple and relaxing addition to the middle of a hectic day.

Spinach Soup

3 Tbsp butter
4 cloves garlic, crushed
¼ sweet onion, finely chopped
6 cups fresh baby spinach
1 cup chicken stock
3 ounces cream cheese
3 ounces beer, suggest an IPA
1 cup heavy cream
½ cup Parmesan cheese
Nuts as garnish (we used spiced nuts we always make and have on hand, but raw or roasted would work, too)

In large sauce pot melt butter over medium heat. Add garlic and  onion, cooking until garlic and onions begin to brown. Add spinach and toss until it wilts and begins to darken, about five minutes. Add beer and simmer until soup is hot. Add cream cheese, heavy cream and Parmesan cheese and stir. Continue cooking until the cheese is melted. Use a hand blender and puree until spinach is macerated and soup is smooth. Simmer on low for about five minutes. Sprinkle individual servings with nuts and serve immediately.

Meaty Squash Bake

meaty squash bake

This dish was purely delish and purely a result of leftovers. We had spaghetti squash left over from serving as a side dish with the rolled chicken, and a lovely brisket our friends brought over was still calling to us from the fridge. Knowing we would have leftovers from the leftovers, I wanted to make sure it would be something that would freeze and reheat well. I think we hit the jackpot! I don’t know of many savory leftovers that can’t be combined and topped with cheese, do you? The nice thing about it is you can also cook up some fresh spaghetti squash, and maybe some ground beef for it if you don’t have leftovers to manipulate. It freezes well too! As you see, I made this in my mom’s kitchen, and while I was visiting her I definitely cooked more than we and our visitors could possibly consume, so freezer friendly is a good thing.

Meaty Squash Bake

1 pound chopped meat (leftover brisket, chicken, pork, etc)
2 1/2 cups cooked spaghetti squash
2 tsp garlic powder
1 tsp sea salt
1 cup heavy whipping cream
3 eggs
2 cups Colby jack cheese, shredded

Preheat oven to 350 degrees. In large bowl stir together squash, garlic powder and salt. Add meat and stir again. In small bowl whisk together eggs and cream. Add cream mixture to squash and meat. Fold until everything is coated with cream mixture.  Pour mixture into 9×12 baking dish. Sprinkle top with cheese. Bake for 35 – 45 minutes until outer edge of cheese begins to brown. Remove from oven and let sit for about ten minutes before serving.

Post Navigation