Any Kitchen Will Do

Give me a kitchen and I will cook.

Archive for the category “baked”

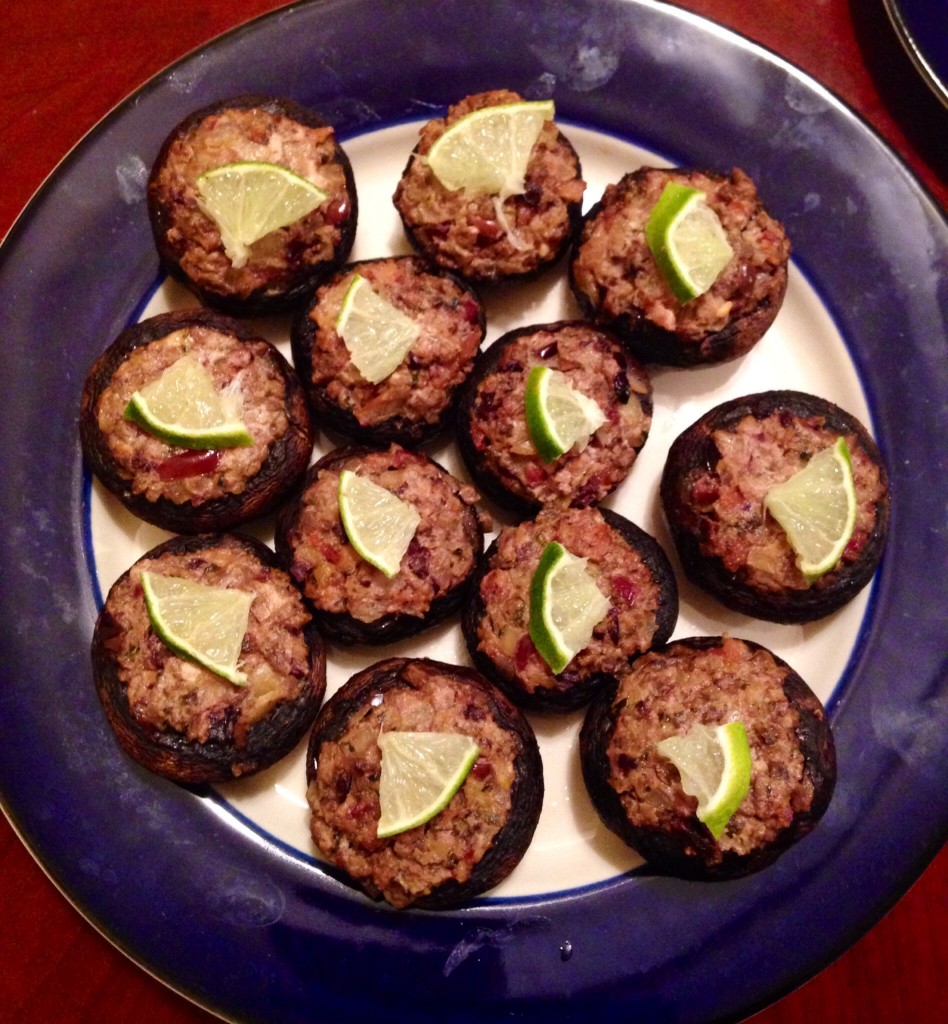
Baked Parmesean Mushrooms

image

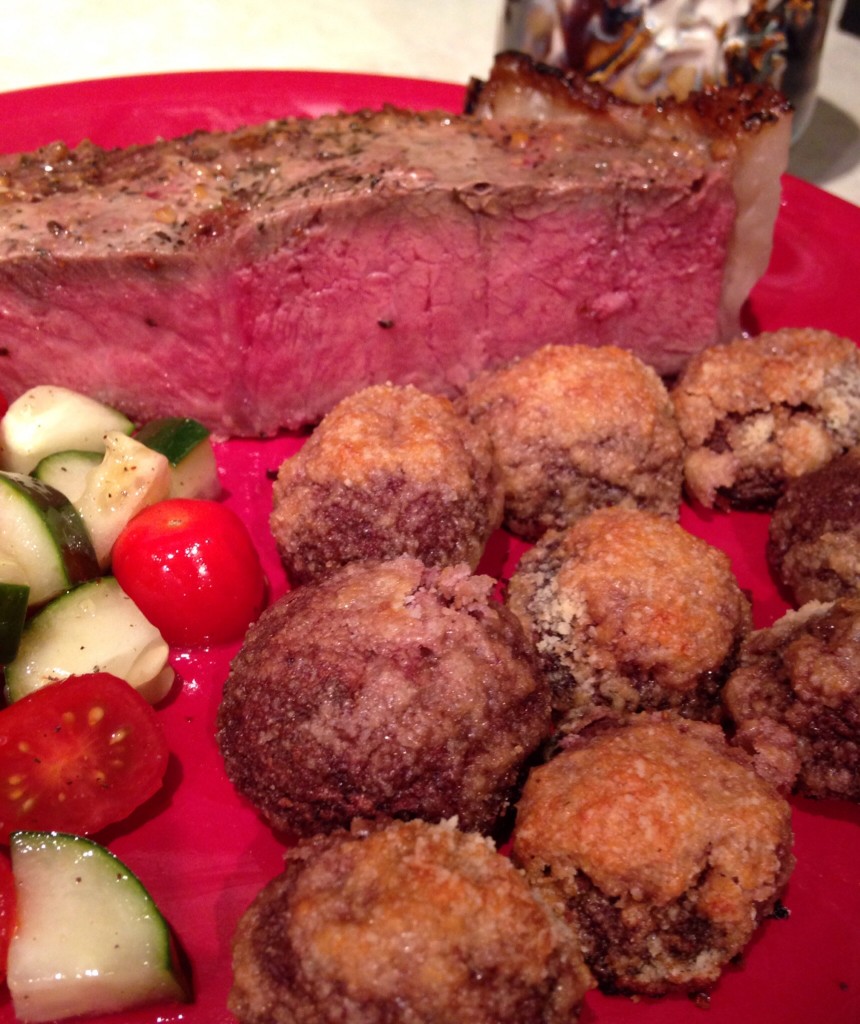
I will start by saying this recipe was not made with Little B in mind, except that I did not expect her to eat any of it. After happily snacking on mushrooms as a toddler she summarily spurned them during the 4th and 5th years of her life. That does not deter me from putting them in meals. She has often eaten them, unbeknownst to her. Sure, they are sometimes chunky, making it possible for her to remove them and make a point of expressing her distaste for them on the edge of her plate. Other times there is not way to differentiate them from pieces of meat or other veggies and they are happily consumed. When I have made stuffed mushrooms she eats the stuffing but not the cap (but there is mushroom in the stuffing Bwahahahaha!). I hope someday she changes her mind, again, about the shrooms, but for now I am just glad she has an interest in new foods and ones that are healthy for her. There is no mistaking the mushroom-ness of this side dish. It went well with some ribeye steaks Big D smoked up for a very satisfying dinner.

Baked Mushrooms

12-18 mini portabello or white mushrooms
1/2 cup dry red wine
1/4 cup lemon juice
2 tsp garlic powder
1 1/2 tsp sea salt
1 Tbsp dehydrated chopped onion
1 cup finely grated parmesean cheese
1/2 cup almond flour

Trim mushroom stems until they are flush with the bottom of the cap. In a shallow dish or resealable bag add the marinade ingredients – wine, lemon juice, 1 tsp garlic powder, 1 tsp sea salt and onion. Stir until salt dissolves. Add mushrooms and toss in marinade until they are all coated. Leave mushrooms to marinate at room temperature for about two hours. Preheat oven to 400 degrees. Remove mushrooms from marinate and pat dry with towels. In a medium bowl combine parmesean cheese, almond flour, 1 tsp garlic powder and 1/2 tsp sea salt. Stir dry mixture until combined. One at a time coat each mushroom with the dry mixture – it should stick well to the wet mushrooms. Place each mushroom stem side down on a shallow baking sheet, evenly spaced. Bake for 20-25 minutes, until mushrooms shrink a bit and coating begins to brown. Remove from oven and let sit for about five minutes before serving.

Rebellious Ratattouille

image

I think this is ratatouille but some people may find it lacking. What I love about it is the combination of flavors I get from the alternating, thinly sliced vegetables in a single bite. I like bell peppers in general, which are usually included in this dish, but I don’t like the taste and texture they add to the other veggies used here, so I left them out. Look at me being a ratattouille rebel. A neat thing about this recipe is it can be doubled and tripled easily by adding more sliced vegetables and a larger pan. It also makes for a lovely presentation in a serving dish or on your plate.
Rebellious Ratattouille
1 medium zucchini
1 medium yellow squash
1 medium onion
3 large Roma tomatoes
1 14.5 ounce can diced tomatoes
2 cloves garlic, crushed
1 Tbsp dried oregano leaves
1 Tbsp dried parsley leaves
1/2 tsp sea salt
1/4 tsp ground black pepper
In a medium pot over medium heat add the canned tomatoes, garlic, oregano, parsley, salt and pepper. Simmer for about ten minutes, until heated through and bubbly. Remove from heat to let cool. Preheat oven to 375 degrees. While sauce simmers prepare the vegetables by slicing them thinly, less than 1/8 inch thick. Sprinkle slices with salt and pepper. Removing seeds from tomatoes is optional. Using a stand or stick blender purée the tomatoes ito a smooth sauce. In a loaf pan pour a thin layer of tomato sauce (you will probably have leftover sauce). Alternate the slices of zucchini, yellow squash, tomatoes and onion, placing them in two long rows in the pan. Bake for 30 minutes, cover pan with foil and bake for an additional 15 minutes. Remove from oven and let sit for 5 minutes before serving.

Mediterranean Meatloaf

mediterranean meatloaf 2
I have shared a couple different meatloaf recipes with you in the past, like the spicy one and the veggie one, but never one wrapped in bacon! This one has a bit of a Greek twist, like my recent foray into stuffed mushrooms. I would blame other things, but the extreme moistness of this loaf I attribute to the bacon. It is great for the loaf protection. As with many baked meals, it tastes great the day it is made, but after sitting in the fridge and reheating, it is even better! I may even get all crazy next time I make this and serve a little tzatziki on the side!
Mediterranean Meatloaf
1 1/2 – 2 pounds ground beef
2 eggs
2 cups crumbled feta cheese
1 cup chopped raw spinach
1 cup chopped kalamata olives
1 cup chopped marinated artichoke hearts
1 cup finely chopped onion
4 cloves garlic, crushed
1/4 cup chopped fresh mint
1/4 cup fresh oregano leaves
1/2 cup chopped fresh parsley
1 Tbsp sea salt
1 tsp ground black pepper
8-10 slices bacon, uncooked
Preheat oven to 350 degrees. In a large bowl place the ground beef, making a lower section in the beef. Add the eggs, cheese, spinach, olives, artichoke hearts, onion, garlic, herbs, salt and pepper. Using your hands, break up egg yolks and squish other bowl contents together with meat until well combined. Press meat mixture evenly into 9×9 inch baking dish or large loaf pan. Arrange bacon slices on top of the meat in a criss cross pattern, tucking the ends around the sides of the meat. Gently press down on the loaf to avoid any uneven shaping resulting from tucking the bacon. Bake in oven for one hour. Remove and let sit for about ten minutes before removing to serving dish, then serve.

Kelley’s Killer Stuffed Mushrooms

image
Have you ever felt like you are being watched? I did just the other day. I was sitting on my mom’s patio and suddenly felt like I was being observed, with the strong need to figure out what was doing it. No people. No pets. A few birds were out there, but they were busy with the feeders. In the end I decided it was the basil. Tall, healthy stalks rising out of a huge pot, with big, bright green leaves soaking up the morning sun. They were leaning slightly in my direction, so the little leaves at the very tips of the stalks worked like cyclop eyes…I decided the only way to rid myself of the paranoia was to use some basil. It wants me to, right? A functional plant that just happens to be pretty, too? I was sure mom’s well stocked fridge would reveal a wealth of ingredients to go with the stalking stalks. As you can see from the list of ingredients I was right. I called them Kelley’s Stuffed Mushrooms because Kelley likes all things Greek, and these have a leaning in the Greek direction, and they would be consumed at her house. Besides all that, she is one of the most awesome people on the planet. This is not my first Greek themed dish, but it is the first time I remember splitting kitchens when making a dish – prepared in one kitchen and cooked in another. These lovely ‘shrooms went stuffed but uncooked with us to a dinner party, and were baked in S&K’s kitchen right before serving. I do think transporting the broth separate from the dish was a good idea, though. Adding the little lime wedges helped add a bit of color, and squeezing a bit on right before enjoying them brought out the lovely flavors of the cheese and olives.
Kelley’s Killer Stuffed Mushrooms

12 baby Portabello mushrooms
2 garlic cloves, finely diced
1/4 medium white onion, finely diced
12 kalamata olives, pitted and finely chopped
3 slices of bacon, cooked crisp and crumbled
4 quarters marinated artichoke hearts, finely chopped
1 cup crumbled feta cheese
8-10 fresh basil leaves, chopped
1/2 tsp ground oregano
1/2 lime, juiced
2 Tbsp extra virgin olive oil
1/2 cup chicken broth
Salt to taste
Lime, thinly cut into small slices (garnish)
Remove stems from mushrooms. With a small spoon scrape out brown gills from each mushroom cap, making more room for the stuffing. Finely chop the stems and scrapings. In a large skillet over medium high heat add the oil. When oil is hot add onion and garlic. Cook until soft. Before onions and garlic begins to brown add the chopped stems, olives, bacon, artichoke hearts, basil and oregano. Stir occasionally until stems are soft and combined with the other ingredients. Add feta to the pan and stir until it is melted and combined. Remove pan from heat, add juice from the half lime and stir. Preheat oven to 375 degrees. Divide stuffing among the mushroom caps, placing them, spaced evenly, in a 9×12 inch baking dish. Slowly pour the broth in the pan, making a shallow pool under the caps. Place pan in oven and bake for 30 minutes, until mushrooms sweat and shrink. Remove from oven and let sit for about five minutes. Garnish with small lime slices and serve.

Apple Strawberry Crisp

20141113-204155.jpg

Unlike the other German themed dish I made recently and broke our typical non-starchy rule (shame), this crisp is intended to follow the theme of German sweets, but not so much to the letter. It is why I include berries, apples and cinnamon. According to the numerous people if know who have visited the lovely country it was accurate to think of apple cakes, berry strudels and lederhosen when I concocted it. The ‘crumble’ top could be thinner, but  why reduce yumminess?!

Apple Strawberry Crisp

Filling
2 green apples, peeled and sliced
2 cups strawberries, stems removed and sliced
3 Tbsp Stevita
2 Tbsp lemon juice
2 tsp ground cinnamon

Topping
1/2 cup almond meal
1/4 cup golden flaxseed meal
2 cups finely ground raw pecans
1/2 cup butter, melted
1 Tbsp stevita
1/2 tsp sea salt

Preheat oven to 350 degrees. Place apple and strawberry slices in a medium bowl. Sprinkle with sweetener, lemon juice and cinnamon. Toss fruit until it is all coated. Let sit while preparing topping. In a small bowl add the almond meal and ground pecans. Pour in butter and stir to combine. Add stevita and salt. Stir to combine. Divide fruit mixture among four or five single serve ramekins, or place it all in a 9″x9″ baking dish. Spread topping on top, completely covering fruit. Bake for about 30 minutes, until fruit is bubbly. Cooking time for using a larger baking dish may need to be 45-50 minutes. Serve plain, with whipped cream or ice cream.

More One Minute Muffins

one minute muffins

We ran out of homemade bread! Big D is out if town! What are we to do?! I can make bread, yes. I can follow recipes and such, but it feels wrong in this instance. Here is why. Big D and I spend a lot of evenings watching each other cook and talking about things. All kinds of things. Not necessarily about what is being cooked, but other stuff. Our kitchen has a bar that opens into it, so one of us can sit out of the way and still have full access to the kitchen goings on. Little B is always nearby, but our talking is usually about something other than dinosaurs and fairies, so is often boring to her. By all means there are plenty of Little B-centric chats, but less likely during these casual cooking tete-a-tetes. Since it felt so wrong bread baking in Big D absentia, I decided to take a stab at one minute muffins again. I did so previously, with results being a little more labor intensive and very specific to accomplishing hamburger buns. Those buns were not going to hit the spot for, say, a breakfast sandwich with sausage, egg and cheese. I wanted something a bit smoother and softer. These are definitely smoother, softer, shorter and sweeter. I also give two different flour/meal choices, but share them together in spite of the very different results. Flaxseed gives a more ‘grainy’ texture, while the almond meal is smooth and spongier. Pick what pleases you. In trying to include the variations that impact results, I hope I do not confuse. Try a muffin and see what you like!
More One Minute Muffins
1-2 Tbsp butter
1/2 to 1/3 cup golden flaxseed meal or almond meal
1 tsp baking powder
1/4 tsp stevita
1 egg
In large microwaveable mug melt butter (less butter makes for a dryer muffin). Add dry ingredients and stir (a larger quantity of meal makes for a shorter, denser muffin). Add egg and mix until fully incorporated. Place mug in microwave. Cook on high one minute – use of almond meal often needs an additional 30 seconds if the middle is still sunken after one minute. When cooked through remove from microwave and immediately flip muffin out of mug. Serve.

Banana Bread

banana bread_edited-1

Little B has been requesting banana bread for over a month. We don’t usually buy bananas because Little B is the only one who eats them, and often loses interest before the bunch is gone. The same was true this week. Two bananas were left to get dark brown and look pathetic. I remembered all the breads we have made over the past year and did a crap shoot. The ratio between almond and coconut flour definitely needs to be considered to ensure a moist result, but not overly so. The bananas would provide a natural sweetness, but no need to do much sweetening otherwise. Cinnamon always tastes yummy when sprinkled on a banana, so why not drop in a bit? The bread did not rise very much, but it was still light and fluffy. Little Be loved it, but picked out the walnuts, so the next batch we will do without. A lot of buts that turned into a lovely bread. And the darned bananas are finally gone.

Banana Bread

1 cup almond flour
1/2 cup coconut flour
1 tsp baking soda
1/2 tsp sea salt
1 Tbsp Stevita (can be excluded, if you find the mild sweetness of banana sufficient)
1 tsp ground cinnamon
2 ripe bananas
4 Tbsp butter, melted
3 eggs
1 cup finely chopped raw walnuts (optional)

Preheat oven to 350 degrees. Line rectangular bread pan with parchment paper or grease muffin pan. In a large bowl combine the almond and coconut flours, baking soda, sea salt, sweetener and cinnamon. In a separate bowl place the bananas. Puree the bananas with a stick blender (or mush with hands like Little B prefers) until smooth. Add butter and eggs, whisking together until smooth. Pour liquid mixture, and nuts (optional) to dry mixture. Whisk together until combined. Batter will be thick. Pour batter in bread pan, or divide batter equally among muffin pan divets. Bake in oven for 20 – 30 minutes. Muffins take about 20 minutes, loaf about 30. Remove from oven and let cool in pan for about ten minutes. Serve or store in refrigerator.


Bacon Wrapped Scallops

bacon wrapped scallops

Big D is going to be so pissed that I did this while he was out of town. I just could not wait! There is a local restaurant that makes something similar, and I had a serious craving. The restaurant appears to wrap the scallops with bacon and pierce with toothpicks, then deep fry them and serve with hollandaise sauce. Their sauce is a bit subtle – it may be the version of sauce they make, but I have longed for something tangier when we have ordered and inhaled them as an appetizer. Not one to deep fry things, I decided to broil, since scallops are easy to overcook and quick cooking works well with the broiler. I was tempted to do more seasoning, but decided to keep it simple. I was not disappointed. These were so easy to make at home and delicious! I promise I will make them again sweetie and after you get home!

Bacon Wrapped Scallops

8 large scallops (about 1″ diameter raw)
4 slices bacon, cut in half
8 round toothpicks
Salt and pepper to taste

Spicy Cocktail Sauce

1 Tbsp tomato paste
1 1/2 Tbsp raw horseradish, grated
1/4 cup lemon juice

Preheat oven on low broil. Lightly sprinkle scallops with salt and pepper. Wrap a piece of bacon around a scallop, overlapping the edges. Secure the bacon with a toothpick, pushing it through both sides of the scallop. Repeat with all scallops. Place scallops on a shallow baking pan. Position oven rack about 8 inches below broiler. Place scallops in oven. Broil for about ten minutes, making sure not to overcook the scallops. If you only have one broiler setting assume it is high and reduce cooking time to 5-7 minutes, watching carefully – a few more minutes may be needed, depending on broiler heat. The bacon may smoke a bit. While the scallops cook make the spicy cocktail sauce: whisk together the paste, horseradish and juice until well blended. Sprinkle sauce on serving dish. Place scallops on plate and serve immediately after removing from the oven.

Chocolate Cheesecake

chocolate cheesecake
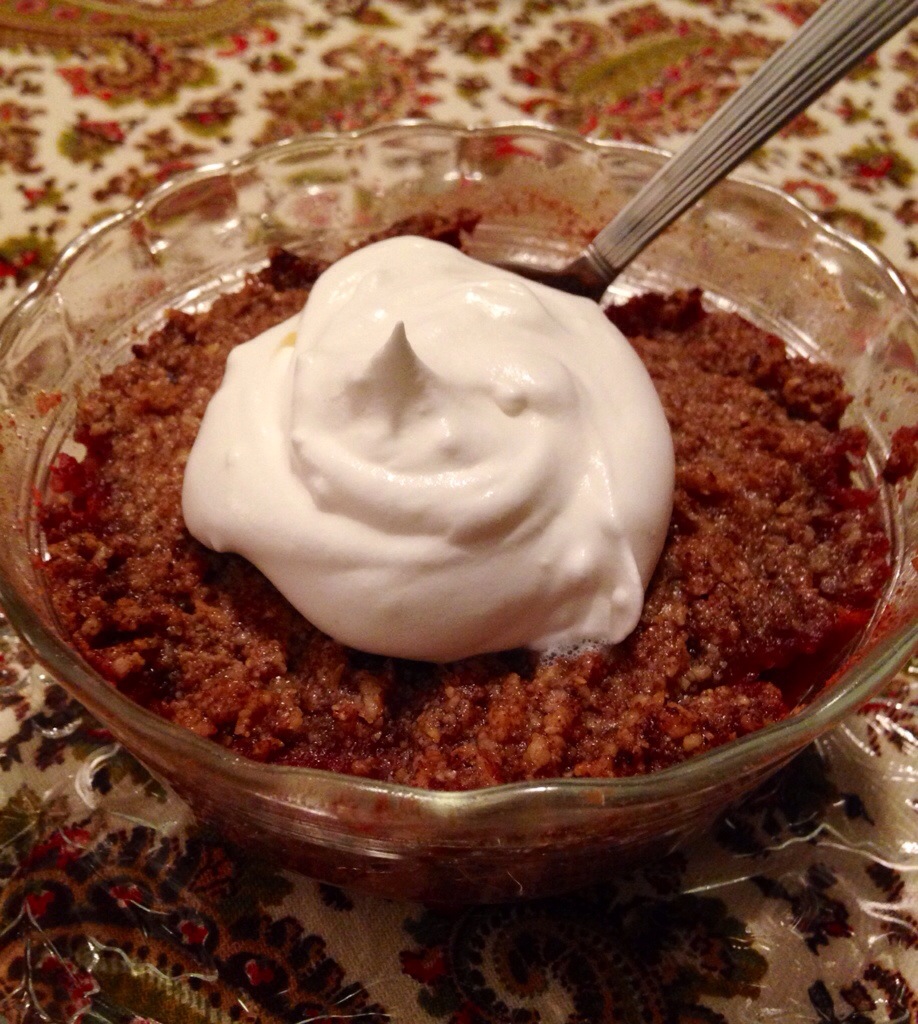
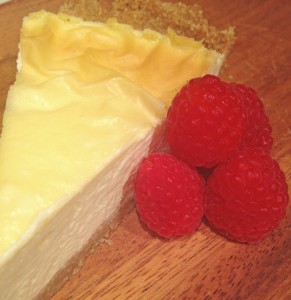
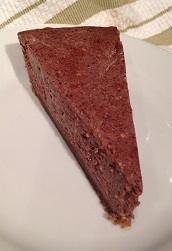
So the cheesecake saga continues. Our young friend Skinny D has been visiting with us on his first trip to Alaska. When I was making the limey cheesecake for Big D he got a similar ‘happy face like a kid with a new bike’ look as he requested a chocolate cheesecake. Of course I could not say no, and was curious how it would turn out, considering the smooth success from the first cheesecake attempt. I do wish to provide full disclosure here – I have made cheesecake before – it was a pumpkin cheesecake with a gingersnap crust. It was lovely and carby and wheaty. A healthier version may be in my future this fall, for I really liked the pumkiny goodness. Back to the here and now. This cheesecake was smooth like the last one, and Skinny D was very happy. So was Big D and Little B (although for some reason Little B did not like the crust). One piece of advice on cheesecake making – this cheesecake was smooth, but as you can see in the picture, there are little speckles. It is my fault. I did not ensure that the cream cheese was soft enough, nor did I take the time to do extra mixing, so little bitty pieces of cream cheese did not get thoroughly combined. Did not seem to have a negative impact on texture or flavor though. I bet I will take the time to do it right next time!

Crust
2 cups finely ground almond flour
2 Tbsp coconut flour
1 Tbsp butter, melted
1 Tbsp Stevita granulated sweetener
1 tsp unsweetened cocoa powder
1 egg white, lightly whisked

Filling
16 ounces cream cheese, room temperature
1/3 cup sour cream, room temperature
2 eggs, room temperature
1 egg yolk (retained from crust ingredients)
4 ounces unsweetened chocolate
1/3 cup Stevita, granular sweetener
1/2 tsp ground cinnamon
1 tsp vanilla extract

Preheat oven to 325 degrees. In 9″ pie dish cut a round of parchment paper that fits the bottom of the dish. In medium bowl stir together all dry crust ingredients. Add the butter and stir until the ingredients clump. Add the egg white, mix until well combined. Crust will still be crumbly. Press crust into dish until bottom and sides are covered. Filling: in large bowl combine cream cheese and sour cream. Melt chocolate in the microwave proof bowl – heat and stir in 10 second increments until chocolate is melted and smooth. Add chocolate to cream cheese and sour cream mixture. Whisk together until completely smooth. Add butter and stir again until smooth. Add eggs and yolk, stir to incorporate and until smooth. Add sweetener and vanilla. Beat until well combined and smooth. Pour filling into crust and gently smooth surface. Place in oven. Bake for 30-35 minutes, until filling sets. Turn off heat without opening oven door. Leave cake in oven until oven and cake are completely cooled, about two hours. Remove from oven  and chill for at least an hour. Serve plain or with fresh berries.

Limey Cheesecake

limey cheesecake

Of all the desserts in all the homes and restaurants and coffee shops I have visited, I am likely to pick cheesecake last. I actually like smooth, flavorful cheesecake, but I have found over time that I am picky and end up finding them icky. I tend not to pick it as my treat of choice because it is easy to make icky cheesecake. For me icky has a specific definition when it comes to cheesecake – that slightly rough, bumpy texture that tastes like something vague, usually plastic or paper, and is far from convincing me to think, ‘hmm, I like this’. Enter Big D. He loooooves cheesecake. I actually have not discussed the ‘icky’ version I tend to experience, but he got a sad little look the other day when we saw some cheesecake in the dessert display of a restaurant. ‘Can you make some?’ he asks hopefully. I say ‘yes, of course’, and his face lights up like a kid with a new bike. Don’t even ask me how many bikes he owns; needless to say, I have seen the look on him plenty of times before. Here is my attempt at cheesecake, with no wheat or sugar. I think it turned out pretty smooth and flavorful. No ‘icky’ factor for me this time! I would really disappoint myself if I contributed an icky cheesecake. There is enough of it in the world. And based on Big D’s reaction to eating it, I scored big on getting a repeat of the new bike face.

Limey Cheesecake

Crust
2 cups finely ground almond flour
2 Tbsp coconut flour
2 Tbsp butter, melted
1 tsp Stevita granulated sweetener
1 tsp ground cinnamon
1/4 tsp ground nutmeg
1/4 ground ginger
1 egg white, whisked (save yolk for filling)

Filling
16 ounces cream cheese, room temperature
1/3 cup sour cream
2 large eggs and 1 egg yolk, room temperature
3 Tbsp butter, room temperature
2 Tbsp heavy whipping cream, room temperature
1/3 cup Stevita, granular sweetener
2 large limes, zested and juice separated from meat (use less for milder lime tang)
1 tsp vanilla extract
Fresh berries (optional)

Preheat oven to 325 degrees. In 9″ pie dish cut a round of parchment paper that fits the bottom of the dish. In medium bowl stir together all dry crust ingredients. Add the butter and stir until the ingredients clump. Add the egg white mix until well combined. Crust will still be crumbly. Press crust into dish until bottom and sides are covered. Filling: in large bowl combine cream cheese and sour cream. Whisk together until completely smooth. Add butter and stir again until smooth. Add eggs and yolk, stir to incorporate and until smooth. Add sweetener, lime zest, lime juice and vanilla. Beat until well combined and smooth (see a pattern?). Pour filling into crust and gently smooth surface. Place in oven. Bake for 30-35 minutes, until filling sets. Turn off heat without opening oven door. Leave cake in oven until oven and cake are completely cooled, about two hours. Remove from oven  and chill for at least an hour. Serve plain or with fresh berries.


Post Navigation