Any Kitchen Will Do

Give me a kitchen and I will cook.

Archive for the category “garlic”

Cilantro Pesto

cilantro pesto with spoonWe had a bundle of cilantro sitting in a water jar on the counter. Since I kill it every time I try to grow/regenerate it, I tend to overstock on it when I find it fresh cut in the store. It was starting to look sad, even with its water, which meant it needed to be used pretty soon. The stuff goes from perky to slimy and brown pretty quickly when it starts to go, so I had to act fast. Big D was grilling steaks for dinner, so what could I do with cilantro. Hmmm….cilantro, steaks, cilantro, steaks….I know! I remembered a cilantro sauce from a restaurant I went to years ago in Denver, I think it. Maybe it was Boulder. Instead of basil they used cilantro for pesto. I decided to whip up some cilantro pesto to drizzle on top of the wonderfully seared rare steaks. It helped me use the cilantro instead of leaving it to go bad, and I could not imagine it being uncooperative with the grilled meat. I was right, I must say. The pesto worked great with the steaks, and the leftovers also worked great on pork loin. Another plus was the pesto kept much better in an airtight jar in the fridge compared to un-pesto cilantro would have done sitting on the counter. Double score!

Cilantro Pesto

1 bunch fresh cilantro, most thicker stems removed
1/4 – 1/3 cup extra virgin olive oil
4 cloves garlic
1/4 cup pecan halves
1/4 cup grated Parmesan cheese
1/2 jalapeño, seeds removed
1/2 tsp sea salt
1 Tbsp lime Juice

Add all ingredients except oil to blender or food processor. Purée until blended, then slowly drizzle oil into mixture. Scrape sides and blend more until everything is about the same size. Use immediately or chill until about an hour before serving. Room temperature is the best for serving.

Eggs and Greens

eggs and greens

After all the effort put in to making holiday lunches and dinners, the last thing I want to do after a late or particularly celebratory evening (aka, one too many glasses of champagne), is make a big, fancy breakfast. To fill the tummy and make the breakfast last until said lunches or dinners, try some eggs and greens! The combination of protein and fiber will fill up your tummy and won’t take very long to throw together. You can always use fresh greens, but more cooking may be needed. We like keeping frozen greens in the freezer that were previously blanched, so a quick saute will make instant, hot veggies for us. We always, always have eggs around, so the combination is a no brainer. I like my eggs cooked medium so there is some firm parts to munch with the egg whites, while the runny part mixes up with the greens. Occasionally I will throw some leftover meat in with the greens if we are realllllly hungry, but it is not necessary to fill right up. Leftover ham could, potentially, result in a type of green eggs in ham, without the freakishly green food coloring added to the eggs. Yes, I have done such a thing to poor eggs, and they taste great if you close your eyes. Heh. If Little B is in a -particular- mood I may have to scramble instead of fry an egg for her, but she likes the greens regardless! Yay!

Eggs on Greens

3 Tbsp butter, salted
2 cloves garlic, crushed
4 cups frozen collard greens, chopped
4 – 6 eggs
Salt and Pepper to taste

In a saute pan over medium high heat add 1 Tbsp butter. When butter is melted add garlic and toss until garlic sweats. Add greens and toss until wilted and heated through, about five minutes. Sprinkle with salt and pepper to taste and toss. Remove from heat, cover and set aside. The greens will continue to soften and keep warm, but not lose much more in the way of nutritional benefit. In another pan add 2 Tbsp butter over medium heat. When butter is melted crack all four eggs into the pan. Fiddle with the edges of the eggs so they don’t become one big four-eyed egg. Sprinkle with just a bit of salt. At this point you have two choices – flip or cover. After just enough time to let the eggs set, turn down the heat to low. You can either: 1) flip each egg separately and cook for another minute, or 2) if you don’t like flipping, just cover the pan for a minute or so, allowing the top of the eggs to set. Either way, poke the yolks gently to monitor speed of cooking, until they are cooked to desired doneness – soft, medium or hard. It is not my fault if you over poke and puncture the yolk, but how else will you determine how done it is? To plate, put a half the greens on a plate and flatten them a bit, then add two eggs. Serve and consume immediately.

Bacon Wrapped Thanksgiving Turkey

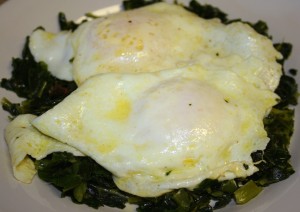
To all fellow bacon lovers – what may be even better than wrapping steak or jalapenos or chicken breasts in bacon? Turkey! The end result may not look like the quintessential golden skinned turkey, but boy is it moist and flavorful! Our traditional method is to use a smoker to do the turkey, along with whatever appetizers we crave, like stuffed mushrooms, and even throw in the occasional bunch of jalapenos, tomatoes and onions, which make a smokin’ salsa. Our current living situation, at the top of an apartment building, is not conducive with smoker use. We didn’t want the landlord following the trail of smoke and nagging us about rule breaking. A quick searing of steaks on the balcony grill is one thing, but eight or so hours of trailing smoke is more than what we thought we could get away with. We went ahead and did an oven version this year. I am curious about how this recipe would work in a smoker, but we will have to find out another time. It was fun to do the bacon wrapping and watch the bacon get dark and crispy. Instead of having the typical crispy skin to eat, we had a blanket of bacon. The skin kind of melted into the meat, becoming part of the bacon. I am not sure how it happened, but the results were very satisfying. I got the idea from here, but made adjustments, since we are particular about fresh herbs for Thanksgiving, even though we often rely on the dried stuff most of year. The bird was stuffed with carrots, celery, onion, garlic and the herb combination that turned out wonderful. There are various versions of this recipe with comments about soft bacon, but I don’t know what they are talking about. As you can see, there is a crispy shell on it and the meat is well cooked and moist and wonderful. If you follow my instructions you should be able to get the same results. Enjoy!

Bacon Wrapped Thanksgiving Turkey

One 15-pound turkey
1 cup fresh parsley leaves
½ cup fresh tarragon leaves
½ cup fresh sage leaves
¼ cup rosemary leaves
10 cloves garlic, peeled and crushed
½ cups olive oil
4 cups vegetables, including carrots, celery, onion and garlic
3 pounds bacon, sliced into thin strips

Wash the turkey inside and out and pat dry. Place in refrigerator for at least an hour uncovered to cool. Preheat the oven to 500 degrees. Mix together the herbs, minced garlic and olive oil to make a paste. Rub the paste in the cavity and underneath the skin of the breasts of the turkey, carefully so you do not tear the skin. Fill the cavity with the vegetable mixture, and place in a roasting pan. Add 1-2 cups of water in the roasting pan, so there is about ¼ inch of water, then roast the turkey in the oven for 30 minutes. Remove from the oven and turn the heat to 350 degrees. Cover the turkey in the bacon slices, in cross-hatch form* or just by overlapping the slices in strips. Insert a meat thermometer in the thickest part of the breast. Put the turkey back in the oven and continue to cook for about 20 minutes per pound (about three hours total, including the high temperature period) until an internal thermometer temperature reaches 160 degrees. 

*To do the cross hatch on top and bottom there can be preparation while the high temperature cooking happens. Take two pieces of wax or parchment paper, about two feet long each. Create the cross hatch by alternating bacon pieces into one foot by one foot sections. After the turkey finishes the first half hour of cooking, move the turkey to a surface where juices can drain. In the baking pan flip one of the cross hatch sections into the dish and spread it out. Place the turkey on top, then flip the second cross hatch on top. Between the wings and legs connect the cross hatch edges as much as reasonably possible. Wrap the wings and legs with bacon strips, making sure to cover all the meat and skin. Add a few more pieces on the top and bottom of the cross hatch pattern to cover all surfaces of the turkey.
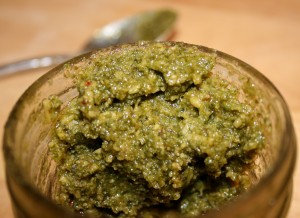
Veggie Kinda Hummus

Hummus tastes good in so many ways. And by ways I mean it can be used as a dip, or spread, or side dish or a nice base for presenting other foods. My favorite use is spreading it on pita and filling with Greek salad. These days I try to not eat much pita, and frankly hummus made from chickpeas can put me over the top carb-wise on a day if I am not careful. I still like the idea of using hummus as a fiber filled  base for anything from salad to grilled meats or seafood. To reduce the carb count I came up with a way to make kinda hummus, using veggies. I can use it where I would otherwise put hummus, with fewer carbs while keeping the fiber content high. The other day Big D made a killer batch of taco meat. I slathered a layer of kinda hummus on the plate under the meat and cheese and tomatoes. Yum! The vegetable proportions can vary depending on what you have in the fridge, but keeping the cauliflower  at about half the bulk will helps obtain the hummus consistency. Be sure to let the veggies cool before pureeing, cuz they can certainly become a hot mess!

Veggie Kinda Hummus

2 cups chicken broth
1 medium head cauliflower
2 cups broccoli, chopped
1 small onion
2 celery stalks, chopped
1 carrot, chopped
2 cloves garlic
Salt and pepper to taste

Combine broth, garlic and vegetables in a large pot. Cook over medium high heat until boiling. Reduce heat and simmer for 30-45 minutes until all the vegetables are soft. Let cool until safe to transfer to use a hand blender, counter top blender  or food processor. Using a strainer or
slotted spoon separate the veggies from the liquid. Purée the vegetables until smooth, all at once or in batches. Add some of the cooking liquid only if it is too thick to purée. The vegetables will be pretty wet, so you probably won’t need the liquid. Serve warm or cold as a spread, dip or plating base for meats and other vegetables, as you would hummus.

Mustard Baked Chicken

I know it is not very exciting, but there are not many dishes simpler than baked chicken parts for a weekday dinner. We always have chicken pieces of some sort in the freezer. Instead of pretending we eat exotic meals every day of the week I will continue to share variations of staples we rely on for dinners and very often lunches the next day. We continue to find that cooking our own food on a regular basis  helps us stay on a diet that makes us feel great, thus the reliance on back stock of protein in the freezer. This recipe is a result of opening the fridge on a Wednesday evening and having the thawed chicken thighs telling me “I know we are common, but make us special. Very special.” A few things from our well stocked fridge resulted in special yumminess. Saute some greens for a bed, and the special chicken is scrumptious! Wonderful wolfing down of dinner on a Wednesday!

Mustard Baked Chicken

2-3 pounds chicken pieces, skin on
1/2 cup spicy brown or horseradish mustard
1 cup olive oil mayonnaise
1 tsp garlic powder
2 Tbsp fresh lime juice
Salt and Pepper
1 cup grated mozzarella cheese

Preheat oven to 350F. Rinse and pat dry chicken pieces. Season all over with salt and pepper. Place chicken, skin side up, in a large baking dish. In a small bowl stir together mustard, mayonnaise, garlic powder and lime juice. Spread sauce over the top of all the chicken. Bake in preheated oven for about 45 minutes, until juices run clear and edges of chicken begin to brown. Turn off oven, sprinkle cheese over chicken and leave in oven for about 10 minutes, until cheese is melted. Serve immediately.

Thyme and Lime Chicken Soup

You are walking along enjoying the crisp fall breeze, when you suddenly have an urge for a bowl of hot chicken soup. You run by the store and into the soup aisle, only to discover that all their offerings include noodles, rice, tons of salt, preservatives and fillers. Where, oh where, is the veggie and chicken filled bowl of goodness you were craving? And what about that extra twist you want to be surprised with as the first spoonful slides down your throat? Well, here are all the things you’re looking for! The surprise is how wonderfully the beer mixes with the lime juice and thyme to give the soup a nip not usually found in chicken soup. Don’t worry. After hours of exposure to heat the alcohol cooks away, but the more subtle flavors of the beer stays in the soup. Little B inhaled two bowls in one sitting. Enjoy!

Thyme and Lime Chicken Soup

½ pound thick sliced mushrooms
3 Tbsp dried thyme
1 tsp sea salt
2 Tbsp extra virgin olive oil
3 limes, juiced with meat included
2 pounds cooked chicken, chopped or shredded
2 cups miniature carrots, chopped into coins
3 stalks celery, chopped
1 medium Onion, chopped
4 cloves garlic, crushed
4 small or roma tomatoes, roughly chopped
1 cup water
12 ounces beer (pick a strong flavored one – pale ale or IPA – goes well with the lime)
Salt to taste

Preheat oven to 350F. In a medium bowl combine the juice and pulp from one lime, olive oil, thyme and salt. Add the mushrooms and toss until coated. On a medium cookie sheet spread out the mushrooms slices flat with a little space between each. Drizzle any sauce over the mushrooms. Bake for 20-25 minutes, until they begin to brown. Remove from oven and set aside to cool. In crock pot add water and remaining lime juice with pulp, then turn pot to high. Add chicken, carrots, celery, onion, garlic and tomatoes. Stir and let soup heat up, about an hour. When the soup is hot add mushrooms (along with any juices left on the baking sheet) and the beer to the soup. Continue to cook on high for three more hours. Turn temperature to low and cook for 3 – 4 more hours. All the ingredients can be added to the crock pot at the same time and cooked on low for 8 – 10 hours, but the results are tangier if the vegetables are allowed to heat up in the water/lime liquid before adding the beer. Either method bears good results. If using the stove top, bring the soup to a boil before adding the mushrooms and beer, then simmer on low for 5 or 6 hours. Season with salt to taste before serving.

Mashed Cauliflower

I can hardly believe I did not write about mashed cauliflower before now. It is a staple of ours that appeases any craving I ever had for mashed potatoes. The flavor and texture is rich and smooth. It is a really easy dish, but the results can vary as far as thickness and smoothness. Over the years we have experimented with ingredients and processes – chopping finely before cooking, steaming the head whole, steaming then using a hand blender to puree, using a potato smasher to get a rough consistency. All of this experimentation led to a wonderful conclusion – cook the cauliflower in large chunks, then puree after draining the steaming liquid – this method seems to give it just the right texture and thickness. Too thin and you get soup, too thick and the flavors just don’t mix the right way. When it is just right – very Goldilocks is what I call it – the dish is addictive and will do you proud on any holiday dinner table. Don’t get me wrong, the soupy version and the one with flavors not mixing just righ are delicious as well, but we challenge ourselves to get dishes -just- right. The following version is wonderfully thick and flavorful. It definitely has a place of honor on our table. It is a dish that really is better the next day, so take advantage of that fact and make it the day before, only needing a quick heating up before serving.

Mashed Cauliflower

1 large head cauliflower, cut into large pieces
½ cup water
½ cup butter
4 cloves garlic, crushed
1 Tbsp dried thyme leaves
Salt to taste

In a large pot add water and 1 tsp salt. Bring to a boil and add cauliflower. Lower temperature and cover, steaming until soft, about 10 minutes. Place cauliflower in food processor or blender, retaining liquid from pot, and puree until smooth. If necessary add a small amount of the steaming liquid to help with the puree process. When smooth, return cauliflower to the pot and add butter, garlic and thyme. Turn heat on under pan to low and cook until butter is melted and spices are blended. The cauliflower can be served immediately, or chilled overnight to maximize the blending of flavors. Reheat over low heat on stove top for best results, but microwaving on 50% power until hot works as well. Serve along with anything calling for a side of mashed potatoes. You won’t regret it!

White Pizza on a Wheatless Crust

Things are pretty exciting around here right now. Not only is Grandma Jo in town for a visit, but Big D’s newly published book is selling like crazy! Every time I read it I have to make sure I allow enough time to sit and keep reading. It is hard to find a place in the story to stop, set the book down and not wonder what is going to happen next, even when I am trying to concentrate on something else. The book is called Shiver on the Sky, and is available as an e-book on Amazon. We are enjoying the good reviews and watching the sales numbers rise. Take a few minutes to check it out – there is a short, discount promotional period right now, so check it out and let us know what you think! To celebrate the successful launch of the book we had a pizza feast the other night. We don’t do delivery – nobody I know of delivers wheat free pizza – we do our own thing. Even before we started avoiding wheat we did not do delivery much, but you can read about one of those adventures here and yet another, gluten free adventure here. The pizza we make is always loaded with a lot of garlic and a whole pile of toppings. The important part is the awesome crust, which I originally found here, from This Chick Cooks, but have since tweaked. It holds the toppings without getting soggy, and there is no doughy crust getting in the way of the garlic. Did I mention we use a lot of garlic? Oh, and we use a bunch of garlic, which is not mandatory, but we like a lot of garlic on our pizza. Garlic in the crust, garlic cooked with the mushrooms and garlic sprinkled between the layers of topping. And a last sprinkle of garlic on the top layer of cheese. Any topping combination you like will work on top of the crust, especially garlic.

White Pizza on a Wheatless Crust

2 cups shredded mozzarella cheese
2 Tbsp coconut flour
2 Tbsp flaxseed meal
¼ tsp baking soda
2 tsp dried parsley
1 tsp dried basil
1 tsp garlic powder
½ tsp onion powder
½ tsp sea salt
2 eggs, beaten

Toppings:
½ cup ranch dressing
1 Tbsp extra virgin olive oil
½ pound ground Italian sausage
1 cup thin sliced pepperoni
1 cup sliced mushrooms
4 cloves garlic, sliced
½ cup chopped black olives
2 cups shredded mozzarella cheese
1 cup shredded sharp cheddar cheese
½ cup grated Parmesan cheese

In a medium saute pan over medium heat add the olive oil. When the oil is hot add the garlic and cook until it softens. Add the sausage, breaking it up into bite sized pieces. When the sausage is half cooked add the mushrooms and toss the whole mess around until the sausage is done and the mushrooms are at least heated through. Preheat oven to 425F, then prepare the crust. In a medium bowl combine the dry ingredients with the cheese. Add the eggs and stir until combined. It will be a bit sticky and not look at all like pizza dough. That is okay. Cover a large cookie sheet with parchment paper. Spread the dough on the paper, making a very thin layer. The best way to spread it is to press down on it with your fingers – it helps to have a little bit of oil on your fingers to reduce the stickiness. It won’t spread out to all the edges, but it will cover most of the pan. The layer should be no more than 1/8 inch thick. Place pan in oven and cook just until it puffs up and the edges and top begin to brown, about seven minutes. Reduce the oven temperature to 400F. Remove the crust from the oven and begin piling on the toppings. We usually start with a thin layer of ranch dressing, followed by some cheddar cheese, sausage/mushroom/garlic, mozzarella cheese, then pepperoni and olives, followed by a mix of cheddar, mozzarella and last but not least Parmesan. If you like your pizza herby, then do what we do and sprinkle some parsley, basil and garlic between the layers of toppings. Bake the pizza for 10-15 minutes, until the cheese is melted and starting to turn brown on the edges. Remove from the oven and let cool for at least five minutes before cutting.

Roasted Cabbage

Now this – this is easy and delish! We love cabbage. And not just because it is low in carbohydrates and high in fiber, but because it tastes good, has great texture and marries up with a variety of flavors. It can double the bulk of a meat dish, or fill up the crevices of a stuffed pepper. It can also make a raw salad extra crunchy. Once when we were living in New Orleans I picked up a big head of green cabbage at a farmers market. All the heads looked pretty much the same, but I grabbed one of the smaller ones. Little B was a baby at the time, hanging around in a sling, nestled against me dozing on and off. I was tired from all the baby maintenance. When I got home and started cleaning and trimming the cabbage, it was filling up my sink. I was pretty impressed at the size. It was huge! Filled the sink. We ate on it for a week. Unlike Charlie of the Chocolate Factory, I never had to rely on cabbage water for dinner. I love the stuff. Roasting it in the oven brings out the flavor without getting watery. It is easy to cook up while something is finishing up on the grill. Enjoy!

Roasted Cabbage

1 head green cabbage
1 tsp chopped fresh garlic
1 tsp chopped fresh ginger
½ tsp ground nutmeg
2 Tbsp olive oil
Salt and Pepper to taste

Preheat oven to 375F. Cut the cabbage head in half, leaving the stem attached. Out of each half cut a 1” slice. Trim some of the stem out of the slices, but leave enough to help hold the slices together. Set aside the outer slices for another use. In medium rectangular baking dish drizzle 1 Tbsp of the oil. Sprinkle the garlic and ginger, as well as some salt and pepper over the oil in a shape approximate to the circumference of the cabbage slices. Place the slices in the pan, gently pressing down so the spices are pushed into the cabbage. Sprinkle the remaining oil on the top of the slices, along with more salt and pepper. Bake for about 30 minutes, then flip the slices. Bake for 30 more minutes, or until cabbage is softened to preferred tenderness. Serve immediately.


Stuffed Poblano Peppers

We found a new favorite dinner! Thank goodness I did not have enough peppers to double the recipe, or we would have had to roll ourselves out of the kitchen after eating them all! Did you ever go to a Mexican restaurant, order a chile relleno and end up with a kinda tasteless mound, filled mostly with rice and covered with soggy, sometimes slightly undercooked batter? Here is a way to avoid all that unpleasantness! A little more effort is needed to fill out the other elements of your own combination platter, but here is some help with enchiladas, salsa, guacamole and rice. Since I was not going to dip these peppers in batter I chose not to char and remove the skins – with all the cooking and liquid the peppers were soft and skin inconsequential. This is a a great recipe for using leftover meat and vegetables. It always works great with other pepper types, like cubanelle, etc…

Stuffed Poblano Peppers

4 Poblano peppers
4 ounces cream cheese, room temperature
2 cups shredded pork or cooked seasoned ground beef
1 cup cabbage, cooked and chopped up (or very finely chopped raw cabbage)
1 cup canned diced tomatoes
1 tsp dried oregano
1 tsp ground cumin
1 clove garlic
Salt and pepper to taste
2 cups shredded cheddar and Monterrey Jack cheese
½ cup water
Sour cream and lime wedges for serving

Preheat oven to 400F. Make one slit in each pepper lengthwise. Remove seeds and membrane from inside, careful to leave the stem attached to the pepper. Sprinkle inside of each pepper with salt. In blender or food processor combine tomatoes, oregano, cumin and a dash each of salt and pepper. Puree until you have a smooth tomato sauce. Set aside. Divide cream cheese into four pieces. With the back of your spoon (or your fingers if you don’t mind a little mess) spread the cream cheese around in the cavity off the pepper. In a medium bowl combine the meat and cabbage. Stuff the meat and cabbage mixture in the pepper, making sure the slit does not tear open any more than necessary. Top the meat and cabbage the tomato sauce, making sure it drizzles down within the pepper. Top with the cheese, tucking it in under the edges of the peppers, then gently pushing the pepper edges together as far as you can. In a baking dish just big enough to hold the peppers (9×9 or 8×11) pour in the water, then add the peppers. Cover loosely with foil and bake for 20 minutes. Remove foil and bake for 20-30 more minutes, until cheese begins to brown. Remove from oven and let cool for about five minutes before serving. Top with a dollop of sour cream and a lime wedge for drizzling juice over the stuffed pepper.


Post Navigation