Any Kitchen Will Do

Give me a kitchen and I will cook.

Archive for the category “Douglas Kitchen”

Hot Bacon Dressing

hot bacon dressing

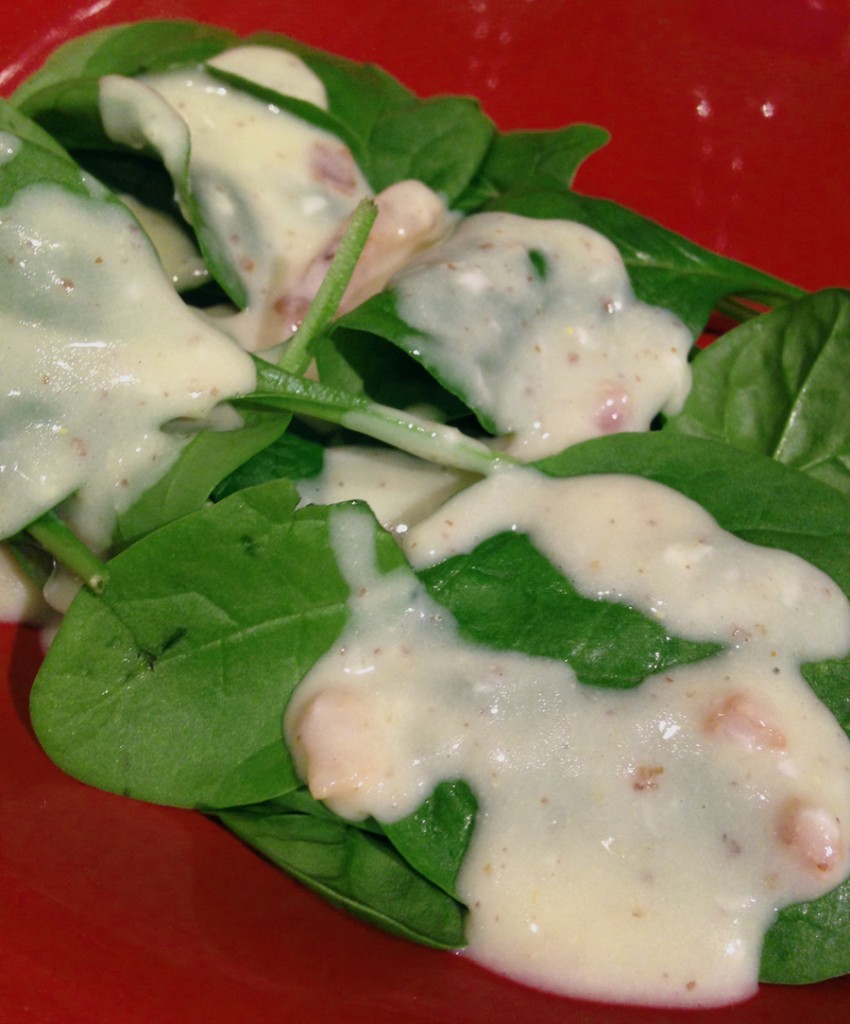
I am sure I have previously discussed my love for spinach. As a child I was a fan of Popeye and never understood the scrunched up faces of other kids facing the green stuff on their plates. As I got older I craved salads with deep green spinach over the pale, watery nature of iceberg or other lettuces. The term ‘hot’ used for this recipe can mean two things – spicy hot and temperature hot. Other versions of the dressing can be heated up much more so as to clearly wilt the spinach as it is poured. This version, since it relies on egg as a thickener instead of flour or other powders, cannot be made so hot. I rely on the spicy version of the word hot here instead. The tang of the vinegar along with the heat of the horseradish and mustard make it so. It will probably not wilt the spinach, but will still leave a mark on your palate. The picture shows the dressing being used simply on raw baby spinach as a side dish. If I have the salad as a main course I will add onion and soft boiled eggs, and other veggies as I please. Here, it was a way to quickly boost the veggie/protein ratio at dinner one night. The dressing can also go on top of other side dishes, for it has a tang that would compliment broccoli, squash, asparagus, and so forth. If you heat it up leftovers do it gradually in the microwave at half power or low on the stove so as not to create scrambled eggs.

Hot Bacon Dressing

4 slices bacon
1/4 c. water
1/4 c. Apple cider vinegar
1 tsp Stevita granulated sweetener
1 Tbsp horseradish mustard (or 2 tsp yellow mustard and 1 tsp raw grated horseradish)
1 egg
Pinch salt
(Optional) 1/4 red onion, jullienne
(Optional) 4 soft boiled eggs (6 minute eggs)

Cook the bacon over medium high heat in small pan until crisp. Crumble bacon and set aside. Turn temperature to low under bacon grease and let cool to the lower temperature. Add water, vinegar, sweetener and mustard, stirring until combined. Whisk in egg and continue stirring constantly so the egg does not cook firm. When the egg is fully incorporated add crumbled bacon, continuing to cook and stir under heated through. Taste and add salt if needed. Turn heat up to medium, continuing to stir, and heat until steam rises from the dressing, about two minutes. Serve immediately over raw baby spinach, optionally including onion slices and soft boiled eggs sliced in half.

Baked Parmesean Mushrooms

image

I will start by saying this recipe was not made with Little B in mind, except that I did not expect her to eat any of it. After happily snacking on mushrooms as a toddler she summarily spurned them during the 4th and 5th years of her life. That does not deter me from putting them in meals. She has often eaten them, unbeknownst to her. Sure, they are sometimes chunky, making it possible for her to remove them and make a point of expressing her distaste for them on the edge of her plate. Other times there is not way to differentiate them from pieces of meat or other veggies and they are happily consumed. When I have made stuffed mushrooms she eats the stuffing but not the cap (but there is mushroom in the stuffing Bwahahahaha!). I hope someday she changes her mind, again, about the shrooms, but for now I am just glad she has an interest in new foods and ones that are healthy for her. There is no mistaking the mushroom-ness of this side dish. It went well with some ribeye steaks Big D smoked up for a very satisfying dinner.

Baked Mushrooms

12-18 mini portabello or white mushrooms
1/2 cup dry red wine
1/4 cup lemon juice
2 tsp garlic powder
1 1/2 tsp sea salt
1 Tbsp dehydrated chopped onion
1 cup finely grated parmesean cheese
1/2 cup almond flour

Trim mushroom stems until they are flush with the bottom of the cap. In a shallow dish or resealable bag add the marinade ingredients – wine, lemon juice, 1 tsp garlic powder, 1 tsp sea salt and onion. Stir until salt dissolves. Add mushrooms and toss in marinade until they are all coated. Leave mushrooms to marinate at room temperature for about two hours. Preheat oven to 400 degrees. Remove mushrooms from marinate and pat dry with towels. In a medium bowl combine parmesean cheese, almond flour, 1 tsp garlic powder and 1/2 tsp sea salt. Stir dry mixture until combined. One at a time coat each mushroom with the dry mixture – it should stick well to the wet mushrooms. Place each mushroom stem side down on a shallow baking sheet, evenly spaced. Bake for 20-25 minutes, until mushrooms shrink a bit and coating begins to brown. Remove from oven and let sit for about five minutes before serving.

Big D’s Eggnog

image

Some may be freaked out about this recipe. Not because it is eggy and not because it is boozy, but because it is RAW. You might get a bit antsy about consuming raw eggs, but we live on the edge. I do like the taste of cooked eggnog and in my opinion is often dominated by the alcohol taste. I much prefer the raw version – I can taste all the different flavors mixing together in each sip. It is frothy right out of a blender, and nice and smooth after it sits in the fridge for an hour or two. Do not fear, for it is still boozy, just not as obvious. We often make it between November and January. I have thought about making it other times of the year, but it seems wrong. Big D has perfected the ratios over the years and I discovered recently that I have yet to post about it! Well, here it is. I hope you enjoy it!

Big D’s Eggnog

10 eggs
2 cups heavy whipping cream
1/2 cup Stevita granular sweetener
1 tsp ground nutmeg
1 Tbsp vanilla extract
1/2 cup spiced rum
1/4 cup whiskey
Additional ground nutmeg for garnish.

Combine all ingredients in a blender. Blend on high for 10 seconds. Let eggnog sit for five minutes. Serve immediately, sprinkled with nutmeg, or refrigerate until time to serve.

Yule Platter

yule platter_edited-1
Every year on winter solstice we have a family party – Merry Yule! Especially during our winter time in Alaska this day is a big turning point – the shortest day of the year is the beginning of longer days and the approximate midpoint of chilly winter weather. Yes, there are still heavy winter storms in late March sometimes, but there is mostly rain after February here in Southeast. Most of our snow this season so far is melted, with temperatures in the high 30s, and a white Christmas is questionable. Regardless of the weather there is definitely a shortage if light. Sunrise is about 8:45am, if you can see it through the clouds, and then sets about 3pm. One way we celebrate Yule each year is to have a simple meal, made up of preserved foods that require little or no cooking. We don’t do much of the preserving ourselves, but work off the labors of others. Big D smokes some jerky, onion, garlic and cheese, while other items like pickled veggies, cured meats and nuts are added to the platter. We snack from the platter while sipping something bubbly – champagne, beer for me and Big D, and root beer for Little B.  It makes for a winter celebration we appreciate before the hustle and bustle of Christmas Eve and Day, which remind us of our childhood traditions. The simple celebration reminds us that the world is hibernating under the bare branches, blustery winds and wet ground. It reminds us of our New Year resolutions from Samhain and look forward to the Candlemas celebration of light in February. A time to ponder during a more sedate time of year when much of the natural world sleeps. Since there is not much recipe involved, here is a list of suggested items for your platter.
Yule Platter
Dry coppa, pastrami or prosciutto
Dry Salami
Beef Jerky
Roasted Chestnuts
Garlic Stuffed Olives
Jalapeno Stuffed Olives
Dry Roasted Mixed Nuts
Specialty Cheeses, sliced
Pickled Asparagus
Pickles
Roasted Mixed Nuts
Arrange ingredients in a pretty way on large platter. Offer and provide bubbly and/or fermented beverages. Eat, drink, be merry. Don’t feel guilty about the ease of this dinner, for more complicated ones are on the horizon.

Rebellious Ratattouille

image

I think this is ratatouille but some people may find it lacking. What I love about it is the combination of flavors I get from the alternating, thinly sliced vegetables in a single bite. I like bell peppers in general, which are usually included in this dish, but I don’t like the taste and texture they add to the other veggies used here, so I left them out. Look at me being a ratattouille rebel. A neat thing about this recipe is it can be doubled and tripled easily by adding more sliced vegetables and a larger pan. It also makes for a lovely presentation in a serving dish or on your plate.
Rebellious Ratattouille
1 medium zucchini
1 medium yellow squash
1 medium onion
3 large Roma tomatoes
1 14.5 ounce can diced tomatoes
2 cloves garlic, crushed
1 Tbsp dried oregano leaves
1 Tbsp dried parsley leaves
1/2 tsp sea salt
1/4 tsp ground black pepper
In a medium pot over medium heat add the canned tomatoes, garlic, oregano, parsley, salt and pepper. Simmer for about ten minutes, until heated through and bubbly. Remove from heat to let cool. Preheat oven to 375 degrees. While sauce simmers prepare the vegetables by slicing them thinly, less than 1/8 inch thick. Sprinkle slices with salt and pepper. Removing seeds from tomatoes is optional. Using a stand or stick blender purée the tomatoes ito a smooth sauce. In a loaf pan pour a thin layer of tomato sauce (you will probably have leftover sauce). Alternate the slices of zucchini, yellow squash, tomatoes and onion, placing them in two long rows in the pan. Bake for 30 minutes, cover pan with foil and bake for an additional 15 minutes. Remove from oven and let sit for 5 minutes before serving.

More One Minute Muffins

one minute muffins

We ran out of homemade bread! Big D is out if town! What are we to do?! I can make bread, yes. I can follow recipes and such, but it feels wrong in this instance. Here is why. Big D and I spend a lot of evenings watching each other cook and talking about things. All kinds of things. Not necessarily about what is being cooked, but other stuff. Our kitchen has a bar that opens into it, so one of us can sit out of the way and still have full access to the kitchen goings on. Little B is always nearby, but our talking is usually about something other than dinosaurs and fairies, so is often boring to her. By all means there are plenty of Little B-centric chats, but less likely during these casual cooking tete-a-tetes. Since it felt so wrong bread baking in Big D absentia, I decided to take a stab at one minute muffins again. I did so previously, with results being a little more labor intensive and very specific to accomplishing hamburger buns. Those buns were not going to hit the spot for, say, a breakfast sandwich with sausage, egg and cheese. I wanted something a bit smoother and softer. These are definitely smoother, softer, shorter and sweeter. I also give two different flour/meal choices, but share them together in spite of the very different results. Flaxseed gives a more ‘grainy’ texture, while the almond meal is smooth and spongier. Pick what pleases you. In trying to include the variations that impact results, I hope I do not confuse. Try a muffin and see what you like!
More One Minute Muffins
1-2 Tbsp butter
1/2 to 1/3 cup golden flaxseed meal or almond meal
1 tsp baking powder
1/4 tsp stevita
1 egg
In large microwaveable mug melt butter (less butter makes for a dryer muffin). Add dry ingredients and stir (a larger quantity of meal makes for a shorter, denser muffin). Add egg and mix until fully incorporated. Place mug in microwave. Cook on high one minute – use of almond meal often needs an additional 30 seconds if the middle is still sunken after one minute. When cooked through remove from microwave and immediately flip muffin out of mug. Serve.

Cheesy Burger Bombs

burger bombs

Hamburgers are heavily relied on in this household. And I use the word household loosely, for reliance includes those times when we eat in restaurants. At most places a hamburger can be ordered without a bun and with a salad instead of fries. It makes for a satisfying meal and keeps us safe from wheaty pasta and breaded concoctions on menus. Recently on a weekday evening I was standing in the kitchen, staring at a bag of ground beef, ready to be made into our dinner. Regular burgers with cheese melted on top was about to be made. As I reached into the fridge for cheese, I spotted little ever-present cheese wheel snacks in the cheese drawer. Little B loves to unwrap them, peel off the wax and throw the whole wheel into her mouth. She then slowly chews it up while looking like a chipmunk. The leftover wax serves as a mommy-eating monster lots of times, reminding me of the Pac Man games of my youth. I figured, why put the cheese on top of the burgers when it can be inside?! I have put filling inside of burgers in the past, but never such big cheese bombs! I am up for trying, are you?

Cheesy Burger Bombs

1 – 1 1/2 pounds ground beef
1 egg
1 tsp sea salt
1/2 tsp ground black pepper
1 tsp dried oregano leaves
1 Tbsp ground turmeric
4 – 6 Baby Bel cheese snack wheels
1/4 cup bacon grease or other high heat fat

Sauce

1 14-ounce can diced tomatoes, with juice
3 Tbsp tomato paste
1 Tbsp ground turmeric
1 Tbsp dried oregano leaves
1 Tbsp dried basil leaves
1 tsp sea salt
1/2 tsp ground black pepper

First make the sauce. In medium pot combine tomatoes, tomato paste and spices. Stir and cook over medium heat until steam rises. Cover and turn heat down to simmer until ready to serve. While sauce is cooking prepare the burgers. Remove plastic and wax wrapping from cheese wheels, then set cheese aside. In large bowl combine the ground beef, egg and spices. The best way to combine it all is using your hands, but because of the turmeric they may turn yellow. Divide the beef mixture into 1/4 pound piles. Take a pile in your hand and flatten it into a patty. Place a cheese wheel in the middle of the patty and wrap the edges of the patty over the cheese. Close up the edges to completely cover the cheese. Repeat making patties until all the beef is used up. In a frying pan heat the bacon grease over medium high heat. Place burgers in pan and cook on one side for about five minutes, until the bottoms begin to brown. Flip burgers, turn heat down to medium and cover. Cook for another 5-10 minutes, until burgers are done to your liking. Serve immediately over a bed of the sauce spread on a serving plate.

Banana Bread

banana bread_edited-1

Little B has been requesting banana bread for over a month. We don’t usually buy bananas because Little B is the only one who eats them, and often loses interest before the bunch is gone. The same was true this week. Two bananas were left to get dark brown and look pathetic. I remembered all the breads we have made over the past year and did a crap shoot. The ratio between almond and coconut flour definitely needs to be considered to ensure a moist result, but not overly so. The bananas would provide a natural sweetness, but no need to do much sweetening otherwise. Cinnamon always tastes yummy when sprinkled on a banana, so why not drop in a bit? The bread did not rise very much, but it was still light and fluffy. Little Be loved it, but picked out the walnuts, so the next batch we will do without. A lot of buts that turned into a lovely bread. And the darned bananas are finally gone.

Banana Bread

1 cup almond flour
1/2 cup coconut flour
1 tsp baking soda
1/2 tsp sea salt
1 Tbsp Stevita (can be excluded, if you find the mild sweetness of banana sufficient)
1 tsp ground cinnamon
2 ripe bananas
4 Tbsp butter, melted
3 eggs
1 cup finely chopped raw walnuts (optional)

Preheat oven to 350 degrees. Line rectangular bread pan with parchment paper or grease muffin pan. In a large bowl combine the almond and coconut flours, baking soda, sea salt, sweetener and cinnamon. In a separate bowl place the bananas. Puree the bananas with a stick blender (or mush with hands like Little B prefers) until smooth. Add butter and eggs, whisking together until smooth. Pour liquid mixture, and nuts (optional) to dry mixture. Whisk together until combined. Batter will be thick. Pour batter in bread pan, or divide batter equally among muffin pan divets. Bake in oven for 20 – 30 minutes. Muffins take about 20 minutes, loaf about 30. Remove from oven and let cool in pan for about ten minutes. Serve or store in refrigerator.


Bacon Wrapped Scallops

bacon wrapped scallops

Big D is going to be so pissed that I did this while he was out of town. I just could not wait! There is a local restaurant that makes something similar, and I had a serious craving. The restaurant appears to wrap the scallops with bacon and pierce with toothpicks, then deep fry them and serve with hollandaise sauce. Their sauce is a bit subtle – it may be the version of sauce they make, but I have longed for something tangier when we have ordered and inhaled them as an appetizer. Not one to deep fry things, I decided to broil, since scallops are easy to overcook and quick cooking works well with the broiler. I was tempted to do more seasoning, but decided to keep it simple. I was not disappointed. These were so easy to make at home and delicious! I promise I will make them again sweetie and after you get home!

Bacon Wrapped Scallops

8 large scallops (about 1″ diameter raw)
4 slices bacon, cut in half
8 round toothpicks
Salt and pepper to taste

Spicy Cocktail Sauce

1 Tbsp tomato paste
1 1/2 Tbsp raw horseradish, grated
1/4 cup lemon juice

Preheat oven on low broil. Lightly sprinkle scallops with salt and pepper. Wrap a piece of bacon around a scallop, overlapping the edges. Secure the bacon with a toothpick, pushing it through both sides of the scallop. Repeat with all scallops. Place scallops on a shallow baking pan. Position oven rack about 8 inches below broiler. Place scallops in oven. Broil for about ten minutes, making sure not to overcook the scallops. If you only have one broiler setting assume it is high and reduce cooking time to 5-7 minutes, watching carefully – a few more minutes may be needed, depending on broiler heat. The bacon may smoke a bit. While the scallops cook make the spicy cocktail sauce: whisk together the paste, horseradish and juice until well blended. Sprinkle sauce on serving dish. Place scallops on plate and serve immediately after removing from the oven.

Chocolate Cheesecake

chocolate cheesecake
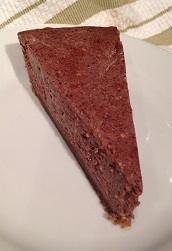
So the cheesecake saga continues. Our young friend Skinny D has been visiting with us on his first trip to Alaska. When I was making the limey cheesecake for Big D he got a similar ‘happy face like a kid with a new bike’ look as he requested a chocolate cheesecake. Of course I could not say no, and was curious how it would turn out, considering the smooth success from the first cheesecake attempt. I do wish to provide full disclosure here – I have made cheesecake before – it was a pumpkin cheesecake with a gingersnap crust. It was lovely and carby and wheaty. A healthier version may be in my future this fall, for I really liked the pumkiny goodness. Back to the here and now. This cheesecake was smooth like the last one, and Skinny D was very happy. So was Big D and Little B (although for some reason Little B did not like the crust). One piece of advice on cheesecake making – this cheesecake was smooth, but as you can see in the picture, there are little speckles. It is my fault. I did not ensure that the cream cheese was soft enough, nor did I take the time to do extra mixing, so little bitty pieces of cream cheese did not get thoroughly combined. Did not seem to have a negative impact on texture or flavor though. I bet I will take the time to do it right next time!

Crust
2 cups finely ground almond flour
2 Tbsp coconut flour
1 Tbsp butter, melted
1 Tbsp Stevita granulated sweetener
1 tsp unsweetened cocoa powder
1 egg white, lightly whisked

Filling
16 ounces cream cheese, room temperature
1/3 cup sour cream, room temperature
2 eggs, room temperature
1 egg yolk (retained from crust ingredients)
4 ounces unsweetened chocolate
1/3 cup Stevita, granular sweetener
1/2 tsp ground cinnamon
1 tsp vanilla extract

Preheat oven to 325 degrees. In 9″ pie dish cut a round of parchment paper that fits the bottom of the dish. In medium bowl stir together all dry crust ingredients. Add the butter and stir until the ingredients clump. Add the egg white, mix until well combined. Crust will still be crumbly. Press crust into dish until bottom and sides are covered. Filling: in large bowl combine cream cheese and sour cream. Melt chocolate in the microwave proof bowl – heat and stir in 10 second increments until chocolate is melted and smooth. Add chocolate to cream cheese and sour cream mixture. Whisk together until completely smooth. Add butter and stir again until smooth. Add eggs and yolk, stir to incorporate and until smooth. Add sweetener and vanilla. Beat until well combined and smooth. Pour filling into crust and gently smooth surface. Place in oven. Bake for 30-35 minutes, until filling sets. Turn off heat without opening oven door. Leave cake in oven until oven and cake are completely cooled, about two hours. Remove from oven  and chill for at least an hour. Serve plain or with fresh berries.

Post Navigation