Any Kitchen Will Do

Give me a kitchen and I will cook.

Archive for the category “Douglas Kitchen”

Limey Cheesecake

limey cheesecake

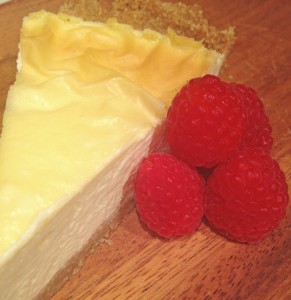
Of all the desserts in all the homes and restaurants and coffee shops I have visited, I am likely to pick cheesecake last. I actually like smooth, flavorful cheesecake, but I have found over time that I am picky and end up finding them icky. I tend not to pick it as my treat of choice because it is easy to make icky cheesecake. For me icky has a specific definition when it comes to cheesecake – that slightly rough, bumpy texture that tastes like something vague, usually plastic or paper, and is far from convincing me to think, ‘hmm, I like this’. Enter Big D. He loooooves cheesecake. I actually have not discussed the ‘icky’ version I tend to experience, but he got a sad little look the other day when we saw some cheesecake in the dessert display of a restaurant. ‘Can you make some?’ he asks hopefully. I say ‘yes, of course’, and his face lights up like a kid with a new bike. Don’t even ask me how many bikes he owns; needless to say, I have seen the look on him plenty of times before. Here is my attempt at cheesecake, with no wheat or sugar. I think it turned out pretty smooth and flavorful. No ‘icky’ factor for me this time! I would really disappoint myself if I contributed an icky cheesecake. There is enough of it in the world. And based on Big D’s reaction to eating it, I scored big on getting a repeat of the new bike face.

Limey Cheesecake

Crust
2 cups finely ground almond flour
2 Tbsp coconut flour
2 Tbsp butter, melted
1 tsp Stevita granulated sweetener
1 tsp ground cinnamon
1/4 tsp ground nutmeg
1/4 ground ginger
1 egg white, whisked (save yolk for filling)

Filling
16 ounces cream cheese, room temperature
1/3 cup sour cream
2 large eggs and 1 egg yolk, room temperature
3 Tbsp butter, room temperature
2 Tbsp heavy whipping cream, room temperature
1/3 cup Stevita, granular sweetener
2 large limes, zested and juice separated from meat (use less for milder lime tang)
1 tsp vanilla extract
Fresh berries (optional)

Preheat oven to 325 degrees. In 9″ pie dish cut a round of parchment paper that fits the bottom of the dish. In medium bowl stir together all dry crust ingredients. Add the butter and stir until the ingredients clump. Add the egg white mix until well combined. Crust will still be crumbly. Press crust into dish until bottom and sides are covered. Filling: in large bowl combine cream cheese and sour cream. Whisk together until completely smooth. Add butter and stir again until smooth. Add eggs and yolk, stir to incorporate and until smooth. Add sweetener, lime zest, lime juice and vanilla. Beat until well combined and smooth (see a pattern?). Pour filling into crust and gently smooth surface. Place in oven. Bake for 30-35 minutes, until filling sets. Turn off heat without opening oven door. Leave cake in oven until oven and cake are completely cooled, about two hours. Remove from oven  and chill for at least an hour. Serve plain or with fresh berries.


Baked Crispy Chicken

oven fried chicken

I have seen the use of crushed pork rinds as a ‘breading’ in a lot of different places lately. I was originally going to use our approach to breading we rely on for Scotch Eggs, using golden flaxseed meal, but wanted to try the pork rind approach first. We are usually dark chicken meat people, but our young house guest Skinny D likes white meat, so we caved in and made it too. Adding the variety gave us an opportunity to try three different chicken conditions – dark meat, white meat and skinless ‘tenders’. oven fried chicken panThe results were awesome – the pork rind breading worked on everything! Leftovers were a little soggy when microwaved instead of toasted/baked, but straight out of the oven worked for me as a fried chicken replacement. Big D found it to be a bit lacking in his pursuit of more crunch, but we have ideas to change that. Stay tuned!

Baked Crispy Chicken

8 chicken thighs, with bone and skin
2 chicken breasts, with bone and skin
1/2 cup butter, melted
2 large bags pork rinds
1 cup grated parmesean cheese
1/4 cup parsley, finely chopped
1 Tbsp garlic powder
2 tsp onion powder
2 tsp cumin powder
2 tsp sea salt
1 tsp ground black pepper
1 Tbsp dried oregano leaves

Preheat oven to 350 degrees. Line shallow baking sheets with aluminum foil. Using a blender or food processor cut the pork rinds into small crumbs. Place crumbs in large mixing bowl. Add cheese and spices to the crumbs and stir until combined. Remove bones from chicken breasts while leaving the skin attached, removing separately the long tenderloin pieces along the bone for ‘chicken strips’. Slice chicken breasts in half, making four evenly sized pieces. Season all pieces of chicken with sea salt. One at a time coat each piece of chicken with butter, then thoroughly coat all surfaces of each one wit the crumb mixture. Place each piece, skin side up, on the baking sheets, leaving about an inch of space around each piece. Bake for about one hour, until juices run clear. Serve immediately.

Adapted from Oven Fried Chicken at Buttoni’s Low Carb Recipes.

Tomato Soup

tomato soup

In the past I have talked about gazpacho and tomato artichoke soup, but this one is smoother and just as simple. There is a Little B story behind it. Kid menus in restaurants are horrible, for the most part. Hey kids! Have some wheat bread, some wheat pasta, some breaded stuff and some candy! Oh joy. Just what I want my daughter to consume and ping from for hours. True, there are some places that have good options (some steak houses actually have kid steaks – go figure!). We usually end up ordering vegetable sides or soups for Little B when we eat out. That, or share food we order jointly to share. No problem really, and agreeing on a dish with Little B always comes with negotiations. All of these possibilities work, and heavy reliance on servers who can actually take orders. One of Little B’s favorite restaurant soups is tomato. There are a few places in town that offer it regularly, so she often seeks it out. When we cannot find it we figure something out at the restaurant, then when she still yearns for it, I will whip up a batch of tomato soup at home. I often vary it a bit, depending what is in the fridge, but this is the basic tasty recipe, including bunches of veggies and some cream for fat. She slurps it up and always gives me a big thank you smile. The greatest thing ever.

Tomato Soup

3 14.5 ounce cans diced tomatoes
1/4 cup red wine
2 cloves garlic, crushed
1/4 cup chopped onion
1 stalk celery, chopped
1/2 tsp sea salt
Dash ground black pepper
1/4 tsp turmeric
1/4 cup heavy whipping cream

In medium pot over medium-high heat add all ingredients except cream. Cover and cook until bubbly. Stir, reduce heat to low and cover. Simmer for 30 minutes, until onions and celery are soft. Turn off heat and let cool for about ten minutes. Add cream and stir. Using a stick blender puree the soup until smooth. Alternately, put soup in a blender and puree until smooth. Serve immediately, or reheat but do not boil.


Mixed Meat Omelet

mixed meat omelet_edited-1
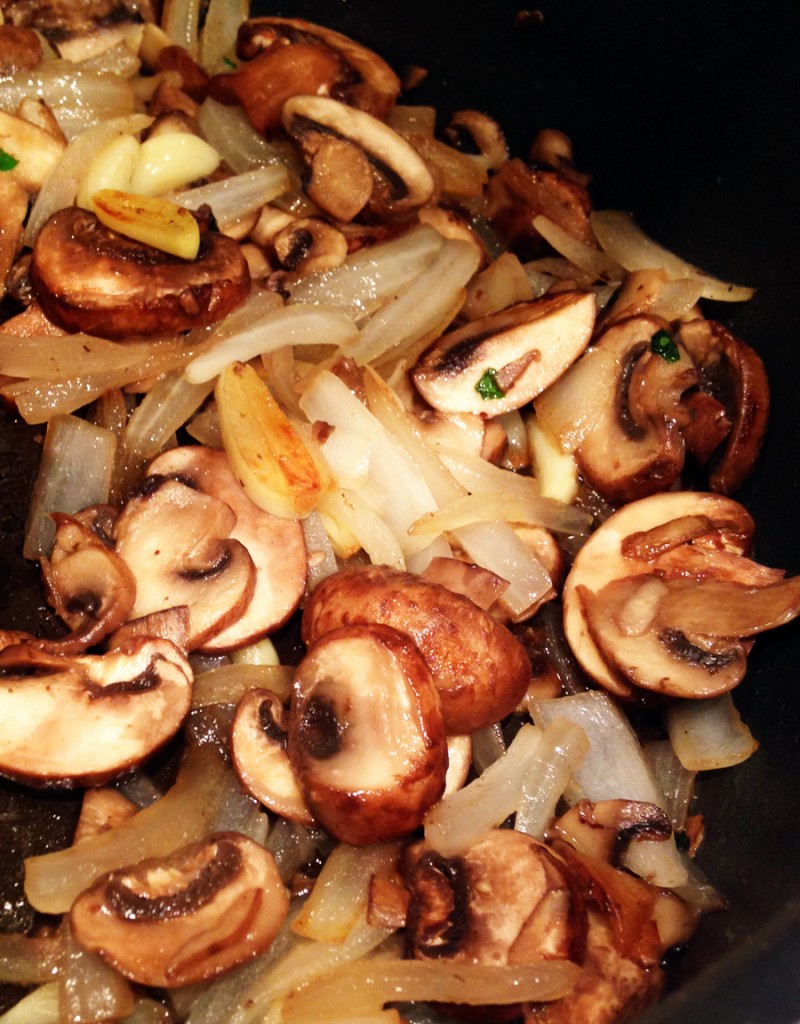
Long long ago I owned an omelet pan. It was a nice omelet pan, used often to whip up the eggy concoctions. Less long ago I got rid of it. Not because it was unused, but in many respects redundant. Can’t the same thing be done with a frying pan? Over the years we have stocked and unstocked kitchens in our travels and moves. Often the ‘specialty’ devices get purged. You know what I mean – items that do one thing that can easily be done with another, like an avocado slicer (replaced by knife), smoothie maker (replaced by blender), or egg seperator (replaced by a hand or shell) or a food chopper (replaced by knife), or the omelet pan (replaced by a, well, pan). You get the idea. The omelet pan was sacrificed during one of these purges and not replaced. My omelets don’t look as pretty these days, but they sure taste good, and don’t stick. I am also an advocate for having the ingredients mixed and cooked up with the egg, not placed in the equivalent of an egg ‘taco’, like some restaurants serve – egg part of the omelet gets overcooked separately, then the actual ingredients get dropped in, egg gets flopped over it and served. If I wanted a taco I would order one. Anyway, here is a lovely combination, and my approach to making an integrated omelet, which I also addressed about two years ago with an onion omelet, which is still one of my standards, but tastes totally different. Enjoy both of them!

Mixed Meat Omelet

1 cup mixed leftover meat (in this case, pepperoni, prime rib and kielbasa sausage), cut in small pieces
4 garlic cloves, roughly chopped
1/3 cup finely chopped yellow onion
1 Tbsp bacon grease
4 eggs
Salt and pepper to taste
1 cup grated cheddar cheese
1 batch chimichurri (optional)

Heat bacon grease over medium-high heat. Add onions and garlic, cooking for about five minutes, until they begin to brown. Add meat and heat through. While meat and vegetable cook crack the eggs into a bowl, sprinkling with salt and pepper. Whisk eggs until uniform. When meat and vegetables are ready shuffle the pan so they are evenly distributed on the bottom of the pan. Turn heat down to medium-low. Pour in egg, tilting pan until the entire bottom has a layer of egg. Sprinkle cheese evenly over the top. Cover and cook for a few minutes, until egg begins to set. When edges hold their shape, carefully flip one half over the other. Slide omelet to the middle of the pan and cover, cooking for another minute to let egg set in new position. Turn off heat, cut omelet into three or four equal pieces and serve. Suggest serving with chimichurri, a side of bacon and some bread.

Creamy Baked Asparagus

cremy asparagus

The other day Big D brought home some slim, tender asparagus. They looked wonderful, but were not the best candidates for making our favorite bacon wrapped version. I grabbed some of our pantry staples and created this easy side dish. It ended up very rich, and almost overpowered the smokes salmon we served it with. Not quite, but I will seriously consider serving it with roast pork or beef next time. This would probably work just as well with green beans. Let’s see if Big D comes home with some soon…

Creamy Baked Asparagus

1 bunch slender asparagus
1/2 cup heavy whipping cream
1 egg
1 tsp garlic powder
1/2 tsp onion powder
1 tsp sea salt
1 cup cheddar cheese, grated

Preheat oven to 375 degrees. Chop rough ends off of asparagus spears. Chop the asparagus into 1/2 inch pieces, leaving the tip pieces a little bit longer – makes about three cups of chopped pieces. In a small bowl whisk the egg. Add the cream, garlic powder, onion powder and salt. Whisk until egg is fully incorporated. Place asparagus in 9×11 or 9×9 baking dish. Pour cream mixture over the top and stir slightly to make sure all pieces are coated. Sprinkle cheese on top. Bake uncovered for 30-35 minutes, until cheese is gold and bubbly. Remove from oven and let sit for about ten minutes, until cream mixture is set.


Jalapeno Cheddar Muffins

jalapeno bread

Holy guacamole these things are good! They also go well with guacamole. Or just butter. Or split and used for a sandwich. Or sliced thinly and toasted and used for tea sandwiches…. You probably get that they are very versatile. They are also savory and flavorful. They remind us a lot of the garlic cheddar biscuits a soon-to-be-defunct restaurant chain serves. I don’t actually like their seafood, but love their salads and (used to) adore eating the biscuits. When reheating them just brush on some melted garlic butter and you will see what I mean.

Jalapeno Cheddar Muffins

2/3 cup coconut flour
1/2 cup butter
8 large eggs
1/2 – 3/4 tsp sea salt
1/2 tsp garlic powder
1/2 tsp baking powder
1 1/2 cups cheddar cheese, shredded
3 Tbsp fresh jalapeno, chopped

Preheat the oven to 400 degrees. Whisk together the coconut flour, salt, and baking powder. In another bowl, beat the eggs. Whisk in the melted butter. Add the coconut flour mixture to the egg/butter mixture and stir to combine until it forms a wet dough mixture. Add jalapenos and 1 cup of shredded cheese. Stir until cheese is well distributed. Divide the batter among 12 greased muffin tins or eight mini loaf tins. Sprinkle the remaining cheese on top of the muffins/loaves. Bake for 20 – 25 minutes or until cheese turns golden brown. Let cool slightly before removing from pan.

Mushroom Onion Saute

mushroom onion sautee

I have spoken before about the delicate balance of having side dishes hot and ready when gorgeous meats are pulled off the grill. The grilled meat is best served warm, so everything needs to be ready and waiting! Here is a quick side dish that works with grilled stuff, and frankly, anything that is baking in the oven and needs something on the side. I sometimes forget that sharing main dishes can overshadow the often quick and easy sides, which are not to be discounted or forgotten. I remember when I first began to cook on my own I always though complicated was better tasting, and I was sooooo wrong! Simple is better, but complicated is fun! Try this. Can’t go wrong.

Mushroom Onion Saute

2 Tbsp butter
4 cups mini portobello
1 medium white onion
4 garlic cloves
1/4 cup fresh parsley, finely chopped
Sea salt taste

In medium frying pan over medium high heat add butter. When butter is melted add onion and garlic. Toss until coated with butter and let cook until they release water (sweat). Add mushrooms and parsley. Toss until well mixed and coated. Continue cooking until mushrooms soften and onions begin to brown. Season with salt and cook three more minutes until salt is able to saturate vegetables. Remove from heat and cover until ready to serve. When served with or on top of grilled meats these vegetables soak up meat juices and complement them well.

Spicy Poblano Meatloaf

spicy poblano meatloaf

I know it is only August, but temperatures up here in Alaska continue to be cool during summer and my thoughts already turn to warm, fall dinners. Some of you are walking around in swimsuits trying to survive three digit temperatures and staying in the swimming pool as long as possible. We never put away our jackets and fleece, still needing them regularly, and daylight is down to a paltry 17 hours each day. We actually get to see sunset colors before bedtime! You are allowed to laugh, but regardless of the inspiration, I came up with this meatloaf. I remember when I was a kid I would make fun of the meatloaf my mom would make. Not because it did not taste good, it was awesome. It was just a thing. I was not alone in this form of entertainment – my dad and brother joined in too. They liked the loaf just like me and always had seconds. I am still not sure why we decided to make fun of it, but one day mom had a little too much of the kidding and declared she would not make meatloaf again. She was serious. I don’t remember ever having it again after that night.  Regardless of the edge over which we pushed mom, I still consider meatloaf a childhood comfort food. An important thing to not forget is the smushing of ingredients with hands. There is no way to properly combine ingredients without using hands. Don’t even consider excluding the step. I will probably make a summer salad tomorrow when the temperature gets up to a sweltering sunny 70 degrees, but today I cuddle under a warm blanket with my plate of loafy food watching the fog and rain.

Spicy Poblano Meatloaf

1 1/2 pounds ground beef
2 Tbsp avocado oil
1 poblano pepper, seeded and chopped
1/2 medium onion, finely chopped
3 stalks celery, finely chopped
4 cloves garlic, finely chopped
1 Tbsp chili powder (adjust amount to preferred spiciness)
2 tsp ground cumin
2 tsp cumin seeds
1/2 cup fresh cilantro, roughly chopped
1/4 cup fresh parsley, roughly chopped
2 cups grated cheese (suggest cheddar or colby/monterrey jack mixture)
Sea salt to taste

Preheat oven to 375 degrees. Add avocado oil to medium frying pan over medium high heat. When oil is hot add pepper, onion, celery, cumin seeds and garlic. Sprinkle generously with salt. Stir and cook until soft and browning begins. Add the chili powder, cumin, cilantro and parsley and stir. Continue cooking until liquid is reduced and some browning begins. Set aside mixture and let cool slightly. In large bowl add ground beef, eggs and cheese. With your hands mix together the three ingredients until well combined. Add cooked mixture and combine well. Load the meat into and press firmly in a 9 x 9 square baking dish. Place in oven and bake for one hour, until loaf separates from edges of pan and cheese bubbles up and begins to brown. Remove pan from oven and let cool for about ten minutes, letting the liquid settle. Serve with a vegetable side, like a creamy cabbage collard mix.

Creamed Cabbage Collard Mix

creamy collard cabbageLots of nights I open the fridge to figure out what needs to be cooked sooner rather than later, then I have a guide for our evening meal. Other times I go out on our balcony to see what needs to be harvested from our little container garden to use as a guide. This dish was a result of both guides. There was a partial head of cabbage in the fridge, and the collard greens on the balcony needed to be thinned so the smaller, younger leaves could thrive. The savory combination was a wonderful complement to a spicy meat dish and added the requisite fiber to the meal. I encourage you to grow your own garden, keep your fridge stocked with fresh vegetables and let them inspire what lands on your dinner plate. Cook well, eat well!

Creamed Cabbage Collard Mix

1/2 medium head cabbage, roughly chopped
2 – 3 cups collard greens, stems removed
1/2 cup mayonnaise or 1/4 cup heavy whipping cream
1/2 tsp chili powder
Salt and pepper to taste

Heat a large frying pan to medium-high heat. Add mayonnaise or cream and chili powder. Heat until mayonnaise is melted or cream is bubbly. Add cabbage and greens. Sprinkle generously with salt and pepper. Stir until vegetables are coated. Let cook for about ten minutes, stirring every few minutes until cabbage and greens are wilted, but still slightly crispy. Remove from heat and cover until time to serve.

Stuffed Bell Peppers

stuffed pepper plated

We had some lovely visitors from Texas recently. While they were here we had big plans to cook a lot of stuff for them, but we ran out of meals and time. These bell peppers were still hanging out in the refrigerator after they left, so I needed to do somstuffed peppers panething wonderful and amazing with them. It was not their fault they were usurped by a brunch buffet, grilled ribeye, bacon wrapped asparagus and pizza. I used to never like stuffed peppers. They were often overcooked, filled with flavorless rice and left me hungry. When I first made stuffed peppers for myself I decided they needed to eliminate the unsavory elements. Heh. Get it? Unsavory? Okay, I will stop. I first tried stuffing poblano peppers, which turned out great. This time I worked with the previously spurned colorful bell peppers. Bottom line, I added flavor and subtracted rice. The peppers turned out to be a lively, satisfying meal on a rainy day after much errand running. Next time the peppers will not be second or third fiddle, but instead the first choice. Yummy!

Stuffed Bell Peppers

5-6 bell peppers, any color
1/2 large onion, finely chopped
1/2 pound ground beef
1/2 pound ground sausage
1 egg
1 cup Colby/Monterrey Jack cheese, grated
1 tsp ground cumin
5 garlic cloves, chopped
1/2 tsp sea salt
1/2 tsp ground black pepper
1/2 tsp red chile flakes
1 cup beer (recommend an IPA)
5-6 slices Monterrey Jack cheese
Salt to taste
1 batch chimichurri (optional)

Remove top of each pepper, also removing pulp and seeds from inside. Rinse, shake out excess water and place in 8 x 11 inch baking dish. Divide onions equally among the peppers by dropping them into the bottom of each. Sprinkle onions with salt. In a large bowl combine beef, sausage, egg, grated cheese, cumin, garlic, salt, black pepper and chile flakes. Squishing it all together with your hands is the best method. Firmly press the meat mixture into each pepper until it is level with the top. Bake for 45 minutes. Place a slice of cheese on top of each pepper. Return to oven and bake for an additional 20 minutes, until peppers are soft and cheese begins to brown. Remove from oven and let cool for about ten minutes. Suggest serving drizzled with chimichurri.

Post Navigation