Any Kitchen Will Do

Give me a kitchen and I will cook.

Archive for the category “Takoma Park Kitchen”

Cheese Crisps

cheese crisps

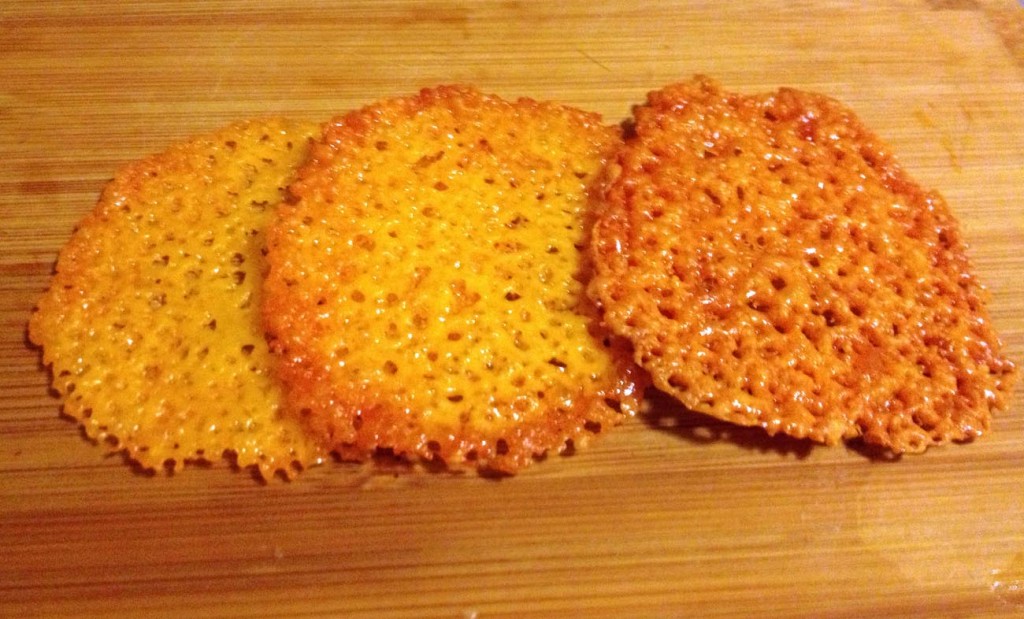
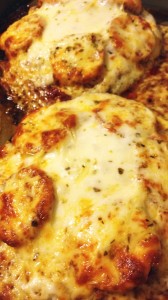
I like chips. I like crackers. Don’t eat much of either anymore, but still crave them. I have tried to make cheesy low carb versions in the past but to no avail and pork rinds just don’t always do it for me. Some experimenting on my own resulted in gooey, stretchy cheese pucks. Delicious, but not crispy. I did some research and found this approach. Perfect! Each pan I cooked for a different amount of time to see how the results varied. As you can see from the picture, I came up with three different types of crackers, in a good way. They were all stiff enough to dip or hold stuff piled on them, but the flavor was very different. I used sharp cheddar, and the sharpness really stood out in the browner, crispier crisps. The ones with the browned edges and lighter middle had a nice crispy and chewy balance, but mostly crispy. The lighter ones were not crispy, but were stiff enough to bend without breaking and make mini tacos. They inspired me to try bigger rounds and cool them in a curved, crispy taco shape. I did the basic sandwich thickness slices of cheese, but plan on trying the shredded, herby versions in the near future. I will update you when I do. When I made these the other night it was just me and Little B we ate every single one, experimenting with dipping and loading the different donenesses to test their capabilities. It was fun, we were very full, and Big D will get his own batch very soon.

Cheese Crisps

1 pound block sharp cheddar cheese
Parchment paper

Preheat oven to 350 degrees. Slice cheese into reasonably thin (like sandwich cheese thick) slices 1 – 1 1/2  inches in diameter. Place slices at least one inch apart on parchment paper on top of shallow baking sheets. Bake for five to seven minutes until the edges just start to brown, or they are brown all over, depending on preference. Remove from the oven immediately. Slide parchment paper off the sheet onto the kitchen counter or other heat resistant flat surface. Let cool. When cool remove crisps to paper towels to soak up lingering grease. Repeat slicing and baking until cheese is gone, because you will eat all of them. If you do have leftovers they can be stored at room temperature in an airtight container.

Portabello Pizza

portabello pizzaThe first time I ever cooked with portabello mushrooms was about 15 years ago. At the time I was making a lot of pizzas closely following my discovery of pizza stones. They make the crust crispy all around and are  great for even cooking. I got into the habit of topping each pizza with two to three veggies and a meat. On some occasions my dinner guests were vegetarians, so minus the meat, but what to add to make the pizza hearty? I explored the produce section of the grocery store and came upon the portabellos – huge caps sitting over a sign that described them as meaty. Well, why not? If they don’t eat meat, why not serve them meaty mushrooms? The pizza with portabellos turned out great, and marinating the mushrooms added an extra layer of flavor. Since my last pizza stone broke and I started leaning toward low carb, I never replaced it. One recent tendency has been to make pizzas with low carb crust, and another is to reach back into my pizza past and snatch up the portabellos. This time I used them as the crust. They are quick and of course Little B can help with every step. Using tomato paste adds a spike of tomato flavor without adding much liquid. The one flaw, but not really, in this recipe is the wetness of the mushrooms. I will continue to explore how to dry out the mushrooms, because they soaked up a bit of liquid and the result is not what I would call hand pizza, but it tasted great. Grab a fork and knife for this flavorful rounds and dig in!

Portabello Pizza

4 large Portabello mushrooms, stems removed
1 Tbsp lime juice
1 small can Italian herb tomato paste (or plain past mixed with 1 Tbsp Italian herbs)
2 tsp dried oregano leaves
2 tsp dried parsley leaves
2 tsp dried basil leaves
2 tsp garlic powder
8 ounces pepperoni, sliced thick
2 cups grated mozzarella cheese
½ cup Parmesan cheese
Salt and pepper to taste

Preheat oven to 350F. Place caps stem side up on baking sheet, then sprinkle with lime juice, salt and pepper. Spread tomato paste on mushrooms, followed by a layer of basil, oregano, parsley and basil leaves, along with garlic powder. Place a layer of pepperoni slices and top with mozzarella and Parmesan cheeses. Bake for 20-25 minutes, until mushrooms are tender and cheese is melted and browning.

Non Vodka Chicken

non vodka chicken

I have been absent for a bit, and so has chicken from my blog. I am always trying to find variety, because chicken is always chicken, and absence makes the heart grow fonder, right? Busy work and busy weekends made for a quiet kitchen lately, and the repeating of old, reliable recipes. Also, Big D has been on a culinary swing while I go about other things. Work is busy, and spending a bunch of time outside in the heat makes me groggy, so hanging out reading books to Little B is much more appealing than a hot oven or stove. This recipe I almost called pizza chicken, because when Big D first took a bite he said it reminded him of pizza. Did the same for me! I was inspired by my hankering to inhale a bowl full of pasta with vodka sauce. The thing about vodka sauce is not necessarily the vodka, but what it does to the flavor of the tomatoes. The vodka, when used, actually soaks into the tomatoes and enhances their flavor with a tart tanginess. The alcohol itself evaporates. If you have had the sauce before you know what I mean. If not, then imagine a mild bloody mary – a skidge of pepper and hot sauce – not to ferocious, but an extra bite beyond plain tomato. I decided to try to find the same flavor as the vodka sauce, but without the vodka. What else could I do with a hankering for vodka sauce while experiencing an absence of vodka? It was my own fault. I used the last of it from our stash to make a Greyhound (vodka and grapefruit juice with a twist). A little bit of this, a little bit of that resulted in the sauce taste I was looking for to go on top of chicken, and then I made it chunky, a la pizza. Yum!

Non Vodka Chicken

1 Tbsp butter
8 ounces mushrooms, roughly chopped
1/2 tsp sea salt
1/4 onion, finely diced
4 ounces chopped black olives
3 cloves garlic, minced
1 – 14.5 ounce can fire roasted diced tomatoes
1 – 15 ounce can tomato sauce
1 Tbsp dried parsley leaves
2 tsp dried oregano leaves
6 – 8 chicken thighs, skin trimmed, but some left on meat
4 ounces cream cheese
2 – 3 tsp Crystal hot sauce

In medium sauce pan over medium high heat melt butter. Add mushrooms, salt, olives and garlic. Saute for about five minutes until mushrooms and garlic soften and butter browns a bit. Add tomatoes and tomato sauce, parsley and oregano. Stir and lower heat. Let simmer for about 15 minutes. While sauce simmers place chicken thighs in frying pan over medium high heat, skin side down. When skin is crispy flip thighs, turn down heat to medium and cover. While chicken cooks finish the sauce. Add cream cheese to the sauce and stir occasionally until cheese is melted and sauce is smooth (except for vegetable chunks, of course). Sprinkle one to two teaspoons hot sauce and stir. Taste to confirm there is a tang in the sauce, but not necessarily a bite. If no tang, then add more hot sauce. Simmer for about 15 more minutes. When chicken is cooked through and juices run clear, remove from heat and let rest. Remove chicken from pan and place on serving dish. Pour sauce over chicken and serve immediately.

Chef Salad

chef salad

I am avoiding a serious subject. A hot oven. I try to avoid it as much as possible in the Takoma Kitchen.  For one, it is an electric oven, which heats up very differently than gas, and regardless of electric or gas, it also makes our little place pretty warm. Here is one of the concoctions I do that does not take much stove or oven heat. The original chef salad is very American, originating in Pennsylvania or New York, depending on which claims you believe, first created in the 1930s or ’40s. Throw a few types of meat and cheese on a plate with a boiled egg and dressing and there you have it, a salad with a bunch of stuff on it so you don’t have to make a bunch of choices. I like the approach on a hot summer evening, and the reduced exposure to even more heat is a plus. Technically, the bacon and eggs require heat to prepare, but they are often left over and already in the fridge. That, or I send a heads up message to Big D and he takes a break from work and cooks up a pan of rashers while boiling some eggs ‘the way grandma did them’, with the shells practically falling off in the pan. Dinner can be custom made on each plate and put together pretty quickly – Little B gets eggs, bacon, cucumber and tomato, while Big D gets an extra pile of meat with ranch dressing, and I get a little bit of everything, especially the pepper jack cheese.

Chef Salad

6 ounces thin cut roast beef
6 ounces thin cut roast turkey
6 ounces thin cut virginia baked ham
4 ounces sliced swiss cheese
4 ounces sliced medium cheddar cheese
4 ounces sliced pepper jack cheese
8 ounces grape tomatoes
2 ounces baby portabello mushrooms, sliced
2 mini cucumbers, sliced into coins
2 – 4 medium boiled eggs, sliced in half
6 slices bacon, cooked and chopped
8 ounces raw baby spinach leaves, rinsed and dried
4 – 6 ounces salad dressing (traditionally French or Thousand Islands)

On two large dinner plates divide the spinach and spread evenly. Slice cheese into ¼ inch wide strips. Roll each slice of meat individually. Alternate cheese strips and meat rolls in a circle on top of the spinach bed.  Arrange the mushrooms, tomatoes and cucumber coins between the cheese and meat. In the center of the salad place the egg halves. Sprinkle bacon over top of salad. Serve immediately after drizzling with preferred dressing.

Strawberry Lemon Cake

strawberry lemon cake

Little B turned four and is taking it very seriously! There are a number of things she won’t do now that she is older than three. It is fun and serious to watch her work it all out. A couple of years ago we started a tradition of doing a family out of town trip to a beach for her birthday. We continued it this past weekend by dipping our toes in the Atlantic Ocean. A challenge for these trips is having a sugar free, wheat free cake ready and waiting for her on THE day. Last year we succumbed to a wheaty, chocolaty concoction from a store near the beach. We got a sugar buzz, while also feeling guilty about not following our diet rules. Rules are made to be broken, yes, but with consequences. She pinged and ponged, then crashed. Not fair to a body, but we did it anyway. I solved it this year by making this strawberry lemon cake and waiting to put it together the day of, thanks to a fridge in the hotel room. It traveled well and thankfully I packed a knife for spreading of the frosting and cutting of the pieces.  Worked like a dream and the whole thing was inhaled by us all. We kept to our food rules, had fun, and no sugar/wheat crash. Besides the princess paraphernalia (ugh) and first bicycle (yay), the cake was a favorite. She wanted a strawberry cake with strawberry frosting. Instead of repeating the cupcakes we made a while back I decided to try a cake with almond meal. I thought the almond and lemon would go wonderfully with the strawberries. The result had a much different texture compared to the coconut flour concoction we came up with before – good, but in a different way. The cake came out dense, very strawberry, very moist and nice and sweet, just like the birthday girl!

Strawberry Lemon Cake

Cake
4 Tbsp butter
3 eggs
4 medium strawberries, cored and chopped
1 tsp vanilla
1 lemon, juiced with meat
1 cup almond flour
½ cup golden flaxseed meal
¼ tsp salt
½ tsp baking soda
2 cups granulated erythritol
1/8 tsp pure stevia powder
½ cup small quartered strawberries

Frosting
1 package cream cheese, room temperature
1/2 cup butter, room temperature
1 cup granulated erythritol
1/2 cup pureed strawberries

In medium pan over medium heat melt the butter. Continue cooking it until the butter is brown and fragrant. Remove from heat and set aside. Preheat oven to 350 degrees. In a blender add eggs, cored and chopped strawberries, vanilla and lemon juice with meat. Blend until combined and strawberries are pureed. Add almond flour, flaxseed meal, salt, baking soda, erythritol, stevia. Blend some more until you have a smooth batter. Stir in butter until well combined. Line the bottom of a 9-inch round baking dish with parchment paper. Pour batter into pan, then drop strawberries into the batter, distributing them evenly. Bake in preheated oven for 25 – 30 minutes. The time may vary based on the juiciness of the strawberries. Remove from oven and let cool in the pan. When cool gently flip cake out of pan and place on serving dish. Frost as desired – I used the strawberry cream cheese version above – combine all ingredients together and whip until smooth. It may need to be chilled for a few minutes to firm up before spreading on the cake. Keep cake refrigerated if room temperature is over 75 degrees. Enjoy!

Adapted from here.

Salmon Patties

salmon patties
I got nostalgic on this one, in many respects. I was craving salmon and began remembering the patties my mom used to make with the canned stuff when I was little. I liked them, but always got a little shiver when I came across one of the soft, yet still crunchy pieces of bone from the canned salmon. I still recall not being able to decide whether the shiver was fun or not. The soft bone was easily chewable but always a surprise in the otherwise non-chewy dish. Another nostalgia point was from my time living in Juneau, Alaska. In late summer and early fall the salmon pile up on each other in an effort to swim upstream and practically jump out of the water into your arms. You have to make sure they are not aiming for bear arms, but after the all clear on the bear front, you can just grab the slippery suckers. Needless to say, even if you don’t fish there is a bounty of salmon, from ‘dogs’, also known as chum salmon, to the sweet, naturally bright red meat of the sockeye salmon. Living in Juneau you are surrounded by fisherpeople who get their maximum catch as often as they can and they share share share. It can be smoked, steamed, grilled, marinated, chopped, dried, jarred, canned….which brings me to this recipe. For this recipe I used canned pink salmon, which in this case is wild caught from Alaska. Not ideal, compared to the taste of the stuff that was swimming in the creek this morning, but effective in my effort to combine the nostalgie, and the fact that the only fresh salmon found in Maryland is Atlantic. Sigh. And as Big D said, these were the first salmon patties he ever had that were not dry and Little B enjoyed them, too. Score!

Salmon Cakes

1 can pink salmon, drained with spine and other bones removed
1/3 cup plain Greek yogurt
3 eggs
1 lemon, juiced with meat included
½ – 2/3 cup golden flaxseed meal
½ tsp sea salt
½ tsp dried dill
1 tsp dried thyme leaves
1 tsp dried parsley leaves
1 clove garlic, crushed
½ cup coconut oil

In medium bowl add salmon and break it up into small flakes. Make a pool in the middle of the salmon and drop in yogurt, eggs, salt, thyme, parsley, garlic and dill. Whisk together egg, lemon juice and yogurt mixture with a fork until eggs are broken up. Toss egg mixture with salmon until combined. Add ½ cup of the meal and stir. Let sit for a minute or two. While you wait add the coconut oil to a medium skillet and heat to medium high. If the salmon mixture is not thick enough to drop into the oil and hold shape as patties (thicker than pancake batter, thinner than, say, tuna salad) add some more meal and stir it in until thicker. Drop a large spoonful of mixture into the skillet and gently flatten so it is of even thickness and about two inches in diameter. Cook until the patties set and begin to brown on the edges, about 2 minutes. Gently flip the patties and cook for another minute or two. Repeat process until all the patties are cooked. Serve with zucchini wedges or other veggies.

Cucumber Cilantro Cooler

cucumber cilantro cooler

Cilantro is best when fresh leaves and stems are used. As usual, I bough a bunch of it for a Tex-Mex feast we made the other night, kind of like this one, and some was left over. Also as usual I dropped the extra cilantro in a jar with water to keep it fresh as long as possible. It was still staring at me, and it was the cocktail hour, so I looked for some beverage ideas. I enjoyed my Whiskey Watermelon from a few days ago, so why not?! Here is what I came up with. It came out fresh, tangy and perfect for a hot, humid July evening. I got the idea from here and tweaked to my taste. I also made a version with tequila for Big D and he very much enjoyed it, so if you are not a vodka drinker try it with your liquor of choice.

Cucumber Cilantro Cooler

½ cup chopped cucumber, seeds removed
Small handful of fresh cilantro
2 ounces vodka (I use Tito’s, made in Texas)
1 lime (or 2 key limes), juiced
1 tsp granulated sucralose
Ice
¼ to ½ cup Seltzer water (optional)

Add chopped cucumber to a cocktail shaker along with a large handful of cilantro leaves. Muddle well, and then add vodka, lime juice, sucralose and ice almost to fill the shaker. Shake well for twenty seconds and then strain into a lowball glass filled with ice. If you want to make the cocktail a little less powerful, strain it into a taller glass and top with a splash of seltzer, then stir quickly. Garnish with a wheel of cucumber and a sprig of cilantro. Sip sip sip!

Post Navigation