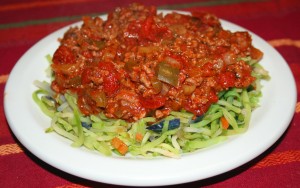
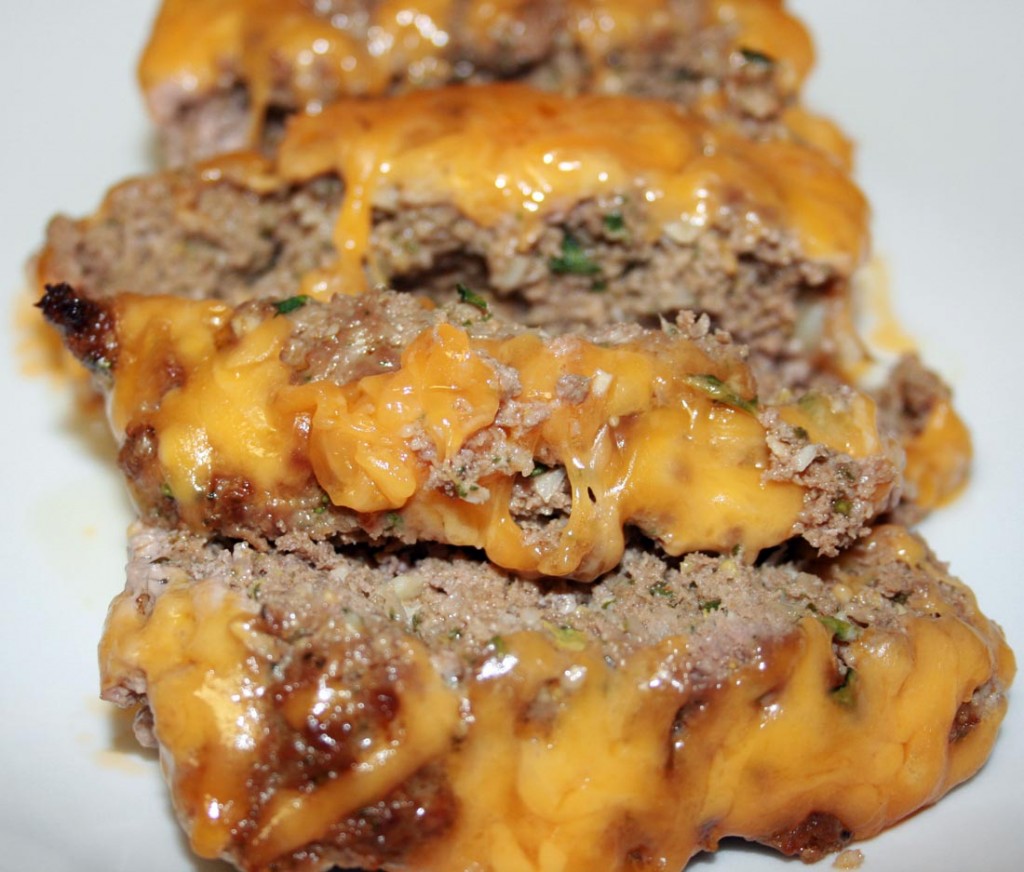
Any Kitchen Will Do

Give me a kitchen and I will cook.

Archive for the category “parsley”

Veggie Meatloaf


veggie meatloaf

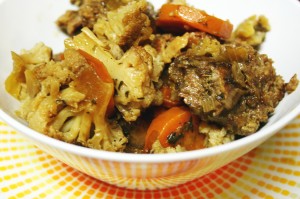
For the most part I don’t have to hide veggies in food to get Little B to eat them. She goes after most of them with a vengeance or by way of an earnest request. Like her all time favorite snack, frozen broccoli “trees”. Yep. Straight out of the freezer. They started out as something to gnaw on when she was teething, but survived as a favorite long after. We try to offer her vegetables every chance we get, even in restaurants, in spite of the restaurants efforts to fill her otherwise. The kid menus at most places include breaded chicken tenders, pasta, sad little mini burgers or a hot dog. Besides being loaded with carbs and often deep fried, such offerings have little nutritional value or variety to expand little palates. More often than not we end up ordering soup or a side of vegetables for her from the non-kid menu. She dives right in. A few times I have tried to order the kid food, but she finds the food as unappealing as I do. It is refreshing to go to a restaurant and actually see smaller versions of the food offered on the rest of the menu, like 1/4 rack of ribs at a barbeque joint, or a kid size version of seafood at a seafood joint. What a concept! I rant because our travels recently have taken us to new restaurants in new places, and I am reminded that sometimes it is not easy to keep Little B eating our version of healthy away from home. This recipe actually stemmed from my desire to use up the vegetable odds and ends in the fridge. It worked very well, held together like meatloaf tends to not want to do. On top of it all Little B ate it up in spite of not being one of her favorite veggies – frozen broccoli, green beans or squash.

Veggie Meatloaf

1 ½ pounds ground beef
2 Tbsp tomato paste
2 stalks celery
1 carrot (or 1 ½ cups mini carrots)
1 small yellow onion
2 cups fresh spinach
4 cloves garlic
3 eggs
½ cup fresh parsley
1 Tbsp dried thyme leaves
1 tsp ground cumin
1 tsp sea salt
½ tsp ground black pepper
1 tsp paprika
1 cup sharp cheddar cheese, grated

In a blender or food processor add tomato paste, celery, carrot, onion, spinach, garlic, eggs, thyme, cumin, salt, pepper and paprika. Pulse until vegetables are very small pieces and herbs are combined. In large bowl combine beef and vegetable mixture. With your bare hands mix meat and vegetables until all the meat is coated and the vegetables are combined with the meat. Press mixture into rectangular bread pan. Bake at 350 for 45 – 55 minutes, until cooked through. Sprinkle top of loaf with cheese and place in hot oven with heat off for five to ten minutes, until cheese is melted. Remove from oven and let rest for about five minutes. Slice in pan, arrange on serving tray and serve.

Gazpacho

20130609-080341.jpgLook at me diving into summery goodness! I am not a real big fan of summer heat, which is only kind of funny, considering I grew up in Texas, where hot and humid are the name of the game for half the year. Maryland has its share of hot and humid, but for only a fraction of the Texas time, thank goodness. After a particularly rainy week we landed ourselves in the RV for a mostly warm, sunny weekend. Such a weather change inspired me to make a nice, cold soup to go with our fire seared meaty dinner. I stocked up on some fresh vegetables, threw them in a blender and waited, not turning on an oven or firing up a single burner on the stove. The meat got cooked over the fire pit as the sun set, making for a beautiful summer meal at twilight and grand evening of simple, refreshing food.

Gazpacho

2 pounds ripe tomatoes, coarsely chopped
1 small cucumber, peeled
1/2 red bell pepper, seeded and chopped
3 garlic cloves, crushed
1 cup fresh cilantro, loosely packed
1/2 cup parsley, loosely packed
1/2 sweet Vidalia onion, coarsely chopped
1/2 tsp sea salt
1/8 – 1/4 cup sherry

Combine all ingredients except sherry into a blender or food processor. Pulse until combined and all pieces uniform size. Add 1/8 cup sherry and pulse again to combine. If you like chunkier soup like me don’t pulse further. For smoother soup, continue pulsing to desired texture. Depending on the sweetness of the tomatoes and onion you may need more sherry and/or salt. If you are not sure, chill soup for about an hour and taste before deciding to add more. Chill at least two hours or overnight before serving. Garnish individual servings with any combination of tomato/cucumber/bell pepper/herbs you wish.

Steak in Tomato Spinach Sauce

sauteed beef with tomato and spinach sauce

We are moving soon. Again. Not a big move for now, just a short term local move before a bigger move. We don’t know when or where the bigger move will occur, but want to be ready, which means not signing a long term lease or making a real estate purchase. A move translates into me trying to clear out the fridge, freezer and pantry. The less I have to move that is perishable or heavy, the better. This recipe used the last big can of tomatoes from the pantry and some stray steak from the freezer. I like never-been-frozen steak straight off the grill, but if it has been frozen I don’t mind baking or broiling or smothering it in sauce. I like how the tomato and spinach made the sauce nice and rich. Serve it next to or on top of some baked spaghetti squash. I ate too much. Roll me on over to the couch!

Sauteed Steak with Tomato and Spinach

1 Tbsp extra virgin olive oil
½ medium yellow onion, roughly chopped
3 cloves garlic, roughly chopped
2 cups fresh spinach
12 – 14 ounces tomato puree
½ cup dry red wine
2 tsp dried oregano
2 tsp dried parsley
1 tsp ground thyme
1 tsp sugar or sweetener equivalent
1 ½ Tbsp butter
1 pounds thin steak
Salt and pepper to taste

Slice steak against the grain into bite-sized pieces, then season generously with salt and pepper. Set aside. Roughly chop spinach into 1-inch pieces. In medium pot over medium-high heat add olive oil. When oil is hot add onion and garlic. Cook until onion and garlic begins to brown, about two minutes. Add spinach and toss with onion and garlic until most of it wilts, about three minutes. Add oregano, parsley, thyme, tomato, sugar/sweetener and wine, then stir. Lower heat to simmer, and cook uncovered for about ten minutes until it begins to thicken. Cover sauce and cook for 20 – 30 more minutes. Set aside. Right before the simmer time is over heat a shallow saute pan over high heat. Add the butter. Just before it begins to brown add the meat and toss until coated with butter. Continue tossing until steak is cooked to desired doneness (for me about 3 minutes for medium rare). Remove from heat. Add the meat to the sauce, stir and continue simmering for about five minute. Salt to taste. Serve immediately over spaghetti squash, pasta or rice.

Baked Spaghetti Squash with Cheese and Herbs

baked spaghetti squash with cheese and herbs

This stuff is just plain cute. Besides being yummy, serving it in the squash skin makes it fun to eat! I remember when I first had spaghetti squash. My mom served it under spaghetti sauce and said it was just like pasta. That caused the problem – unintended, but problematic. I expected some slight mushiness that started to soak up the sauce. What I got was slightly crunchy strings that mixed with the sauce, but did not absorb. I did not find it appealing after the first encounter. Flash forward a few years.  I tried spaghetti squash again, with the expectation of squash, not pasta. It tasted lovely, absorbing the garlic and herbs tossed with it, instead of futilely attempting to soak up marinara. Now that I think back at the two experiences it reminds me to be realistic with Little B when she is trying something new. We often introduce new foods to Little B that may look like other stuff she has had, but will feel and taste different. For example, when you eat regular or instant pudding, then are given chocolate chia pudding, you will have different experiences. They both taste good, but the texture is very different, not to mention the expansive difference in nutritional value. Honestly, I sometimes generalize and refer to most meats as ‘roast’, because she likes roast and it is easier. When it is truly something new I try to describe it for her so she is more willing to not spit it out. When she likes something new she really likes it, but as she gets older she is actually less inclined the try something new. I think it is because of her natural desire right now to display her independence more than not wanting to try something new. I hope it is temporary because she likes spaghetti squash and it is so much better for her than pasta. My ultimate goal is to have new experiences be positive for her. Not always fun or ideal, but result in some learning experience that will move her forward, for the world is full of new experiences. There will be many more new food experiences in her life and I want her to jump into them feet, or mouth first with passion. I know it has made a world of difference for me!

Baked Spaghetti Squash with Cheese and Herbs

1 spaghetti squash
1 Tbsp extra virgin olive oil
Salt to taste
1 tsp garlic powder
½ – 1 cup mozzarella cheese, grated
¼ – ½ cup Parmesan cheese, grated
1 tsp dried oregano
2 tsp dried parsley

Preheat oven to 375 degrees. Cut squash in half lengthwise and remove seeds. Drizzle olive oil on the halves and use your hands to spread it all over the exposed meat of the squash. Place halves face down on baking sheet. Bake for 30 – 45 minutes until inside of squash is soft, but not mushy. Reduce oven temperature to 350 degrees. Flip over squash halves, carefully hold the hot squash with a mitt or towel. Using a fork, scrape the squash meat off the skin, but leave it in the shell. Sprinkle the squash with salt and garlic powder, then gently toss the meat within the skin. Sprinkle with a little more salt. Divide mozzarella on each half, followed by the oregano and parsley. Finish with sprinkling the Parmesan cheese on top. Return squash to oven on baking sheet, cheese side up. Bake for 15 – 20 minutes, until cheese is melted and beginning to brown. Remove from oven and serve immediately – small squash can result in an entire half being a side dish, while larger squash may need to be cut into quarters for serving.

Cucumber Goat Cheese Bites

cucumber goat cheese bites

I always love goat cheese, but somehow missed eating it lately. I recently tried to remember the first time I had it – the tart, smooth experience flirting with my tongue. I think it was in Golden, Colorado, while lunching in a little cafe in the historic downtown area. For the life of me I cannot remember the name. I would know it if I saw it again, but since I am Maryland at the moment, such an ability is not very helpful. It was spread on a chicken sandwich, in lieu of mustard or other condiments. I remember leaning on the table with my eyes closed, staring at it, wondering where the cheese had been all my life. Granted, I was only 25 or so, but it seemed such a long time to have been without goat cheese! I may have eaten it before, but passed it off as some other ingredient. Since that chicken sandwich I scour menus for it and grab packages now and then from the store. I get unreasonably excited when a restaurant offers a dollop on top of an otherwise basic green salad, or includes it in a cheesy dippy appetizer. My friend over at What’s For Dinner started on a goat cheese kick recently and, inspired, I now eagerly follow suit. On top of the goat cheesiness hankering, the warmer weather is upon us and I am looking to make some cold dishes. Here is a simple cold appetizer, or green salad substitute, that combines flavors my family and I love. The black olives are especially for Little B, who has adored them ever since Great Aunt Debby stuck them on her chubby little one-year-old fingertips.

Cucumber Goat Cheese Bites

1 English cucumber, washed with peel on
5 ounces goat cheese, room temperature
1 tsp dried parsley leaves
½ tsp dried basil leaves
½ tsp garlic powder
5 – 8 extra large black olives, drained and patted dry
Salt and Pepper to taste

Cut cucumber on the perpendicular, to create 1/3 to ½ inch thick slices. Scoop out an indentation about ¼ inch deep on one side of each slice, allowing for the cheese filling to anchor itself. You can use a small melon baller or 1/2 teaspoon scoop. Stir together cheese, parsley, basil and garlic. Sprinkle indentation and top of cucumber slices with salt and pepper. Using a spoon place some goat cheese mixture on top of each slice, filling the indentation and creating a smooth mound on top. Slice olives in half lengthwise, then place a half on top of each cucumber slice. Chill until served.

Rootless Pot Roast

rootless pot roast_edited-1

Pot roast without carrots and potatoes? Well, yeah. I wanted to make a pot roast but without the added carbohydrates from carrots and potatoes. I could cook it all together then not eat the root vegetables, but they would be so sad, and so would I. Instead I added cabbage and onion to soak up the zesty flavors and compliment the meat. Of course, after so much cooking time the roast was falling apart and the vegetables were almost dissolved. It made for a rich, smooth sauce with a hint of veggies. Some gently steamed lime infused broccoli on the side worked wonders and loved the sauce. As my grade school companions would say, KISS – Keep It Simple Stupid. Always a good, yet slightly crude and blunt piece of advice.

Rootless Pot Roast

3-4 pound beef chuck roast
1 medium yellow onion, roughly chopped
½ large head green cabbage, roughly chopped
6-8 ounces tomato paste
2 cups water
1 Tbsp garlic powder
1 Tbsp onion powder
2 Tbsp dried parsley leaves
1 Tbsp dried thyme leaves
2 tsp cumin powder
2 tsp sea salt
1 Tbsp paprika

In a medium bowl combine tomato paste and water. Stir until paste is dissolved. Add all the spices and continue stirring until combined. It will actually thicken. In a crock pot add a layer of vegetables using half the onion and cabbage. Add the roast and pour the sauce on top. Sprinkle the rest of the vegetables over the roast. Cover and cook on high for 5-7 hours or on low for about 10 hours.

Dad’s Spaghetti Sauce

dads spaghetti sauceYou may not have noticed, but earlier this month I began a greenish/Irish theme, which will lead us up to St Patrick’s Day and beyond. Last year I covered traditional stuff like corned beef and cabbage, colcannon and the less traditional but politically symbolic white chocolate frito popcorn. This year I started with coleslaw, which has green cabbage, followed by some chicken with the green of spinach, then the Dublin Coddle, with a slightly more Irish leaning. I really enjoy St Patrick’s Day. Not only because I am about 87% Irish, or that I have a dual citizenship, or that it is another excuse to drink a little too much, but also because when I was growing up we laughingly called everything my dad made ‘Irish’. Irish popcorn, Irish fajitas, Irish potato salad, Irish steak…you get the idea. The dishes did not necessarily have a historically Irish origin, but because a big Irishman with blue eyes put effort into making it for his loved ones. My dad’s specialties were typically products from the outside charcoal grill. He cooked meat exceptionally well. Whether it was fajitas, steak, chicken or a whole passel of meats in his tower smoker – ribs, ham, turkey, roast – if it used to walk he could cook it, and it tasted great. He was the reason I rarely ever ordered steak in a restaurant until I moved out of the house. Restaurant steak always tasted salty, but not flavorful. I know most of his secrets, and I may share them one day, but today is not the day. Today I share with you his spaghetti sauce. One of his two significant non-grill, non-smoker dishes. In case you were wondering, his other dish was potato salad. Now on with the spaghetti sauce. I have done other tomato-based sauces, but this one is consistent with what he always made. Huge batches filled a big old aluminum pot that simmered on the stove top all day. It smelled heavenly, especially walking into a warm house on a cold, wet Texas day. It smelled like comfort, which is what I often sought on a wet Saturday after playing soccer or doing yard work. When I got older I helped him make it, discovering his penchant for perfectly sized chopped veggies and just the right combination of herbs. Another thing about his sauce – he rarely used fresh ingredients. I don’t consider it a good or bad thing. The sauce was always full of flavor and satisfying. He grew up during the Great Depression, which I think established for him certain habits, including the stockpile of canned and dried goods. You should have seen our pantry when I was growing up – we never failed to have fresh meat, fruit or veggies, but if we didn’t there were always canned. I still love the taste of canned spinach and pineapple – separately, of course. I recognize the canned and dried elements in this recipe. I don’t think you can beat the finished product very easily. I have made a version of this from scratch – fresh tomatoes, fresh herbs…it was good, but you know, after cooking it for so long, I could hardly tell the difference. Maybe it was because I tweaked it until it tasted like Dad’s version, or maybe because after enough cooking the fresh version tastes like the Hunt’s canned version. On top of everything else, I found a great new base to hold the sauce – broccoli slaw. In the past I have used traditional spaghetti pasta, gluten free pasta, spaghetti squash and just chopped sauteed squash. This time I saw some broccoli slaw on sale at the store – it is basically broccoli stems cut julienne and packaged with a bit of carrot and red cabbage. I microwaved it straight from the freezer for five minutes to soften, salted it then set it on a plate and topped it with sauce. The texture worked great – not pasta-y, but definitely a strong texture that worked with the sauce. It is my new favorite to pour things over. I can imagine a decadent cheesiness next time, or maybe some kind of lasagna concoction…

Dad’s Spaghetti Sauce

2 Tbsp extra virgin olive oil
1 small white onion, chopped
6 cloves garlic, crushed
1 pound ground beef, 15% fat or less
1 medium green bell pepper, chopped
3 stalks celery with leaves, chopped
1 tsp sea salt
½ tsp ground black pepper
2 Tbsp dried parsley leaves
1 ½ Tbsp dried oregano leaves
1 Tbsp dried basil leaves
42-56 ounces Hunt’s brand canned diced or plum tomatoes
6 – 8 ounces tomato paste
1 tsp truvia, or one small pinch of pure stevia
More salt to taste

In a deep stock pot heat to medium high and add olive oil. When oil is hot add onions and garlic, saute until the onion sweats (gets shiny and releases liquid). Add ground beef. Break meat up with a wooden spoon and saute until browning begins, but not until it is completely cooked. Add bell pepper, celery, salt, pepper, parsley, oregano and basil. Stir and cook until vegetables begin to soften. Add tomatoes and stir some more. Bring to a boil, cover, reduce heat and simmer for 2 hours (or more). Sprinkle in sweetener, to bring out the tomato flavor, and stir well. For an additional 30 minutes to an hour simmer with the top tipped so steam escapes. The sauce should thicken noticeably. Turn off heat and cover. Let sit until ready to serve, or cool to room temperature and refrigerate overnight. If you double or triple the recipe there will be plenty to freeze in reasonable portions. Reheat slowly on the stove top. Serve over your preferred base – either al dente pasta, spaghetti squash, or my new favorite, cooked broccoli slaw.

Dublin Coddle

dublin coddleI adore the name of this dish. And oh my flippin’ floopie, it is rich and delish! It reminds me of a chilly, rainy day I spent in Dublin many years ago, popping into a pub to warm up a bit with some food and drink. I did not have a coddle, but the feeling was the same. It totally has a comfort food vibe, and is considered such in Ireland. I thought of it with St. Patrick’s Day coming up and my Irish-ness starting to raise it’s head here in my blog. It is called a coddle because of the slow simmering manner of cooking the dish. Dublin, of course, comes from the popularity of the dish in the Dublin area. I read one place once that the convenience of slow cooking the one-dish meal and the ease of keeping it warm in the oven has a logical basis – it allowed for a warm meal to be ready for the man of the house when he came home late from the pub, after the rest of the family was already in bed. Heh. From my experience there are almost as many variations of this dish as there are mothers and grandmothers. Just like in the US there are delicious recipe variations for meatloaf, chicken soup and apple pie, each cook makes it their own way. I probably committed some form of blasphemy by excluding potatoes from my version of this dish, but we are stubborn about our use of cauliflower as a potato substitute in our diet, so I happily blasphemed. The results were like a beef stew. I know, I know, there is no beef in the recipe. It is just a bunch of pig. That is what I thought! I think the beer mixes with all the other juices and just makes a darned rich broth that is reminiscent of beef broth. Sooooo good! A layer of thinly sliced potatoes as the top layer is the more traditional route, so I included it as an option in the recipe. I thought the quantities would serve four, but we did not have any sides, just a big bowl of coddle. Since there were so many veggies and protein in the coddle it ended up being healthy servings for two very hungry people. If you are not serving sides with the coddle I would recommend doubling the recipe for a party of more than three.

Dublin Coddle

8 slices thick bacon
6 thick pork sausages (mild Italian or ideally some Irish bangers)
1 Tbsp butter
1 large yellow onion, roughly chopped
3 cloves garlic, sliced
1 cup water
1 head cauliflower or 3 medium potatoes
1 large carrot
1 12-ounce beer or hard cider
1 Tbsp dried parsley leaves
2 tsp dried thyme leaves
Salt and Pepper to taste

Cut bacon into 1-inch pieces. In a large frying pan cook the bacon over medium heat until browned. Transfer cooked bacon to Dutch oven. In bacon grease over medium high heat add sausages and cook until browned, but stop before they are completely cooked through. Cut the sausages into one-inch pieces and transfer them to the Dutch oven. In what is left of the bacon grease add the butter. When the butter is melted add the onion and garlic. Saute until onions are softened but not browned. Transfer onion and garlic to Dutch oven. You are now done with the frying pan. Salt and pepper the stuff in the Dutch oven to your liking, then pour in the water. Slice the carrot into coins, no more than ¼ inch thick. Chop cauliflower into bite-sized floret pieces, or peel and slice potatoes, no more than ¼ inch thick. Add to the Dutch oven a layer of carrot, followed by a layer of cauliflower. You may not need the whole head of cauliflower, but there should be an even layer of it over the top of everything else. If using potatoes make an even layer of slices on top, overlapping them so the other ingredients are substantially covered. Sprinkle the parsley and thyme on top of the cauliflower/potatoes, followed by salt and pepper to your liking. Add the beer or cider. The liquid in the Dutch oven should come up to about the middle of the pot and not totally submerge all the ingredients. Cover the Dutch oven with a tight fitting lid or two layers of foil. Place in 400 degree preheated oven and cook for 45 minutes, then turn heat down to 325 degrees and cook for another 1 to 1 ½ hours, until the cauliflower/potato layer is soft and ready to eat. Turn off the oven and leave the coddle inside it until time to serve. It will stay hot for quite a while.


Meaty Fritatta

meaty frittata

Yep. We are on a run of two meals a day. Not because we are watching calories or anything, but because we are having big holiday lunches or dinners, or leftovers of big holiday lunches or dinners, so any other meals are simple and small. For example, we have quick plates of eggs and greens, or a plate of antipasto because of a big meal happening later. Here is a meal that can use leftover meats and will keep you filled until “the” big meal later. A fritatta is easy to put together while also giving you (aka, me) a few minutes sit and sip some coffee while it cooks, but before digging in. Besides the holiday balancing of big meals, this is something we have on weekend mornings when we are not exactly sure what to do for the day. It is a great time to sit and ponder what we are going to discover in the world with Little B. The awesome part these days is that Little B is very vocal about what she wants to do, and not do, so having a conversation with her about our activities while brunch cooks is pretty darned cool.

Meaty Veggie Fritatta

2 Tbsp extra virgin olive oil
4 cloves garlic, chopped
½ sweet onion, finely chopped
8 ounces sausage, roughly chopped
8 ounces ham or bacon, roughly chopped
1 cup broccoli, finely chopped
8 eggs
¼ cup fresh basil, chopped
1 Tbsp dried oregano
1 tsp dried parsley
½ tsp ground cumin
½ tsp sea salt
¼ tsp ground black pepper
2 cups shredded cheese, a combination of cheddar, colby jack, monterrey and pepper jack

In large frying pan add oil over medium heat. When oil is hot add garlic and onion. Cook until they begin to brown. Add sausage, ham and broccoli. Toss and cook until broccoli begins to wilt. In medium bowl while meat is cooking add eggs, basil, oregano, parsley, cumin, salt and pepper. Whip until eggs yolks and whites are combined and spices are mixed up. When meat is ready add eggs and stir until meat mixture and eggs are combined. Turn heat down as low as possible and sprinkle cheese on top. Cover pan and cook for ten to fifteen minutes, until eggs are set and cheese is melted all the way to the middle. Remove from heat and leave covered for about ten minutes. Uncover and slice into wedges. Serve with fresh fruits and vegetables.

Bacon Wrapped Thanksgiving Turkey

To all fellow bacon lovers – what may be even better than wrapping steak or jalapenos or chicken breasts in bacon? Turkey! The end result may not look like the quintessential golden skinned turkey, but boy is it moist and flavorful! Our traditional method is to use a smoker to do the turkey, along with whatever appetizers we crave, like stuffed mushrooms, and even throw in the occasional bunch of jalapenos, tomatoes and onions, which make a smokin’ salsa. Our current living situation, at the top of an apartment building, is not conducive with smoker use. We didn’t want the landlord following the trail of smoke and nagging us about rule breaking. A quick searing of steaks on the balcony grill is one thing, but eight or so hours of trailing smoke is more than what we thought we could get away with. We went ahead and did an oven version this year. I am curious about how this recipe would work in a smoker, but we will have to find out another time. It was fun to do the bacon wrapping and watch the bacon get dark and crispy. Instead of having the typical crispy skin to eat, we had a blanket of bacon. The skin kind of melted into the meat, becoming part of the bacon. I am not sure how it happened, but the results were very satisfying. I got the idea from here, but made adjustments, since we are particular about fresh herbs for Thanksgiving, even though we often rely on the dried stuff most of year. The bird was stuffed with carrots, celery, onion, garlic and the herb combination that turned out wonderful. There are various versions of this recipe with comments about soft bacon, but I don’t know what they are talking about. As you can see, there is a crispy shell on it and the meat is well cooked and moist and wonderful. If you follow my instructions you should be able to get the same results. Enjoy!

Bacon Wrapped Thanksgiving Turkey

One 15-pound turkey
1 cup fresh parsley leaves
½ cup fresh tarragon leaves
½ cup fresh sage leaves
¼ cup rosemary leaves
10 cloves garlic, peeled and crushed
½ cups olive oil
4 cups vegetables, including carrots, celery, onion and garlic
3 pounds bacon, sliced into thin strips

Wash the turkey inside and out and pat dry. Place in refrigerator for at least an hour uncovered to cool. Preheat the oven to 500 degrees. Mix together the herbs, minced garlic and olive oil to make a paste. Rub the paste in the cavity and underneath the skin of the breasts of the turkey, carefully so you do not tear the skin. Fill the cavity with the vegetable mixture, and place in a roasting pan. Add 1-2 cups of water in the roasting pan, so there is about ¼ inch of water, then roast the turkey in the oven for 30 minutes. Remove from the oven and turn the heat to 350 degrees. Cover the turkey in the bacon slices, in cross-hatch form* or just by overlapping the slices in strips. Insert a meat thermometer in the thickest part of the breast. Put the turkey back in the oven and continue to cook for about 20 minutes per pound (about three hours total, including the high temperature period) until an internal thermometer temperature reaches 160 degrees. 

*To do the cross hatch on top and bottom there can be preparation while the high temperature cooking happens. Take two pieces of wax or parchment paper, about two feet long each. Create the cross hatch by alternating bacon pieces into one foot by one foot sections. After the turkey finishes the first half hour of cooking, move the turkey to a surface where juices can drain. In the baking pan flip one of the cross hatch sections into the dish and spread it out. Place the turkey on top, then flip the second cross hatch on top. Between the wings and legs connect the cross hatch edges as much as reasonably possible. Wrap the wings and legs with bacon strips, making sure to cover all the meat and skin. Add a few more pieces on the top and bottom of the cross hatch pattern to cover all surfaces of the turkey.

Post Navigation