Any Kitchen Will Do

Give me a kitchen and I will cook.

Archive for the category “Uncategorized”

Secret Muffins

secret muffin
Little B and I have a wonderful opportunity to start spending more time together for a while. I guess that would be an obvious (to me) wonderful consequence of quitting my job. Of course part of the time will definitely be spent doing stuff in the kitchen. In recent months she has randomly thrown together fruit and veggies with cheese and called it soup. While some has been yummy, other batches not so much. Knowing that I often share kitchen experiences on my blog, she insisted this time I don’t share the recipe. It must be kept a secret! I cannot tell you we puréed a banana and berries, using them to substitute for butter, and then doubled the sweetener in some microwave muffins. At least I will stop short of listing all the ingredients or tell you how to cook them. I am a bad person, but they were soooo good!

Junky Nuts

junkynuts

No, this is not a promotion for a porn movie. It is much less provocative. This recipe is actually based on some family traditions from both my and Big D’s relations. It reminds both of us of holidays we have always celebrated in November and December. Why am I writing about it in March, you ask? Because this is when I start missing some of the holiday food traditions, like snacks and eggnog. Our little family actually keep ‘holidays’ going from November 1st through March 17th. It stretches so far because things like Samhain, birthdays, Mardi Gras, Candlemas (Imbolc) and the Vernal Equinox (Ostara). We officially take a holiday break between St. Patrick’s Day and Easter before the build up for May Day (Beltane). It is a pretty short break this year (less than three weeks), but it is long enough to develop a hankering for holiday smells and flavors. Specifically, an ubiquitous snack mixture. Big D’s family called it Trash, mine called it Junk – the savory combination of square cereal pieces, pretzels, nuts and cheese crackers baked in a buttery Worcestershire sauce. This exclusively nut version takes out the wheaty, grainy bits and lets the saucy flavor shine while keeping the crunch. The sauce sticks to the nuts and creates salty black bits that linger in nut wrinkles. We started the habit years ago of keeping some type of flavored nuts around as a quick, ‘good fat’ snack for when hunger strikes. I first made this version a few months ago and now I automatically make a batch every week. I don’t know what this means for next November when the holiday season begins again, if we continue to eat them year round. Maybe we will have to come up with some other holiday snack tradition and keep it special, for I am pretty sure I am un-special-ing this one, but for a good cause. Regardless, I think it will all turn out okay, time will continue to turn and holidays will still come and go. Crunch on everybody!

Junky Nuts

4 cups raw walnuts
3 cups raw pecans
2 cups shelled peanuts (raw or roasted)
1/2 cup butter, melted
1/2 cup Worcestershire sauce
1 Tbsp garlic powder
2 tsp onion powder
1 Tbsp sea salt
1/2 tsp ancho chile powder

Preheat oven to 300 degrees. Add melted butter in a large bowl along with the Worcestershire sauce, garlic powder, onion powder, salt and chile powder. Stir until combined. Add walnuts, pecans and peanuts. Toss nuts until they are all coated. Spread nuts evenly in one layer on shallow baking sheets. Bake for ten minutes. Remove from oven and toss nuts so they are all flipped. Return to oven and bake for ten more minutes. If you are baking multiple sheets at once you should switch their positions in the oven. Remove from oven and let cool completely on the sheets. They will look damp at first, but will dry as they cool. Store in airtight container at room temperature.

Three Year Tapenade

tapenade

Happy Blogiversary to me!!! Rarely do I pursue things for long periods of time…consecutively. I do something, then I stop, then I do it again, then I begin something new…you get the idea. It is not that I leave things incomplete, but I will find a stopping point and then go in another direction. My longest recorded continuous successes are people related – being a daughter, a brother a friend, being hitched to Big D over ten years and being mommy to Little B for over five years. Other stuff, like jobs and hobbies are more in the realm of come-and-go. I think I can definitely say that this blog is getting some longevity – a few days ago I started my fourth year, so I have passed my third blogiversary! When I started three years ago it was intended to be a place to put recipes so I could get to them easily. My cookbooks did not always make the cut when we moved and consolidated, so my creations would sometimes be lost. Tracking it on a blog let me combine the availability I wanted, my desire to do some writing and my continued joy in taking pictures. It has become more than just a place to record my food journey, but that of my little family as well. It is a place where others can come and experience it with us. The blog has given me the opportunity to share stories of my childhood, my family, friends and our geographic journeys. The name of it came from the fact that I cook in whatever kitchen I come across.  If the kitchen is not mine the owners so far have generously shared their space with me. Thanks goes out to them and to you for checking in on occasion!

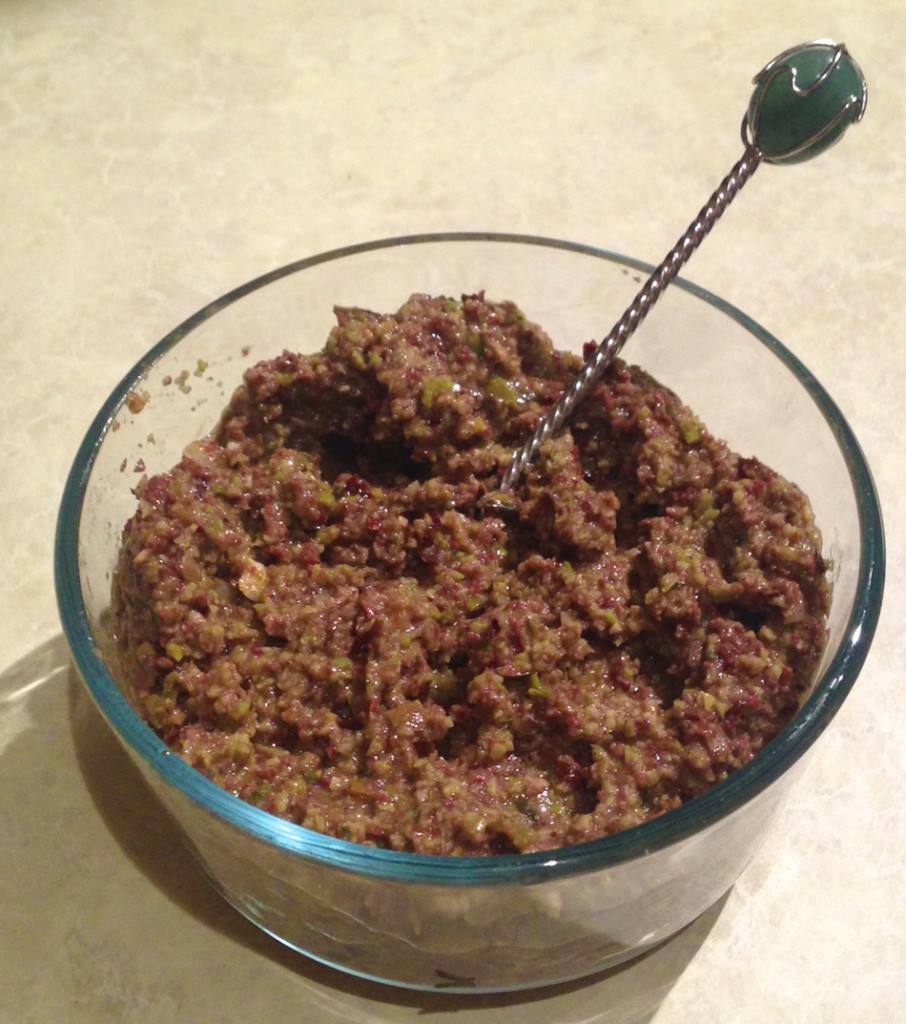
I celebrated the end of the first year with cheese stuffed jalapeno halves. Yum! The second year I did it with low carb cinnamon rolls. Double yum! This year I am taking a different slant, with a New Orleans theme.  I am taking a more savory slant this year with some tapenade. It is very easy and very flavorful. If you ever have a bunch of partially full jars of olives, like we often do, it is a great way to use them.

muffaletta
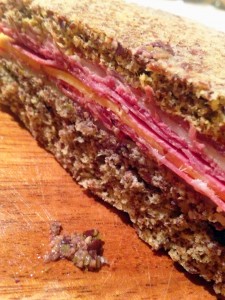
This is not the first time I have mentioned my family’s love for New Orleans. The New Orleans connection is the lovely sandwiches that first introduced me to tapenade when I was a kid. Muffuletta sandwiches are about as common in New Orleans as po’boy sandwiches and gumbo. They originated in the Central Grocery right there on Decatur Street in the French Quarter. When I first had one I could not get enough of the olive ‘salad’ in the sandwich. Between the olives and the meats and cheeses it was a very satisfying meal. To do a version of the sandwich that fits our eating habits I made up some one minute buns in the microwave, whipped up a batch of tapenade in the food processor and opened up a few packages of deli meats and cheeses. The picture to the left does not do it justice, but there is a thick layer of tapenade on the bread that is practically the same color. A blob of the tapenade sits next to it as proof! The tapenade leftovers will not go to waste – I have used it as a dip, a stuffing for chicken, pork and mushrooms. It has an addictive saltiness that, believe it or not, sates my salty snacking craving I used to appease by eating chips. Just a straight spoonful can do the trick! Please make a batch and toast me with a cracker or sandwich full!

Three Year Tapenade

2 cups mixed black and green olives, pitted
3 cloves garlic
1/4 cup small capers
1/4 cup extra virgin olive oil
1 tsp dried oregano leaves
1 tsp dried basil leaves
1 tsp dried parsley leaves
1 anchovy fillet (optional)

Place all ingredients except the olive oil into a food processor. Slowly add the olive oil in a stream while the mixture is blending on low speed, until mixture is an evenly sized paste. Serve as condiment for sandwiches, or with crackers as a dip. Store refrigerated in an air tight container.

To make a Muffuletta Sandwich: the traditional sandwich layers Italian meats (mortadella, salami, ham) and cheeses (mozzarella, provolone) in an alternating pattern, so there is a thick pile of it in the sandwich. The traditional bread is a large round focaccia-type loaf about 10″ in diameter, which can actually make about four sandwiches. On one side of your bread (or low carb individual muffins in our case) spread a thick layer of the tapenade. Layer your meats and cheeses until there is a healthy pile. Add the other half of the bread. Cut into portions and eat!

Rebellious Ratattouille

image

I think this is ratatouille but some people may find it lacking. What I love about it is the combination of flavors I get from the alternating, thinly sliced vegetables in a single bite. I like bell peppers in general, which are usually included in this dish, but I don’t like the taste and texture they add to the other veggies used here, so I left them out. Look at me being a ratattouille rebel. A neat thing about this recipe is it can be doubled and tripled easily by adding more sliced vegetables and a larger pan. It also makes for a lovely presentation in a serving dish or on your plate.
Rebellious Ratattouille
1 medium zucchini
1 medium yellow squash
1 medium onion
3 large Roma tomatoes
1 14.5 ounce can diced tomatoes
2 cloves garlic, crushed
1 Tbsp dried oregano leaves
1 Tbsp dried parsley leaves
1/2 tsp sea salt
1/4 tsp ground black pepper
In a medium pot over medium heat add the canned tomatoes, garlic, oregano, parsley, salt and pepper. Simmer for about ten minutes, until heated through and bubbly. Remove from heat to let cool. Preheat oven to 375 degrees. While sauce simmers prepare the vegetables by slicing them thinly, less than 1/8 inch thick. Sprinkle slices with salt and pepper. Removing seeds from tomatoes is optional. Using a stand or stick blender purée the tomatoes ito a smooth sauce. In a loaf pan pour a thin layer of tomato sauce (you will probably have leftover sauce). Alternate the slices of zucchini, yellow squash, tomatoes and onion, placing them in two long rows in the pan. Bake for 30 minutes, cover pan with foil and bake for an additional 15 minutes. Remove from oven and let sit for 5 minutes before serving.

Limey Cheesecake

limey cheesecake

Of all the desserts in all the homes and restaurants and coffee shops I have visited, I am likely to pick cheesecake last. I actually like smooth, flavorful cheesecake, but I have found over time that I am picky and end up finding them icky. I tend not to pick it as my treat of choice because it is easy to make icky cheesecake. For me icky has a specific definition when it comes to cheesecake – that slightly rough, bumpy texture that tastes like something vague, usually plastic or paper, and is far from convincing me to think, ‘hmm, I like this’. Enter Big D. He loooooves cheesecake. I actually have not discussed the ‘icky’ version I tend to experience, but he got a sad little look the other day when we saw some cheesecake in the dessert display of a restaurant. ‘Can you make some?’ he asks hopefully. I say ‘yes, of course’, and his face lights up like a kid with a new bike. Don’t even ask me how many bikes he owns; needless to say, I have seen the look on him plenty of times before. Here is my attempt at cheesecake, with no wheat or sugar. I think it turned out pretty smooth and flavorful. No ‘icky’ factor for me this time! I would really disappoint myself if I contributed an icky cheesecake. There is enough of it in the world. And based on Big D’s reaction to eating it, I scored big on getting a repeat of the new bike face.

Limey Cheesecake

Crust
2 cups finely ground almond flour
2 Tbsp coconut flour
2 Tbsp butter, melted
1 tsp Stevita granulated sweetener
1 tsp ground cinnamon
1/4 tsp ground nutmeg
1/4 ground ginger
1 egg white, whisked (save yolk for filling)

Filling
16 ounces cream cheese, room temperature
1/3 cup sour cream
2 large eggs and 1 egg yolk, room temperature
3 Tbsp butter, room temperature
2 Tbsp heavy whipping cream, room temperature
1/3 cup Stevita, granular sweetener
2 large limes, zested and juice separated from meat (use less for milder lime tang)
1 tsp vanilla extract
Fresh berries (optional)

Preheat oven to 325 degrees. In 9″ pie dish cut a round of parchment paper that fits the bottom of the dish. In medium bowl stir together all dry crust ingredients. Add the butter and stir until the ingredients clump. Add the egg white mix until well combined. Crust will still be crumbly. Press crust into dish until bottom and sides are covered. Filling: in large bowl combine cream cheese and sour cream. Whisk together until completely smooth. Add butter and stir again until smooth. Add eggs and yolk, stir to incorporate and until smooth. Add sweetener, lime zest, lime juice and vanilla. Beat until well combined and smooth (see a pattern?). Pour filling into crust and gently smooth surface. Place in oven. Bake for 30-35 minutes, until filling sets. Turn off heat without opening oven door. Leave cake in oven until oven and cake are completely cooled, about two hours. Remove from oven  and chill for at least an hour. Serve plain or with fresh berries.


Mixed Meat Omelet

mixed meat omelet_edited-1
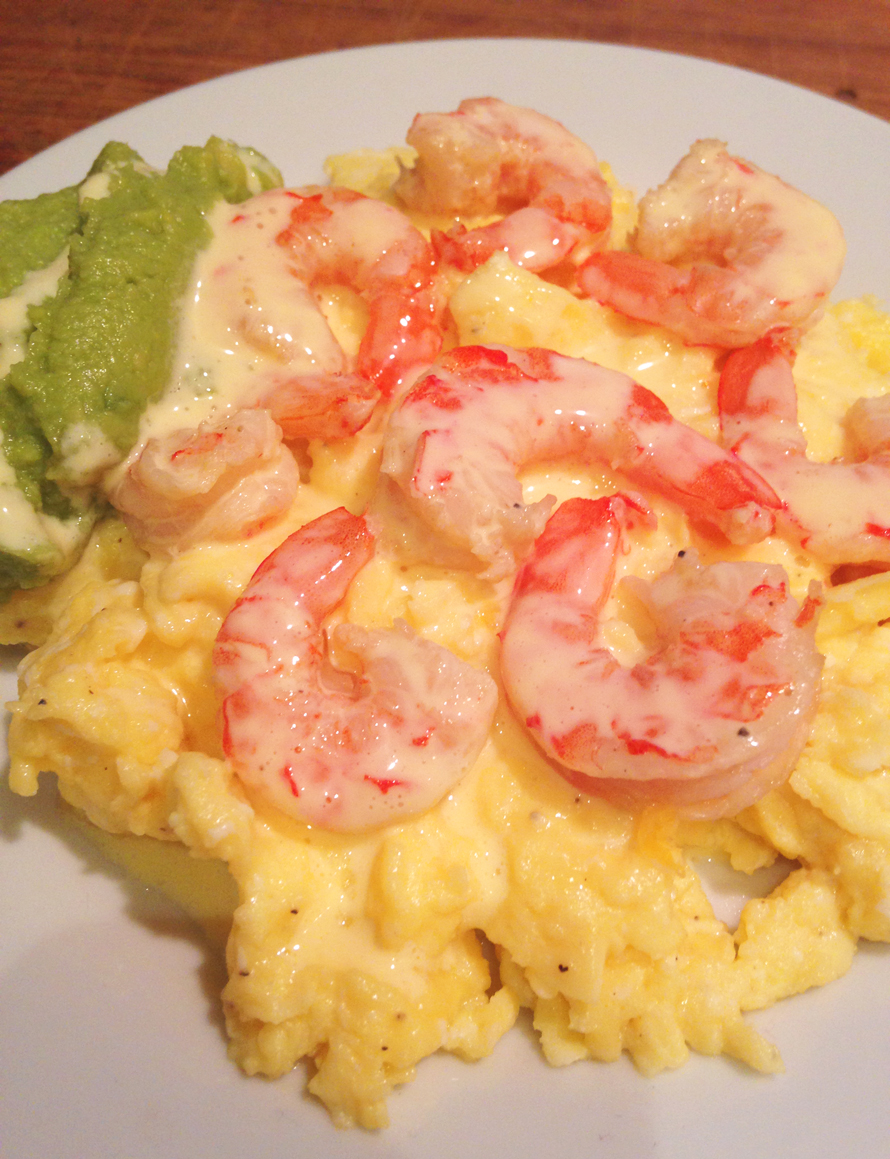
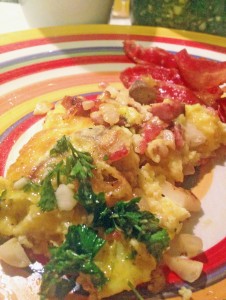
Long long ago I owned an omelet pan. It was a nice omelet pan, used often to whip up the eggy concoctions. Less long ago I got rid of it. Not because it was unused, but in many respects redundant. Can’t the same thing be done with a frying pan? Over the years we have stocked and unstocked kitchens in our travels and moves. Often the ‘specialty’ devices get purged. You know what I mean – items that do one thing that can easily be done with another, like an avocado slicer (replaced by knife), smoothie maker (replaced by blender), or egg seperator (replaced by a hand or shell) or a food chopper (replaced by knife), or the omelet pan (replaced by a, well, pan). You get the idea. The omelet pan was sacrificed during one of these purges and not replaced. My omelets don’t look as pretty these days, but they sure taste good, and don’t stick. I am also an advocate for having the ingredients mixed and cooked up with the egg, not placed in the equivalent of an egg ‘taco’, like some restaurants serve – egg part of the omelet gets overcooked separately, then the actual ingredients get dropped in, egg gets flopped over it and served. If I wanted a taco I would order one. Anyway, here is a lovely combination, and my approach to making an integrated omelet, which I also addressed about two years ago with an onion omelet, which is still one of my standards, but tastes totally different. Enjoy both of them!

Mixed Meat Omelet

1 cup mixed leftover meat (in this case, pepperoni, prime rib and kielbasa sausage), cut in small pieces
4 garlic cloves, roughly chopped
1/3 cup finely chopped yellow onion
1 Tbsp bacon grease
4 eggs
Salt and pepper to taste
1 cup grated cheddar cheese
1 batch chimichurri (optional)

Heat bacon grease over medium-high heat. Add onions and garlic, cooking for about five minutes, until they begin to brown. Add meat and heat through. While meat and vegetable cook crack the eggs into a bowl, sprinkling with salt and pepper. Whisk eggs until uniform. When meat and vegetables are ready shuffle the pan so they are evenly distributed on the bottom of the pan. Turn heat down to medium-low. Pour in egg, tilting pan until the entire bottom has a layer of egg. Sprinkle cheese evenly over the top. Cover and cook for a few minutes, until egg begins to set. When edges hold their shape, carefully flip one half over the other. Slide omelet to the middle of the pan and cover, cooking for another minute to let egg set in new position. Turn off heat, cut omelet into three or four equal pieces and serve. Suggest serving with chimichurri, a side of bacon and some bread.

Creamy Baked Asparagus

cremy asparagus

The other day Big D brought home some slim, tender asparagus. They looked wonderful, but were not the best candidates for making our favorite bacon wrapped version. I grabbed some of our pantry staples and created this easy side dish. It ended up very rich, and almost overpowered the smokes salmon we served it with. Not quite, but I will seriously consider serving it with roast pork or beef next time. This would probably work just as well with green beans. Let’s see if Big D comes home with some soon…

Creamy Baked Asparagus

1 bunch slender asparagus
1/2 cup heavy whipping cream
1 egg
1 tsp garlic powder
1/2 tsp onion powder
1 tsp sea salt
1 cup cheddar cheese, grated

Preheat oven to 375 degrees. Chop rough ends off of asparagus spears. Chop the asparagus into 1/2 inch pieces, leaving the tip pieces a little bit longer – makes about three cups of chopped pieces. In a small bowl whisk the egg. Add the cream, garlic powder, onion powder and salt. Whisk until egg is fully incorporated. Place asparagus in 9×11 or 9×9 baking dish. Pour cream mixture over the top and stir slightly to make sure all pieces are coated. Sprinkle cheese on top. Bake uncovered for 30-35 minutes, until cheese is gold and bubbly. Remove from oven and let sit for about ten minutes, until cream mixture is set.


Spicy Poblano Meatloaf

spicy poblano meatloaf

I know it is only August, but temperatures up here in Alaska continue to be cool during summer and my thoughts already turn to warm, fall dinners. Some of you are walking around in swimsuits trying to survive three digit temperatures and staying in the swimming pool as long as possible. We never put away our jackets and fleece, still needing them regularly, and daylight is down to a paltry 17 hours each day. We actually get to see sunset colors before bedtime! You are allowed to laugh, but regardless of the inspiration, I came up with this meatloaf. I remember when I was a kid I would make fun of the meatloaf my mom would make. Not because it did not taste good, it was awesome. It was just a thing. I was not alone in this form of entertainment – my dad and brother joined in too. They liked the loaf just like me and always had seconds. I am still not sure why we decided to make fun of it, but one day mom had a little too much of the kidding and declared she would not make meatloaf again. She was serious. I don’t remember ever having it again after that night.  Regardless of the edge over which we pushed mom, I still consider meatloaf a childhood comfort food. An important thing to not forget is the smushing of ingredients with hands. There is no way to properly combine ingredients without using hands. Don’t even consider excluding the step. I will probably make a summer salad tomorrow when the temperature gets up to a sweltering sunny 70 degrees, but today I cuddle under a warm blanket with my plate of loafy food watching the fog and rain.

Spicy Poblano Meatloaf

1 1/2 pounds ground beef
2 Tbsp avocado oil
1 poblano pepper, seeded and chopped
1/2 medium onion, finely chopped
3 stalks celery, finely chopped
4 cloves garlic, finely chopped
1 Tbsp chili powder (adjust amount to preferred spiciness)
2 tsp ground cumin
2 tsp cumin seeds
1/2 cup fresh cilantro, roughly chopped
1/4 cup fresh parsley, roughly chopped
2 cups grated cheese (suggest cheddar or colby/monterrey jack mixture)
Sea salt to taste

Preheat oven to 375 degrees. Add avocado oil to medium frying pan over medium high heat. When oil is hot add pepper, onion, celery, cumin seeds and garlic. Sprinkle generously with salt. Stir and cook until soft and browning begins. Add the chili powder, cumin, cilantro and parsley and stir. Continue cooking until liquid is reduced and some browning begins. Set aside mixture and let cool slightly. In large bowl add ground beef, eggs and cheese. With your hands mix together the three ingredients until well combined. Add cooked mixture and combine well. Load the meat into and press firmly in a 9 x 9 square baking dish. Place in oven and bake for one hour, until loaf separates from edges of pan and cheese bubbles up and begins to brown. Remove pan from oven and let cool for about ten minutes, letting the liquid settle. Serve with a vegetable side, like a creamy cabbage collard mix.

Almond Pizza Crust

no flaxseed pizza crust

A long time ago Big D and I started a tradition of pizzabeer. No, that is not a typo. We would go to a spot – whether it was in Alaska, Virginia, Nevada, Texas…wherever we were, we would sit and eat pizza, drink beer and have long, winding talks about where we were going together. Sometimes they were about short term goals, other times they were longer term. Regardless, they were talks over food and beverage. Without some effort it is difficult to have wheat free pizzabeer. When making pizza these days we do it at home and we regularly use a wheat free crust figured out a couple of years ago. It is delicious, but includes flaxseed meal and coconut flour, which gives it a nuttier taste than what we like for some pizzas. This version of a wheat free crust is made by relying on almond meal and cheese. It makes for a crust that can hold the excess of toppings we are wont to use, while not adding a ton of strong flavor. Just think about it – when you eat pizza are you tasting the crust, or is it the toppings? I realized when I was pondering pizza that what I missed most was the toppings, not the crust taste, and the ability to pick up a piece of pizza and take a big bite. There was a simple concept I realized a few years ago when trying to eat healthier – if I am craving a food it was important to figure out what I craved – was it taste, texture, occasion or appearance? The craving focus varies by dish, but it was easy to identify for pizza. Other examples include the creamy of ice cream, the crunch of chips, the heaviness and nuttiness of a piece of bread. Now, back to the crust. We stumbled upon this more subtle tasting version one night when we wanted pizza and were woefully short of coconut flour and flaxseed meal. Necessity is the mother of invention, right? Oh, and look at my new pretty! Big D got me a new pizza stone! It is all fancy with an enamel finish that does not stick and gets crazy hot. Works as well as the more porous versions I have had in the past, but much more versatile.

Almond Pizza Crust

4 cups shredded mozzarella cheese
6 Tbsp almond flour
1 tsp baking soda
2 tsp dried parsley flakes
1 tsp dried basil
1 tsp garlic powder
1/2 tsp onion powder
1 tsp sea salt
2 eggs, beaten

Toppings (Used in the picture)

1/2 cup pizza sauce or tomato paste
1 cup mozzarella cheese and cheddar cheese, grated and mixed
20-24 pepperoni slices
1/2 cup black olives, chopped
Sprinkling of finely chopped basil and oregano

Preheat oven to 450 degrees (if using a pizza stone prepare as directed). Combine together in a medium bowl all ingredients except the eggs. When well combined add the eggs and stir with a fork until a moist dough forms. Spread enough dough onto the pizza stone or baking dish to have a layer about 1/4 inch deep. The pizza stone in the picture needs about 1/2 the dough, and since it is preheated the dough begins to soften as soon as it touches the surface. A stone without an enamel finish may not work with this crust. Bake the crust for no more than five minutes, allowing it to set and just begin to brown. Lower oven temperature to 425 degrees. Remove crust from oven and add sauce, toppings and cheese. Return to oven and bake for 10 – 15 minutes, until top is browning. Let cool for about ten minutes, allowing crust to set and toppings to cool. Slice and serve.

Shrimp Hollandaise on Scrambled Eggs

shrimp hollandaise with eggs

We eat a lot of eggs. Not only are they good sources of protein, they are extremely versatile. Do you want to bake some cookies? Add an egg. Do you want a casserole type macaroni and cheese? Add an egg to thicken it. Do you want a shiny finish on your pie crust? Brush it with an egg wash. Do you want a fun appetizer or side dish? Devil some. Need to feed a crowd of overnight guests? Make a frittata. Do you want a breakfast that sticks to your ribs? Scramble some. You can always throw some meat and cheese into your scrambled egg, but there is always that occasional morning when you want something different. Here is a dish for one of those different days. My original craving was for Eggs Benedict, but I have not yet mastered the low carb English muffin, so I deviated. I figured out that what I was craving was the Hollandaise Sauce. Although not a traditional, more complicated version of the sauce, it was quick to make and ready in advance of the short cooking time needed for the shrimp and eggs. Little B was not very excited about the sauce – she is still young and naive, but she inhaled the eggs, shrimp and guacamole.

Shrimp Hollandaise on Scrambled Eggs

6 eggs
1/4 tsp sea salt
Dash of ground black pepper
1 Tbsp butter
1/2 pound medium shrimp, deveined, shells and tails removed
1/2 lemon
1 tsp sea salt
1 cup prepared guacamole

Hollandaise Sauce
4 oz Butter
2 Egg Yolks
1 Tbsp Lemon Juice
1 Tbsp Water
1/4 tsp salt

For the shrimp fill a medium pot half with water. Add salt, squeeze lemon juice into water and drop the lemon half into the water. Set pot over high heat. While waiting for water to boil for the shrimp, make Hollandaise Sauce. Melt 4 ounces of butter and let cool briefly. While butter is cooling add the rest of ingredients in a blender but do not blend them yet. When butter has cooled a bit spoon out the foamy, bubbly top from butter, leaving the clear, yellow clarified portion. Use only the clarified portion for the sauce. Begin blending the mixed ingredients on low and gradually and steadily add the butter. Let blend for about a minute. Stop the blender. Leave sauce at room temperature until served. If water is boiling add shrimp and cover. Let boil for three to five minutes, just until they turn pink all over. Remove from water and place on towel to drain. In a bowl crack the eggs and add salt and pepper. Whisk until combined. In a frying pan melt butter over medium high heat. Add eggs and stir in the pan until cooked to desired doneness (Big D likes soft so I take his out of the pan first – Little B and I like ours a little more firm). Divide eggs among individual serving plates. Top with shrimp, then drizzle them with Hollandaise sauce. Add a side scoop of guacamole and serve.

Post Navigation