Any Kitchen Will Do

Give me a kitchen and I will cook.

Author Archive

Cinnamon Dough Ornaments

cin ornaments

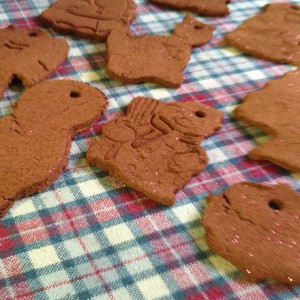
I guess technically you can eat these ornaments, and they get made in the kitchen, so they pass the ‘food blog’ test I arbitrarily created in my head. If you don’t eat them, which I advise, they can make any space they occupy smell WONDERFUL! For days after making these ornaments with Little B the house smelled of cinnamon, then when the ornaments got put on the Christmas/Solstice tree they still smelled wonderful. One of them hanging in my office gets rid of that officy smell, which is not that bad, but nothing compared to cinnamon spice. There is still time before the holidays are over to add some decorations, so dive in and make a batch. Our first roll out was with dough that was too sticky, so the intended shapes got, well, a bit reshaped when transferring them to the pan. They also  cracked a bit when baked. We learned as we went, though, and stiffened the dough up with more cinnamon. The picture shows our mixed results, and you can tell which ones were made with the wet dough compared to the dryer dough. This project appeased my desire to make cut out cookies, didn’t result in sugarbombs sitting around the house begging to be eaten. It was such fun creating glittery ornaments we can enjoy during the holiday season. Stay tuned for a wheat free edible version of cut out cookies, but experiments in that vein continue, and mastery is still pending….

Cinnamon Spice Dough Ornaments

1 ½ – 2 cups ground cinnamon
1 tsp ground clove (optional)
1 cup applesauce
1 Tbsp glitter (optional)

Combine half the ground cinnamon, the ground clove (it will make the dough darker, so decide before adding if you want darker or lighter results), applesauce and glitter. Combine until a dough forms. Add more cinnamon as needed to thicken if it is too sticky. The amount of cinnamon needed varies with altitude and humidity, so keep adding cinnamon until the dough seems crumbly, and you need to knead it for the pieces to stay together. Wet dough will bake brittle and the ornaments will crack, so make sure it is stiff. Roll out the dough and use cookie cutters to shape the ornaments, or cut them out freehand. Use a drinking straw to poke a hole in the ornament, strategically placed, for hanging. Place ornaments on baking sheets covered in parchment paper, or directly on the sheets. Bake ornaments at 200 degrees for two hours, then turn off oven and leave the oven closed until it cools off. Yes, I know you can’t tell if the oven is cooled off unless you open it, but two more hours or overnight should do it. Carefully remove the ornaments from the sheets/paper. Loop string or cord through the hanging holes and decorate something.

Cranberry Roasted Chestnut Muffins

After you do some holiday baking and roast chestnuts on an open fire, you want to do more! We set aside some chestnuts from our recent roasting adventure so I could make these muffins. A recipe for my extra special secret cornbread dressing includes the wonderful inventions of roasted chestnuts and fresh cranberries. I have yet to convince myself to share the recipe, especially since I have not made it in a while, but did recently have a hankering for the flavors that make up the dressing. The evils of corn (it is not the fault of the natural corn, but the sugary nature of the vegetable, which is why I avoid it) have discouraged me from making the dressing in recent years. To recreate the flavor and texture in a corn free way I came up with these muffins. The flax seed gives them the texture that hints at cornbread (and adds extra fiber), while dancing well with the cranberries and chestnuts. Muffins continue to give Little B a sweet treat while keeping her diet high in fiber and low in sugar. She still gets a little confused sometimes when she can have muffins at home and not when we are out, but I have taken to having muffin back ups in my purse for such occasions. She helps make the muffins pretty much every time, which helps keep her interest, and they sate her desire for baked goods. So good so far!!

Cranberry Muffins with Roasted Chestnuts

6 eggs
6 Tbsp butter, melted
4 Tbsp heavy cream or half and half
1 tsp vanilla3 drops liquid stevia
½ tsp sea salt
½ cup coconut flour
¼ cup flaxseed meal
¼ cup powdered erythritol
½ tsp baking powder
8 ounces fresh cranberries
4 roasted chestnuts (can substitute with 10 raw pecan or walnut halves)

Preheat oven to 400 degrees. Prepare muffin pan with liners. In blender add wet ingredients, nuts and cranberries together. Blend on low until cranberries and nuts are broken up in small pieces. In separate bowl combine dry ingredients. Add wet ingredients to dry ingredients and stir just until combined. Divide batter among the 12 muffin cups. Bake for about 15 minutes until tops begin to brown. Let cool for about ten minutes before serving.

Peppermint Bark

I did it again. Had a hankering to make something sweet, delicious and addictive, only to then take it to work and encourage bad habits for my co-workers. There are fancier versions of peppermint bark out there, but I have found this one to be consistent and delish. It can be doubled, tripled, taken to a potluck or divvied among gifts for teachers or neighbors. I warn you to not make it just because you want some. If you are anything like me you will have ‘just a bite or two’ so many times it will suddenly be gone and you are the sole culprit. Either have plans to share it or go ahead and get elastic waist pants. Another warning: don’t confuse peppermint extract and oil – the oil is much more potent than extract, and the results will vary widely, sometimes in a bad way. Yet another suggestion: if you have an energetic young person who wants to help make the bark, hand them the bag of canes and let them whack it on the ground. It will probably do the trick. Happy Holidays!

Peppermint Bark

2 pounds white chocolate chips or roughly chopped white chocolate bark
1 package (about 12) peppermint candy canes
½ tsp peppermint extract or 2-3 drops peppermint oil

Prepare medium sized cookie sheet by lining with parchment or wax paper. Crush candy canes: place unwrapped canes in a resealable bag, then use a rolling pin or tenderizer hammer to break them up, making sure all pieces are less than 1 centimeter long. Set aside candy. Into a medium glass bowl add chocolate. Melt in microwave for one minute. Stir. Continue heating in microwave by using 30-second increments, stirring after each increment. You can also melt the chocolate in a metal bowl over a double boiler with gently simmering water. When the chocolate is warm, smooth and completely melted, add extract or oil and stir well. Pour chocolate onto prepared pan and spread until chocolate is evenly distributed. Sprinkle crushed candy over top and gently press it into the chocolate. Let cool completely at room temperature or in the refrigerator, then break into desired serving sizes – I usually make 2-inch square-ish pieces. Store in air tight container.

Roasted Chestnuts

Chestnuts roasting on an open fire….the opening to one of the most wonderful winter songs ever. So many times in recent years I was actually unable to find fresh chestnuts! This year I found some at the store and snagged a bag. While my wonderful MIL Sherry and forever BFF Kelley were here for a visit we were able to fulfill the cliché.

The coals were still glowing red after Big D seared steaks and we had a red meat feast. We had a blast roasting them, and after they cooled just enough we were able to peel them. We could tell they were done when the shell where they were cut started curling up and away from the nut. It was great evening and the chestnuts made for quite a treat. Sherry and Kelley had never roasted chestnuts. We flitted around the kitchen enjoying the process and savoring the flavors of the nuts. Preparation of the nuts is similar to garlic – the outer shell is removed, then the thin membrane right on the nut itself needs to be removed. As my lovely daughter concluded, they look more like brains, which are food for the zombies. Does it help that they are nested in a nice bed of young greens? Maybe not. I don’t want to know how badly we have distorted her mind, but Shaun of the Dead is a most awesome movie. Roast up some chestnuts this winter, or find a street vendor who did the work for you. It is a flavor that will linger and you will never forget.

Roasted Chestnuts

Roasting pan or grilling grid for fish
Open fire or grill with glowing embers
12 – 24 raw chestnuts

With a sharp knife make a criss-cross cut into one side of the nut shell. Roast over an open fire until the cut sections curl away from the nuts and start hissing. The nuts are a bit like popcorn – as you roast them they can go from roasted to burned in about two seconds, so watch carefully, otherwise they might burn. Remove from fire. Let cool just until they can be handled. Peel off outer shell and remove the brown membrane, until the tan colored nut is exposed. The roasted nut should be about the color of a peanut and the texture of a walnut. Eat immediately or freeze/refrigerate for use with chocolate fondue, in recipes and on salads.

Pumpkin Pie No Sugar No Wheat No Problem

A pumpkin pie with a crispy crust and moist custard, full of spices and sweet pumpkin. A quintessential dessert around my house during the holidays. We like serving it chilled, and mine is usually topped with some freshly whipped cream. I like making it first thing in the morning so the house smells wonderful all day. Little B is becoming quite a pro at stirring, so the custard was a joint effort this year. Sometimes I use fresh pumpkin, other times I resort to canned stuff. I have discovered over the years that the fresh stuff needs a little more spicing to get that just right balance of flavors in the pie. Big D likes his pumpkin pie extra spicy and wheat free, while I want it sugar free with a flaky crust. This recipe met all four requirements! My next wheat free, sugar free pie will be pecan. Stay tuned!

Pumpkin Pie No Sugar No Wheat No Problem

Crust
1 1/2 cups almond flour

1 tsp ground cinnamon
1 Tbsp splenda
4 tablespoons butter, melted

Custard

15 ounces puréed pumpkin
1 Tbsp ground cinnamon
1 tsp ground ginger
½ tsp ground cloves
¼ tsp nutmeg
½ tsp salt
¾ cup splenda
2 large eggs
1¼ cups heavy cream

Heat oven to 375ºF. For the crust, mix together the almond flour, 1 tsp splenda and butter until combined. Press mixture into an 8” or 9” pie plate and refrigerate for at least 30 minutes. In a medium bowl whisk pumpkin purée, splenda, cinnamon, ginger, cloves, and salt to combine. Mix in eggs, one at a time. Add heavy cream and mix well. Pour custard into pie crust. Cover crust edge with aluminum foil. Bake for about 40 minutes, or until filling is set but still a little jiggly in the middle. Cool on a wire rack.


Soupless Green Bean Casserole

I like holiday meals. Partly because of all the lovely foods we don’t make during other times of the year, but also because the meals often require cooking all day. Darn. Heh. We like spending time in the kitchen. Besides keeping us close to the alcoholic beverage supplies, it is a place where we have great conversation and create or try new things. This is a good thing, in my opinion. Besides a huge bird, or a massive ham, I always look forward to green bean casserole. There is something about the beans and the creamy sauce and the occasional mushroom bits all swirled together in a single bite. This version of the casserole does not include the crunchy fried onions, because of the wheaty carbiness of them, but it still turned out to appease my comfort food craving for the soupy, crunch version. I don’t know how well this would work with whole fresh beans, but with the canned french style the sauce coated every bit very well and the richness I love so much was able to shine through. I am not partial to all the extra stuff they put in canned soups, as I have ranted about before, so I am always glad to figure out versions of comfort foods I enjoy with out the canned stuff. Big D got a little perturbed at how much I liked the green bean casserole over the flaxseed dressing, which was pretty good. His holiday comfort food goes back to his grandmother’s dressing, filled with biscuits, cornbread, apples and sage. I don’t know that he ever gave green bean casserole a second thought before we got together. What can I say, I am a green bean casserole girl. Have I mentioned I like green bean casserole? That last one was for Big D.

Soupless Green Bean Casserole

2 Tbsp butter
1 Tbsp coconut flour
1 tsp salt
1 tsp erythritol
1/4 cup onion, diced
2 cups mushrooms, diced
1 cup sour cream
1 Tbsp Worchestershire sauce
3 cans green beans, drained
2 cups shredded Cheddar cheese

Preheat oven to 350F. Melt 2 tablespoons butter in a large skillet over medium heat. Stir in flour until smooth, and cook for one minute. Stir in the salt, erythritol, onion, Worcestershire sauce and sour cream. Add mushrooms. Cook mixture until mushrooms sweat and liquid reduces by about 50%. Add green beans, and stir to coat and heat. Transfer the mixture to a 9×9 casserole dish. Spread shredded cheese over the top. Bake for 30 minutes, or until the top is golden and cheese is bubbly.

Bacon Wrapped Thanksgiving Turkey

To all fellow bacon lovers – what may be even better than wrapping steak or jalapenos or chicken breasts in bacon? Turkey! The end result may not look like the quintessential golden skinned turkey, but boy is it moist and flavorful! Our traditional method is to use a smoker to do the turkey, along with whatever appetizers we crave, like stuffed mushrooms, and even throw in the occasional bunch of jalapenos, tomatoes and onions, which make a smokin’ salsa. Our current living situation, at the top of an apartment building, is not conducive with smoker use. We didn’t want the landlord following the trail of smoke and nagging us about rule breaking. A quick searing of steaks on the balcony grill is one thing, but eight or so hours of trailing smoke is more than what we thought we could get away with. We went ahead and did an oven version this year. I am curious about how this recipe would work in a smoker, but we will have to find out another time. It was fun to do the bacon wrapping and watch the bacon get dark and crispy. Instead of having the typical crispy skin to eat, we had a blanket of bacon. The skin kind of melted into the meat, becoming part of the bacon. I am not sure how it happened, but the results were very satisfying. I got the idea from here, but made adjustments, since we are particular about fresh herbs for Thanksgiving, even though we often rely on the dried stuff most of year. The bird was stuffed with carrots, celery, onion, garlic and the herb combination that turned out wonderful. There are various versions of this recipe with comments about soft bacon, but I don’t know what they are talking about. As you can see, there is a crispy shell on it and the meat is well cooked and moist and wonderful. If you follow my instructions you should be able to get the same results. Enjoy!

Bacon Wrapped Thanksgiving Turkey

One 15-pound turkey
1 cup fresh parsley leaves
½ cup fresh tarragon leaves
½ cup fresh sage leaves
¼ cup rosemary leaves
10 cloves garlic, peeled and crushed
½ cups olive oil
4 cups vegetables, including carrots, celery, onion and garlic
3 pounds bacon, sliced into thin strips

Wash the turkey inside and out and pat dry. Place in refrigerator for at least an hour uncovered to cool. Preheat the oven to 500 degrees. Mix together the herbs, minced garlic and olive oil to make a paste. Rub the paste in the cavity and underneath the skin of the breasts of the turkey, carefully so you do not tear the skin. Fill the cavity with the vegetable mixture, and place in a roasting pan. Add 1-2 cups of water in the roasting pan, so there is about ¼ inch of water, then roast the turkey in the oven for 30 minutes. Remove from the oven and turn the heat to 350 degrees. Cover the turkey in the bacon slices, in cross-hatch form* or just by overlapping the slices in strips. Insert a meat thermometer in the thickest part of the breast. Put the turkey back in the oven and continue to cook for about 20 minutes per pound (about three hours total, including the high temperature period) until an internal thermometer temperature reaches 160 degrees. 

*To do the cross hatch on top and bottom there can be preparation while the high temperature cooking happens. Take two pieces of wax or parchment paper, about two feet long each. Create the cross hatch by alternating bacon pieces into one foot by one foot sections. After the turkey finishes the first half hour of cooking, move the turkey to a surface where juices can drain. In the baking pan flip one of the cross hatch sections into the dish and spread it out. Place the turkey on top, then flip the second cross hatch on top. Between the wings and legs connect the cross hatch edges as much as reasonably possible. Wrap the wings and legs with bacon strips, making sure to cover all the meat and skin. Add a few more pieces on the top and bottom of the cross hatch pattern to cover all surfaces of the turkey.

Veggie Kinda Hummus

Hummus tastes good in so many ways. And by ways I mean it can be used as a dip, or spread, or side dish or a nice base for presenting other foods. My favorite use is spreading it on pita and filling with Greek salad. These days I try to not eat much pita, and frankly hummus made from chickpeas can put me over the top carb-wise on a day if I am not careful. I still like the idea of using hummus as a fiber filled  base for anything from salad to grilled meats or seafood. To reduce the carb count I came up with a way to make kinda hummus, using veggies. I can use it where I would otherwise put hummus, with fewer carbs while keeping the fiber content high. The other day Big D made a killer batch of taco meat. I slathered a layer of kinda hummus on the plate under the meat and cheese and tomatoes. Yum! The vegetable proportions can vary depending on what you have in the fridge, but keeping the cauliflower  at about half the bulk will helps obtain the hummus consistency. Be sure to let the veggies cool before pureeing, cuz they can certainly become a hot mess!

Veggie Kinda Hummus

2 cups chicken broth
1 medium head cauliflower
2 cups broccoli, chopped
1 small onion
2 celery stalks, chopped
1 carrot, chopped
2 cloves garlic
Salt and pepper to taste

Combine broth, garlic and vegetables in a large pot. Cook over medium high heat until boiling. Reduce heat and simmer for 30-45 minutes until all the vegetables are soft. Let cool until safe to transfer to use a hand blender, counter top blender  or food processor. Using a strainer or
slotted spoon separate the veggies from the liquid. Purée the vegetables until smooth, all at once or in batches. Add some of the cooking liquid only if it is too thick to purée. The vegetables will be pretty wet, so you probably won’t need the liquid. Serve warm or cold as a spread, dip or plating base for meats and other vegetables, as you would hummus.

Mustard Baked Chicken

I know it is not very exciting, but there are not many dishes simpler than baked chicken parts for a weekday dinner. We always have chicken pieces of some sort in the freezer. Instead of pretending we eat exotic meals every day of the week I will continue to share variations of staples we rely on for dinners and very often lunches the next day. We continue to find that cooking our own food on a regular basis  helps us stay on a diet that makes us feel great, thus the reliance on back stock of protein in the freezer. This recipe is a result of opening the fridge on a Wednesday evening and having the thawed chicken thighs telling me “I know we are common, but make us special. Very special.” A few things from our well stocked fridge resulted in special yumminess. Saute some greens for a bed, and the special chicken is scrumptious! Wonderful wolfing down of dinner on a Wednesday!

Mustard Baked Chicken

2-3 pounds chicken pieces, skin on
1/2 cup spicy brown or horseradish mustard
1 cup olive oil mayonnaise
1 tsp garlic powder
2 Tbsp fresh lime juice
Salt and Pepper
1 cup grated mozzarella cheese

Preheat oven to 350F. Rinse and pat dry chicken pieces. Season all over with salt and pepper. Place chicken, skin side up, in a large baking dish. In a small bowl stir together mustard, mayonnaise, garlic powder and lime juice. Spread sauce over the top of all the chicken. Bake in preheated oven for about 45 minutes, until juices run clear and edges of chicken begin to brown. Turn off oven, sprinkle cheese over chicken and leave in oven for about 10 minutes, until cheese is melted. Serve immediately.

German Chocolate Cake

A special treat for a special guy. Big D’s birthday happened a few days ago, and on the short things he actually wanted was a German Chocolate cake – his favorite kind. To keep with our diet of low carbohydrates, no sugar and few grains, I felt a challenge coming on. Is there a way to make a German Chocolate cake following those guidelines? I knew it was out there somewhere. I searched and experimented and finally found one that I thought would work. And it did! He was so happy with the rich, dense cake to top off his birthday. He leaned back from the table after eating it with a big grin across his face, surrounded by his consumable and functional presents (he is not a buy-me-something-to-sit-on-a-shelf-so-I-can-dust-it kind of guy). Good thing that German Chocolate cakes are coconut centric by nature, because the coconut flour worked really well. Of course, being cake, Little B scarfed down a whole piece, clueless about how good for it actually was. For this effort I pretty much followed the instructions closely from Maria’s blog here. She has a bunch of other absolutely delicious recipes, so check them out too! The only variation I did to the noted recipe was use a 9×13 pan instead of two round cake pans. After the cake was frozen it popped right out of the baking dish, I cut it up and trimmed the edges off to make a rectangular two layer cake. The recipe cooking times and frosting quantity were both effective for my approach, so I don’t recommend any changes. This approach also gave Big D another birthday treat. He grew up watching his grandmother trim and decorate special occasion cakes, nibbling on the cake scraps while he watched. When he saw there were cake scraps from this cake his face lit up like he was a little kid. I will definitely be making this cake again, maybe experiment with some other flavors for the holidays. If nothing else, I surely know when I will make it German and Chocolate, in about a year…

German Chocolate Cake

Cake
2/3 cup butter or coconut oil
1 cup unsweetened cocoa powder
8 egg whites
¼ teaspoon cream of tartar
2 whole eggs
8 egg yolks
1 cup coconut milk
1 cup Truvia (or erythritol and 2 tsp stevia glycerite)
1 tsp Celtic sea salt
1 tsp vanilla (or coconut extract)
1 cup coconut flour

In a saucepan, melt the coconut oil (or butter) over medium heat. Add cocoa powder and mix well. Remove from heat and cool. In a separate bowl, beat egg whites and cream of tartar until stiff peaks form; set aside. In another bowl mix together coconut milk, 2 whole eggs, 8 egg yolks, sweetener, salt, and vanilla. Slowly mix in cocoa mixture. Add coconut flour into batter and mix until it is very smooth. Fold egg whites into batter. Pour batter into 2 greased round 8 or 9×1½-inch layer cake pans. Bake at 350 degrees F for 30-35 minutes or until a toothpick inserted into the center comes out clean. Cool (I put mine in the freezer overnight…it frosts really easy then). Fill layers and cover top and sides of cake with Coconut-Pecan Frosting

Coconut-Pecan Frosting
1/4 cup coconut milk
8 ounces cream cheese
1/2 cup Truvia
1/2 cup coconut oil or butter
1 tsp coconut extract
1 cup flaked coconut
1/2 cup pecans, chopped (or more to taste)

Mix coconut milk, cream cheese, sweetener, and butter until well combined and very smooth. Add vanilla, coconut, and pecans. Frost the cake and enjoy! Serves 16.

Post Navigation