Any Kitchen Will Do

Give me a kitchen and I will cook.

Archive for the category “Douglas Kitchen”

Herbilicious Chicken

herbilicious chicken

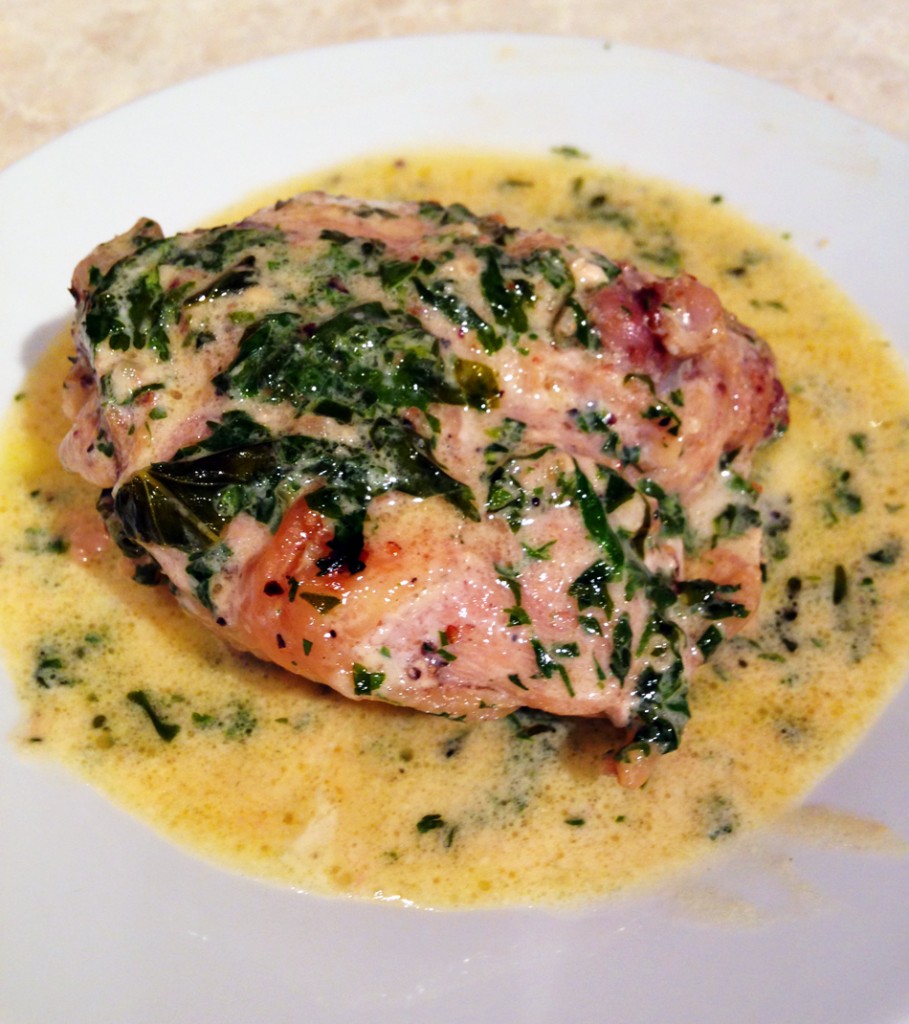
It is so herby and so delicious it must be herbilicious! And chicken to boot! We even made it twice in one week, which is very rare in our house – not only making the recipe, but making chicken. We are a protein kind of house, and most often rely on beef and pork to keep up our intake. Chicken is okay, but not our first choice. A dish has to be really good to get a double-make in a week. Our little balcony garden is growing like gangbusters and the nibbling birds cannot keep up, so we actually get to eat some of our harvest! Our oregano and sage look a little sad, but the cilantro, basil and parsley are very happy with the circumstances, and they do what they can to try and keep up with the towering collard greens. After not doing much gardening in recent years I am now reminded by our little plot just how much better food tastes when I grow it myself. It is amazing how much the sense of taste is influenced by the feeling of such an accomplishment. I can only imagine this dish would also be herbilicious with other herb combinations, so walk out in your garden and grab some handfuls. Let me know how it goes!

Herbilicious Chicken

6 – 8 chicken thighs, skin on
1/4 cup butter
3/4 – 1 cup heavy whipping cream
1 cup fresh parsley
1 cup fresh cilantro
1/2 cup fresh basil
3 cloves garlic, chopped
Salt and pepper, to taste

Season chicken thighs with salt and pepper. In large frying pan over medium high heat place all thighs in the dry plan, skin side down. Cook until skin begins to brown, about eight minutes. Turn thighs and cook for five more minutes. While chicken cooks roll the parsley, cilantro and basil together and slice them up, then finish with a rough chop. Add butter to pan and flip thighs so they are all coated with butter. Add herbs and garlic, again turning the thighs so they are coated. Cover pan and cook for ten more minutes, until juices from chicken run clear. Add cream and stir thighs until cream mixes with juices and herbs. Lower heat and let simmer until cream is heated and chicken is cooked completely, about five more minutes. Serve immediately.

Peanut Butter Chocolate Chip Protein Cookies

protein pb choco cookies

These cookies look ready for a picnic, don’t they?! First impressions may give the appearance of being just a regular cookie, tempting you to abandon your diet or require an additional 20 minutes on the treadmill. Not so! Look closely and you will see they are full of protein, and only have sugar if you choose for them to. We love our sugar free chocolate bars all chopped up and performing the role of topping. Our cookie treats have evolved from the wheaty, to the sugary but not wheaty, to this finale of non-wheaty and non-sugary. We are pretty impressed with ourselves, especially Big D who has become quite the consummate baker! I even changed the name per his request to put the protein after the peanut butter and chocolate chip – I am so proud! Enjoy these cookies on a Sunday picnic, or a Tuesday night – what a treat!

Peanut Butter Chocolate Chip Protein Cookies

1 cup natural peanut butter
1 1/2 Tbsp apple cider vinegar
1 Tbsp butter
3 eggs
1 cup almond flour
2 Tbsp whey or hemp protein powder
1 1/2 tsp baking soda
3 Tbsp Stevita
¼ tsp sea salt
1 cup chocolate chips (or sugar free chocolate bar, chopped)

Preheat oven to 350 degrees. Combine peanut butter, butter, eggs and vinegar in medium bowl. In a separate bowl combine remaining dry ingredients except chips. Add dry mix to wet ingredients and stir until well blended. The dough will be stiff. Cover two baking sheets with parchment paper – paper is optional if sheets are nonstick. For each cookie take 1 – 2 tablespoons in hand and shape a cookie, about  ¼ inch thick and place on cookie sheet. Leave approximately ½ inch between cookies. Gently press three to four chocolate chips into the top of each cookie. Bake for 20-22 minutes, until cookies begin to brown. Remove from oven and cool completely before removing cookies from parchment paper.

Chocolate Bar And More

chocolate bar

Dark chocolate is one of my favorite things. It makes me very happy. Chocolate chips have eluded us in our sugar free world – if chips are available at the store they either have sugar or artificial sweeteners we don’t eat. Some recent failures resulted in chocolate that started melting right after removing it from the freezer, or the balance of chocolate and sweet was not quite right. The coconut butter seems to make a big difference in consistency and flavor. It is made from the meat of the coconut, but with a mild taste. It also stays nice and solid at room temperature, which helps these bars hold up to room temperature adversity. You still get a little meltiness on your fingers when handling it, but what good chocolate bar doesn’t? This chocolate bar recipe does not result in perfect little chips with curly peaks, but the resulting small bits that serve the same purpose are lovely. We joyfully toss them into our homemade mint chocolate chip ice cream and cookies. Sweet levels can be adjusted to taste, and the bar also melts smoothly for home mocha lattes or dessert topping. I am continuing my quest for a curly topped chip, but what is life without a quest?

Chocolate Bar

3 ounces coconut butter
2 oz unsweetened chocolate, chopped
½ cup Stevita
2/3 cup cocoa powder
1/4 tsp vanilla extract

In a small saucepan add coconut butter and chocolate. Melt over low heat until smooth. Remove from heat and stir in Stevita, cocoa powder and vanilla. Continue stirring until smooth. Pour into molds or spread in a pan lined with aluminum foil. An 8×8 size pan makes for the thickness of a typical chocolate bar. Refrigerate until chocolate sets firm, about one hour. For chocolate chips use a sharp knife to chop into small pieces.


Funky Fries

jicama friesI don’t use jicama in my recipes very much. Most often I include it on crudites platters to add variety from the typical celery and carrot sticks. Just last week at a potluck there was a delicious, crunchy salad made with jicama. It was very good, and took me to researching a bit more about using it for other things. You may be sick of hearing about this by now, but we continue to seek out low starch, healthy replacements for otherwise unhealthy comfort foods. When we recently succeeded in making burger buns there was a logical inquisitiveness about the traditional side dish – french fries. I really like the baked fries I made a few years ago, but they rely on potatoes, which are not a routine part of our diet anymore. I know from experience that jicama is crispy and a bit sweet, and in my opinion more flavorful than the traditional potato used for fries. I was skeptical about my hunt for the jicama at the local stores. Everything we buy arrives here on barges or planes (nope, no driving to Juneau!). Although local stores place orders for goods, there is always a mystery about what will actually arrive when, so it is hard to predict much of anything. I was overjoyed when I walked in and there they were, in their muted brown glory – a big pile of jicama! I even found a rather symmetrical one, for they can come in rather lumpy shapes and sizes sometimes. The peeling of it was easy, as usual, and the chopping duties were shared with Little B. I figured these fries could handle some stronger, savory flavors like garlic, onion and parmesean. I was right! The big pile was eaten up by the three of us and our visiting family, so I cannot speak to how robust (or not) leftovers would be. If I ever find out in the future I will let you know. Serve them along with some ketchup (or plain, or with mayo or whatever you like) and you have fries!

Funky Fries

1 jicama
1 Tbsp avocado oil
¼ cup parmesean cheese, finely grated
¼ tsp garlic powder
¼ tsp onion powder
¼ tsp sea salt

Preheat oven to 350 degrees. Peel and slice jicama into strips no thicker than ¼ inch. Slice strips in half. In a large bowl toss fries with the avocado oil. In a plastic bag combine cheese, garlic, onion and salt. Add fries and shake until coated. Place fries evenly spaced on a baking sheet, for too little space in between can prevent crisping. Depending on the size of the pan and the jicama, you may need two or more pans. Bake for 15 minutes. Remove from oven and flip the fries. If you are baking with two pans make sure you switch their position in the oven – my oven bakes faster on the bottom rack if there are two in at the same time, so switching after tossing helps them all cook evenly. Return to oven and bake for 10 – 15 minutes more, until edges are crispy and brown. Serve immediately. Recipe varied from the one found here.

Baked Portobellos

stuffed portabello
I have mentioned in the past my long relationship with portobello mushrooms, their meatiness without being meat, and how well they work as a base for pizza and all things baked. This recipe relies on the mushrooms to utilize leftover chopped onions and sausage. Easy to put together and slide in the oven, I set them up then piddled while they were busy cooking. I was able to to shower, we made ice cream for dessert and even cleaned up the house a bit. Don’t worry. The flavor combination was nice a balanced, with the dressing flavoring the mushroom and the sausage and onion dancing well together. After dinner there was not much left to do but cuddle and read and chat with my family on our big green couch. That is the way I like spending weekday evenings after a busy day – a full stomach from a satisfying meal, and do nothing time, which dones more than nothing for us. That, or the beach, but the beach was for another day.

Baked Portabellos

4 large portabello mushrooms
1/2 – 3/4 cup ranch dressing
1/2 pound ground hot Italian sausage
3/4 cup white onion, chopped
8 slices cheese
1 batch guacamole (optional)

Gently cook sausage in a frying pan over medium heat, breaking it up into bite-sized pieces, but not too small. It can be left slightly pink (it will finish cooking on the mushrooms). Preheat oven to 350 degrees. Place mushrooms cap side down on work surface, leaving the stems attached. With the back of a spoon spread dressing on the gills of the mushrooms. Place sausage pieces on the gills, surrounding the stem. Sprinkle onion on top of the sausage. Place two pieces of cheese on top of each mushroom, lining them up unevenly so most of the sausage and onion is covered. Place mushrooms on baking sheet. Place sheet in oven and bake for 45 minutes to one hour. The cheese should be melted and starting to brown. Remove from oven and let cool for five minutes. Serve plain or with guacamole.

Jalapeno Poppers

stuffed jalapenos_edited-1

During the first year of my blog I made some addictive jalapeno popper dip. It had the stuffed jalapeno taste and we spread it bumpily on almost everything until the last spoonful was gone. After finding jalapenos on sale at the store the other day I decided it was time to again delve into the jalapeno popper world, with the intent of creating a more original result. We have experimented with finding a coating that bakes up crisp during our foray into making Scotch Eggs. Confident in our knowledge  from many egg batches, we applied the same idea to these poppers. Instead of making it easy on ourselves by cutting the peppers in half and stuffing them, we wanted them whole, but also breaded! Why keep it simple and wrap them in bacon? Hmmm….bacon. Not this time. Much too easy and predictable. We wanted to taste the peppers, which would be harder if the bacon was involved. It is a very domineering ingredient, although it goes with almost anything. Now I want some bacon…..but on to the bacon-less poppers! The filling stayed in the poppers and kept them filled, the breading stayed stuck, and boy did we taste the peppers! We expected a varying level of hot among the peppers, as is typical, but Big D got quite a surprise. He must have bit into a seed cluster juuuuust right, for he went running for a drink, then dove for a piece of bread, where he finally found relief. It is rare when he gets over heated by spice, much less have tears well in his eyes because of them. I had no such biting surprise, but really enjoyed noshing on the poppers and relished their return to our growing list of things-we-gave-up-and-missed-but-now-have-back-again. Yay!

Jalapeno Poppers

8 – 10 medium/large jalapenos (as straight as you can find)
8 ounces cream cheese
1/2 cup cheddar cheese, grated
2 egg whites
1 cup golden flaxseed meal
1 tsp garlic powder
1 tsp ground cumin
1 tsp salt
Ranch Dressing (optional)

Preheat oven to 350 degrees. Lay jalapenos on a flat surface and figure out which side they rest on most stably. On the side opposite of the resting side cut a narrow opening that stops short of both ends lengthwise – narrow enough to keep the stuffing in, but wide enough to clean out the seeds and pulp from inside the pepper. Leave the stem attached. With a small spoon or narrow knife gently scrape out some seeds and pulp, making room for the stuffing. Set aside the jalapenos. In a medium bowl place the cream cheese and cheddar cheese. Heat in microwave on 50% power for one minute, until softened. Add 1/2 tsp garlic powder, 1/2 tsp cumin and 1/2 tsp sea salt and stir until ingredients are combined. Using a small spoon gently push cheese mixture into the jalapenos until they are full, or the filling is used up. Place the egg whites in a medium bowl and whisk until slightly foamy. In another bowl combine the flaxseed meal, 1/2 tsp garlic powder, 1/2 tsp cumin and 1/2 tsp salt. Dip each stuffed jalapeno in egg whites, then roll in flaxseed mixture until well coated, pressing some of the meal against the pepper where it does not instantly cling. Gently place coated jalapenosin a small baking dish, with a little space between. Bake for about 50 minutes, until coating browns and peppers are soft. Remove and let cool for five minutes. Serve with ranch dressing or other dipping sauce.

Ranch Dressing

ranch dressing

Summer means salad, especially a salad with nice, tender, young collard green leaves that you see above. They have a nice peppery taste that is less bitter than older collard greens. These particular greens came straight from our little container garden on our balcony, which made them taste even better! It also means raw veggies straight from the fridge as side dishes. Most vegetables better for you raw, and they also contribute to reducing the heat in the kitchen on a warm June day, even in Alaska. Since making our own stellar homemade mayonnaise we are confidently surging forward in using it for sauce bases, which includes this lovely dressing. I have always preferred homemade ranch dressing over the bottled stuff, and have usually relied on dressing mixes. When I started reading labels more closely I discovered some mixes have untoward ingredients, like monosodium glutamate. That stuff puffs me up like a balloon. Others have ‘modified food starch’. If you look up such an ingredient you may find it can sometimes include wheat. Not fun, especially for Big D. There goes the mix permanently off the grocery list. Geez…. Of course, if other people can make homemade versions, then why can’t I? We certainly have a spice cabinet stocked sufficiently to do so. I feel silly not having tried it before. Now I feel happy having it continuously available in my fridge, whether it is summer or not. You will see it here often!

Ranch Dressing 

1 cup mayonnaise
1/2 cup heavy cream
2 Tbsp lemon juice
1 1/2 tsp apple cider vinegar
1 Tbsp dried onion flakes
2 Tbsp fresh parsley, finely chopped
1 tsp dried basil leaves, crushed
1/2 tsp black pepper, ground
1/2 tsp garlic powder
2-4 Tbsp water (optional)
1/4 – 1/2 tsp sea salt, to taste

In a medium bowl combine all ingredients except salt, whisk together until well combined. Add some water if dressing is too thick. Add salt to taste. Chill overnight to allow flavors to blend. Store in the refrigerator.

Mayonnaise

mayoFor a long time I did not try making mayonnaise. Since I was a kid I always liked the taste of it, and the smooth creaminess it gives to sandwiches, sauces and recipes. I fondly remember lunching on many ham and cheese sandwiches layered with tomatoes, pickles and a nice combination of mayo and mustard mixed up with it all. The sandwiches, along with the occasional dollop on a tomato or tossing it in tuna salad brings back memories of hot summer days, and loud lunches in school cafeterias. Just to clarify, I am particular about my mayonnaise. Don’t even try to assume some generic brand or that despicable ‘sandwich spread’ is okay. Give me Kraft or Hellmann’s traditional versions and I am set. That sweet, cloying ‘spread’ is for putting on white bread and other horrid foods. Keep it far away from me. I like my mayonnaise tart and creamy. A few years ago Big D and I started trying to get away from mysterious chemicals, and have gradually moved away from store brands where we could. A lot of our successes have kept us out of the middle aisles of the grocery store; you know, where the processed foods and packaged convenience foods are often found. We still dip into the aisles for stuff, but our kitchen is much more absent of such items, compared to a year ago. We feel happier and healthier for it, especially showing Little B how to rely on whole foods and making what you want from scratch. The first forays into making mayonnaise were good tasting, but not quite a replacement for the flavor of my youth. You might not be as picky about the taste as I am, but Big D tried this version recently and it hit the mark! We are pretty sure it is the avocado oil that took it over the edge as a true substitute for me. Olive oil works well, too, but the flavor of olive oil takes it in a different direction. So excited to have such an easy recipe that works every time and keeps me away from the store stuff, which is soy-filled, sugar-filled and preserved with calcium disodium EDTA. I will take care of my own preservation, thank you.

Mayonnaise

1 egg yolk
1 egg
1 cup avocado oil
2 Tbsp lemon juice
1/4 – 1/2 tsp sea salt

Place egg yolk and egg in a blender, turning it on medium speed. Slowly add oil in a narrow stream to the eggs until fully incorporated. Add lemon juice while the mixture continues to blend. Stir in salt to desired taste. Remove mayonnaise to a glass container that can be sealed air-tight. Store in refrigerator.

Beef and Cheese Enchiladas

lc beef enchiladasThis pan of melted cheese may not look like much, but it represents an exciting success for us. It is another one of those comfort foods we abandoned a while back when we focused on low carb eating. Except for those silly little carby tortillas needed to roll up an enchilada, the traditional ingredients are friendly to our diet. Now, I am sure you already think us crazy for following a restrictive diet. Remember when eggs were bad for you, then red wine were good for you, then maybe not, then….you get the idea. The pros and cons of all kinds of diets in American society fluctuates constantly, so I no longer worry too much about what other people think is ‘good’ or ‘bad’ for us. We feel good, are losing excess weight, and trying to be good examples for our daughter, who we hope can avoid the overweight challenges we currently face. To make us even more crazy we added to a new element to our eating habits. Big D addresses it here very well, so I won’t go into details about intermittent fasting. One side effect of the fasting is that we very much appreciate and value what we eat and look forward to our food-making sessions even more. Some of our sessions resulted in Big D figuring out tortillas recently. We almost immediately decided that a good use of them was experimenting with enchiladas, using the thinnest ones he made. This recipe was enough to fill us up and sate our longing for that South Texas comfort food. Served up with some guacamole and some roasted vegetables, they are so very very good, especially right before a fasting period. I still have not figured out a substitute for refried beans, but give me some time.

Beef and Cheese Enchiladas

4 large tortillas
2 cups taco meat or leftover shredded roast
4 cups shredded colby jack cheese
1 14.5 ounce can diced tomatoes and chiles, drained
Salt and pepper to taste

Preheat oven to 350 degrees. Lay out tortillas on a flat surface. Place 1/2 cup of taco meat and 1/2 cup of cheese on each. Sprinkle with salt and pepper. Make ready a deep, rectangular loaf pan. Roll a filled tortilla until the opposite edges overlap. Place it snugly in the pan. Repeat with the remaining tortillas and fit them closely in the pan, ensuring they don’t unravel when the pan is full. Spread tomatoes and chiles over the top of the enchiladas. Top with the remaining cheese. Bake for 35 – 45 minutes, until cheese is melted and edges are browning and crispy. Remove from oven and let sit for five minutes before serving.

Nutty Chocolate Protein Bars

nutty chocolate protein bars

For months Little B took ballet lessons on Saturdays. They are now over, including the flashy, chaotic shows. It was quite an ‘experience’, but is now over. I will reserve my opinion about the experience, but suspect she has more enthusiasm for other activities. I personally am looking forward to getting back to more weekend hikes.  We have standard food we take on hikes and overnight trips – nuts, peanut butter, jerky, cheese, boiled eggs. They are convenient, energy-building and filling, but with all the summer hiking in our future I wanted to add some variety. The idea for these bars sprung from here. The chewiness and nuttiness reminds me of a candy bar you find at the store – rhymes with tickers. After sufficient bar chilling occured Little B tentatively took a small first bite, then proceeded to eat an entire bar and asked for some in her lunch the next day. Score! This is significant, because in her worldly 4 3/4 year old brain anything mommy suggests is immediately suspect. These bars are a tiny bit sticky at room temperature, but what protein bars aren’t? They hold together well when wrapped in foil or plastic wrap, so score again! It is easy to add them to the hiking food mix, and quite a treat when taking a break looking over water and mountains and whales. Yep. The whales are pretty spectacular. And so is everything else. I am going to experiment with less sticky bars, but these easy-to-make snacks are great for dealing with hunger when you want to spend your time focusing on life and love and nature. Even ballet.

Nutty Chocolate Protein Bars

1 ounce bittersweet chocolate
2 tablespoons butter
2 tablespoons heavy cream
2 tablespoons Da Vinci sugar free syrup, any flavor
1 Tbsp Nutiva Stevita
1 cup whey protein powder, vanilla flavor
1 tsp ground cinnamon
1 1/2 cup mixed raw nuts, finely chopped
1/2 cup unsweetened coconut

Line an 8×8″ baking pan with nonstick foil. In a medium microwaveable bowl, melt the chocolate and butter on half power about 1 minute or until melting and softened. Stir until smooth and blended. Add in the cream, syrup, sweetener and protein powder.The mixture will be stiff and sticky when well blended. Stir in the nuts and coconut – you may need to use your hands to get it all mixed in, but then they would already be ready for putting it in the pan. Firmly press the mixture into the bottom of the foil lined pan using the back of a spoon that is lightly coated with oil or butter, or just use your hands. Chill at least two hours or until firm. Cut into eight large bars or 16 snack squares. Store in refrigerator or freeze.

Post Navigation