Any Kitchen Will Do

Give me a kitchen and I will cook.

Author Archive

Junky Nuts

junkynuts

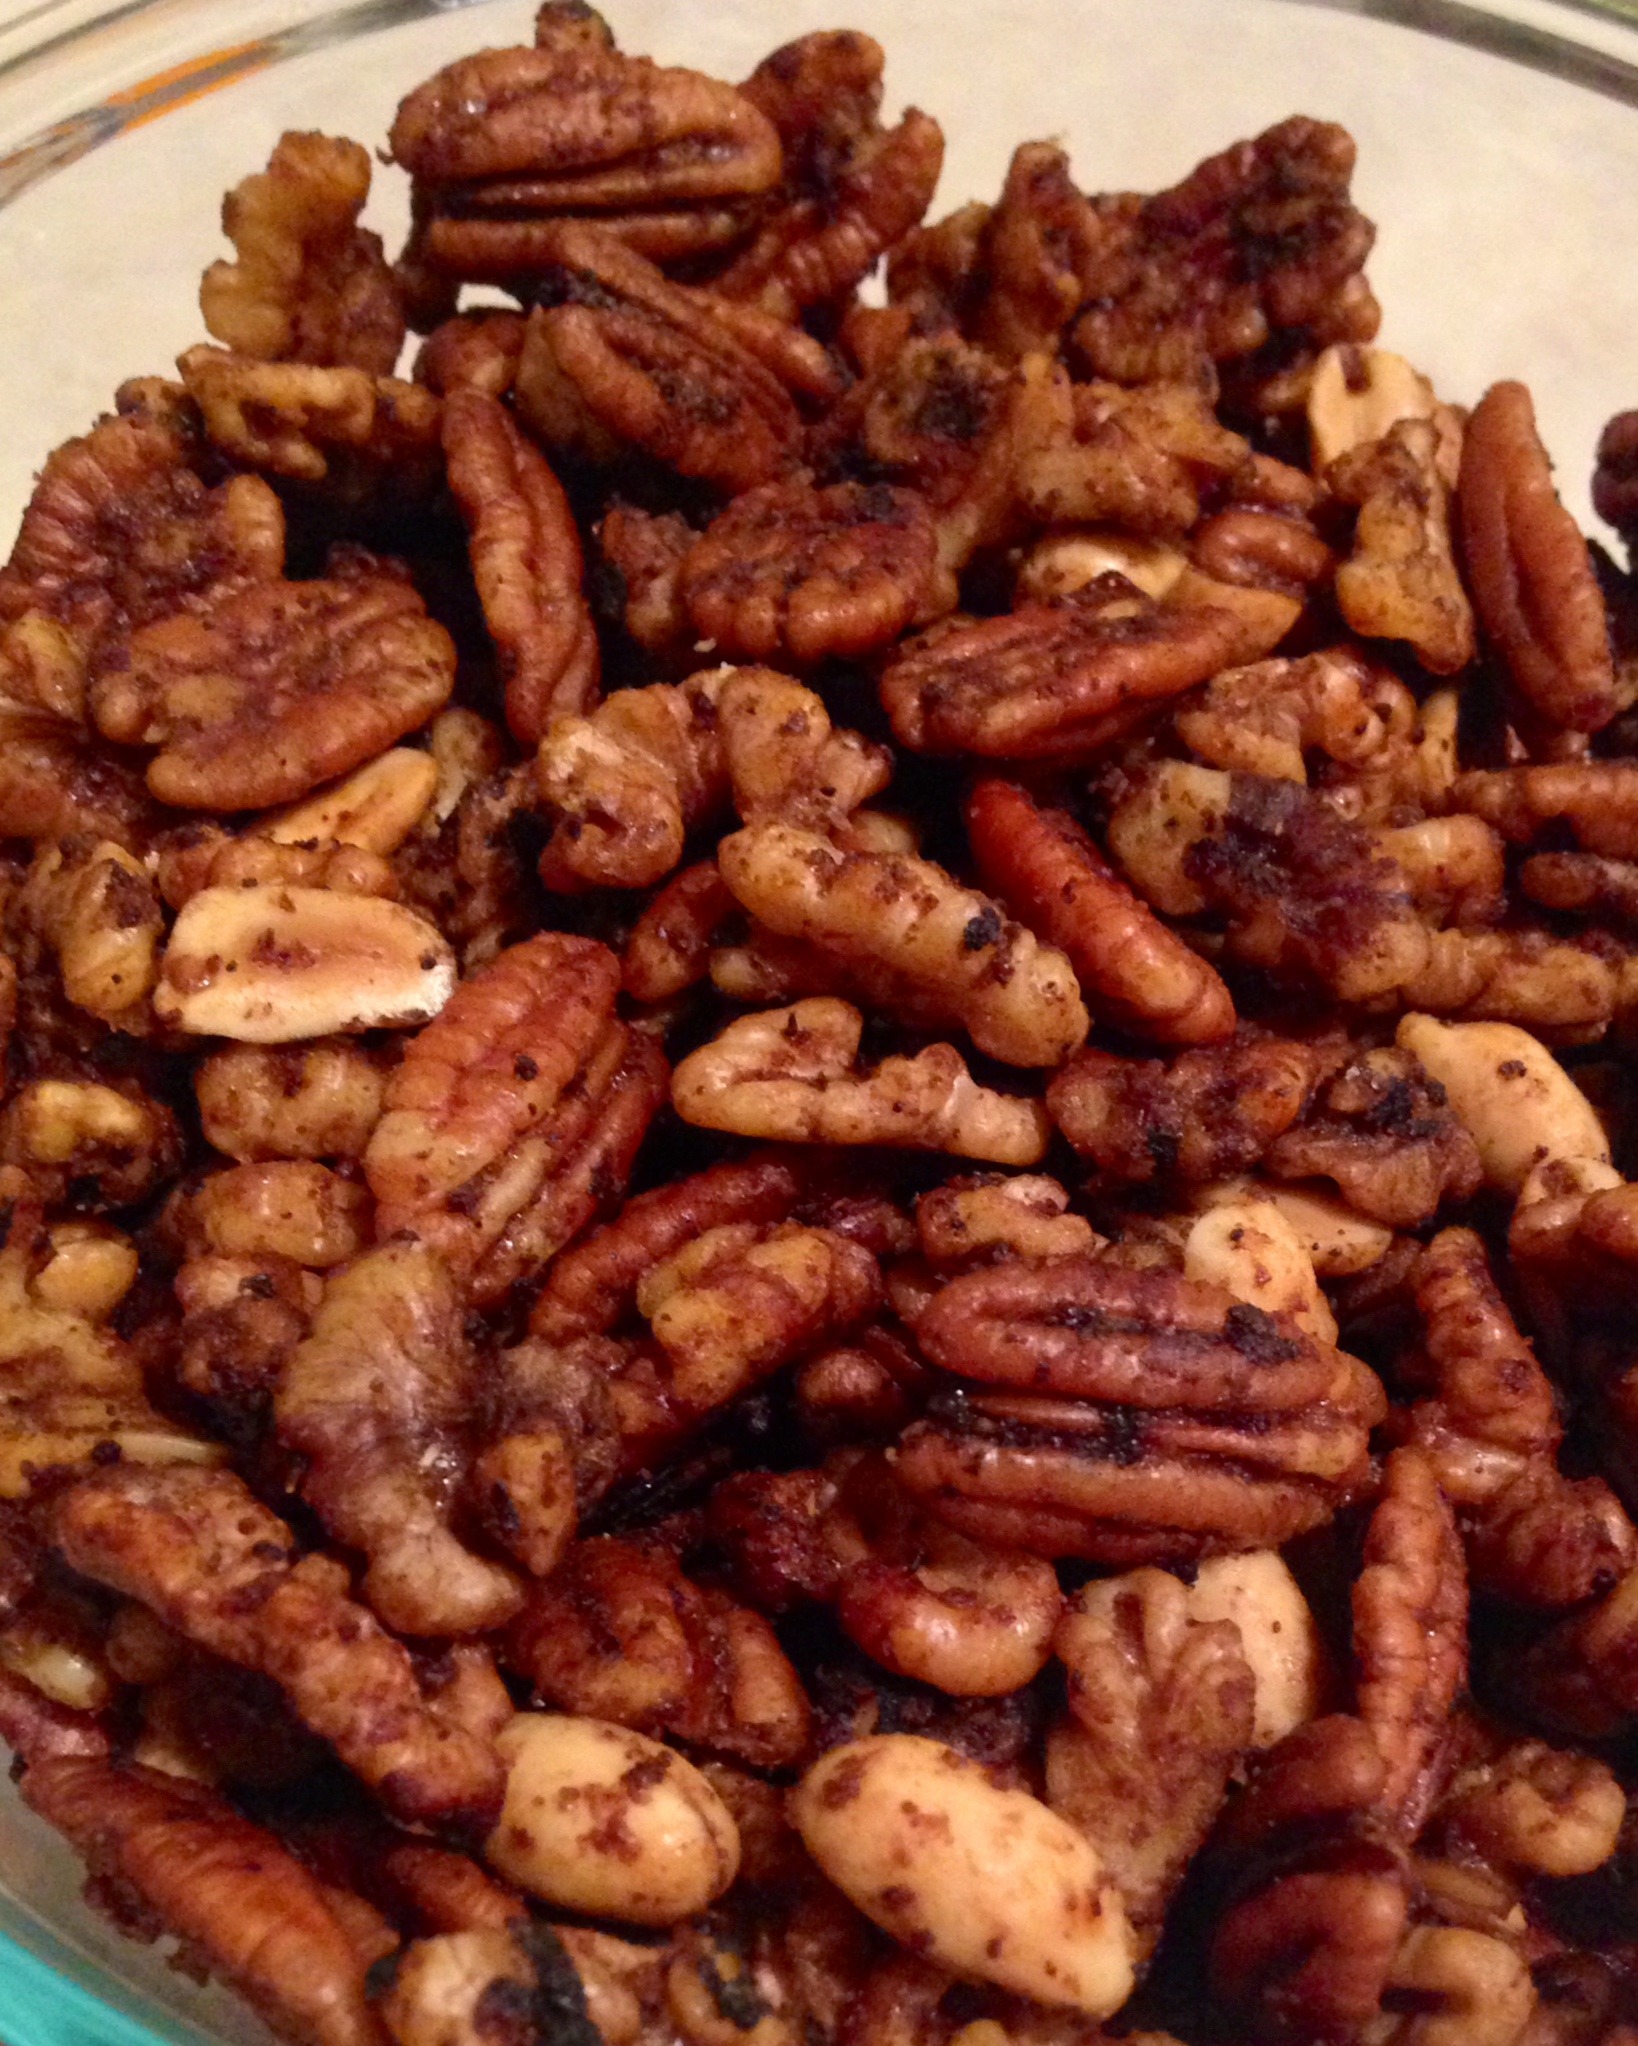
No, this is not a promotion for a porn movie. It is much less provocative. This recipe is actually based on some family traditions from both my and Big D’s relations. It reminds both of us of holidays we have always celebrated in November and December. Why am I writing about it in March, you ask? Because this is when I start missing some of the holiday food traditions, like snacks and eggnog. Our little family actually keep ‘holidays’ going from November 1st through March 17th. It stretches so far because things like Samhain, birthdays, Mardi Gras, Candlemas (Imbolc) and the Vernal Equinox (Ostara). We officially take a holiday break between St. Patrick’s Day and Easter before the build up for May Day (Beltane). It is a pretty short break this year (less than three weeks), but it is long enough to develop a hankering for holiday smells and flavors. Specifically, an ubiquitous snack mixture. Big D’s family called it Trash, mine called it Junk – the savory combination of square cereal pieces, pretzels, nuts and cheese crackers baked in a buttery Worcestershire sauce. This exclusively nut version takes out the wheaty, grainy bits and lets the saucy flavor shine while keeping the crunch. The sauce sticks to the nuts and creates salty black bits that linger in nut wrinkles. We started the habit years ago of keeping some type of flavored nuts around as a quick, ‘good fat’ snack for when hunger strikes. I first made this version a few months ago and now I automatically make a batch every week. I don’t know what this means for next November when the holiday season begins again, if we continue to eat them year round. Maybe we will have to come up with some other holiday snack tradition and keep it special, for I am pretty sure I am un-special-ing this one, but for a good cause. Regardless, I think it will all turn out okay, time will continue to turn and holidays will still come and go. Crunch on everybody!

Junky Nuts

4 cups raw walnuts
3 cups raw pecans
2 cups shelled peanuts (raw or roasted)
1/2 cup butter, melted
1/2 cup Worcestershire sauce
1 Tbsp garlic powder
2 tsp onion powder
1 Tbsp sea salt
1/2 tsp ancho chile powder

Preheat oven to 300 degrees. Add melted butter in a large bowl along with the Worcestershire sauce, garlic powder, onion powder, salt and chile powder. Stir until combined. Add walnuts, pecans and peanuts. Toss nuts until they are all coated. Spread nuts evenly in one layer on shallow baking sheets. Bake for ten minutes. Remove from oven and toss nuts so they are all flipped. Return to oven and bake for ten more minutes. If you are baking multiple sheets at once you should switch their positions in the oven. Remove from oven and let cool completely on the sheets. They will look damp at first, but will dry as they cool. Store in airtight container at room temperature.

Antipasto Salad

antipasto salad

During the past few years I have posted Irish themed dished leading up to St. Patrick’s Day. Things like colcannon, shepherd’s pie, corned beef and cabbage (which I must mention is not actually Irish), and even a traditional Irish breakfast! This year I did not quite ramp up to the day in such a thematic day. I did do some bright, green leeks recently, but that is far as it went. This year we are enjoying some of my past creations instead of new ones. I guess in a way I am reaching back part of the roots of Ireland’s history, just not the most recent – the Gauls! Their influence spread across not only Ireland, but France, Swithzerland, Netherlands, Spain, Italy and Greece. Yes, I am stretching it, but it is fun! In spite of the name, antipasto does not mean it does not like pasta, or that it is after pasta, but it HAS no pasta, and it comes BEFORE pasta. Just the way we like it. We recently had a Greek kick and did some dishes I posted a few year ago, including dolmas, tzatziki and some Greek burgers. We needed a salad to go along with it, because there was a gap on the plate. Hoping that the Greeks and Italians would cooperate, we mixed up some traditionally Italian non-pasta, savory elements, with some Greek, and boy did they go well! The leftovers were great, too, after hanging out in the dressing. I think the Gauls would enjoy it.

Antipasto Salad

1 cup mixed green, black and kalamata olives, pitted
1 cup pepperocini peppers, chopped
1/2 cup crumbled feta cheese
1/2 cup marinated artichoke  hearts, diced
3 plum tomatoes, seeds removed and diced
1/4 yellow or white onion, finely diced
4 ounces thin sliced salami, diced
1/3 cup Greek salad dressing or other vinaigrette

Roughly chop olives so they are of similar size. Place olives in medium bowl. Add peppers, cheese, artichoke hearts, tomatoes, onion and salami. Lightly toss. Add dressing and stir until well coated. Let sit for about 15 minutes then toss again and serve. The salad can also be made a day in advance and chilled until time to serve.

Vegetable Cheese Soup

veg cheese soup

The other day for lunch Big D wanted cheese soup and Little B wanted vegetable soup. We rarely find a canned soup to our liking, much less wheat free, so if we want it we make it. The good thing is we keep a fridge full of cheese and vegetables. The bad news is I did not feel like being a short order cook, so I came up with a one pot wonder. Seeing that there were about three spoonfuls of leftovers, I think they did not mind the merger I came up with. While the sky outside was spitting a mix of rain and snow we filled our bellies with simple warm goodness from scratch. The beer kept us warm too!

Vegetable Cheese Soup

14.5 ounces beef broth
1 cup beer (I used red ale)
2 cups finely chopped broccoli
1 cup finely chopped cauliflower
1/2 cup finely chopped carrots
1/2 cup finely chopped yellow onion
1 plum tomato, finely chopped
4 cloves garlic, finely chopped
2 cups grated mix of cheddar, Monterrey and mozzarella cheese
1/2 cup heavy whipping cream
Salt and pepper to taste

In a medium pot over medium high heat add the broth and beer. When it is starting to boil add the broccoli, cauliflower, carrots, tomato, garlic and onion. Cook for about five minutes, until the vegetables start to soften and soup is hot. Add 1/2 cup of cheese, stirring until combined and the soup is hot again (after it got cooled off from adding the cheese). Continue adding and stirring in cheese 1/2 cup at a time and reheating soup in between until it is all incorporated. Add cream and stir to combine. Cover and let simmer on low for about ten minutes. Serve.


Buttered Leeks

buttered leeks

March is fun in our household. We are big on celebrating St. Patrick’s Day, and up here in Alaska the daylight stretches further and further, making up for the dark winter days we are quickly forgetting. I don’t want to focus on the fact that this is a traditional Scottish dish. I want to focus on the fact it is very green! Can you do that with me? The ground is turning green, the trees are shooting out little green leaves, the flowering plants are shooting up and begging to bloom. Even the moss around here is turning from wintery dull brown to a dozen shades of green. Buttered leeks do the same for our dinner. I really like how they brighten up a plate and uses the whole leek. So many recipes involving leeks focus on the white part and pretend the green parts don’t exist. Where do they think the white parts would be without the green? Never disrespect the green.

Buttered Leeks

2 leeks
1/2 cup butter
1 Tbsp dried thyme leaves
1/2 tsp sea salt
1/8 tsp ground black pepper

Trim off dried leek tips of green portion and roots of white portion. Slice entirety of leek (yes, green and white sections) in thin diagonal pieces. In a large frying pan, over medium high heat, melt the butter. Add thyme, salt and pepper. Stir. Add leeks. Toss until butter mixture coats all pieces of leek. Continue stirring for five minutes. Reduce heat to low and cover pan, cooking for an additional 15 minutes. Leeks should still be bright green but tender. Remove top and salt more to taste. Stir again and serve immediately.

Mustard Parmesean Wings

Mustard paremsean wings

I have a love and loathing relationship with my kitchen. It has nothing to do with whether or not I enjoy cooking, it is just that I don’t always want to cook. What is worse, I think Big D is very similar. There is not always the desire to do, but there is often the desire to eat. Since we rarely bring home prepared or processed foods, there is a constant need to make food with the wonderful ingredients we bring into our home. In finding a balance between needing to eat and wanting to cook I have come up with numerous recipes that don’t take much prep time. One such recipe is my recently shared Bacon Muffins – five minutes to prepare, then the oven does the rest of the work. Here is a more dinner focused quick pick that comes in handy, especially for my wing loving self and Little B – Big D will eat them, but so very much prefers beef! The great part about this recipe is that it completely comes from our freezer and pantry, of staples we always have around. No excuses for not eating well if your pantry is stocked!

Mustard Parmesean Wings

2 – 3 pounds wing pieces, frozen or thawed
1 Tbsp apple cider vinegar
2 Tbsp yellow mustard
1 Tbsp lime juice
1/2 cup finely grated Parmesan cheese
1/2 tsp ground turmeric
1 Tbsp dried parsley flakes
1 tsp sea salt
1 tsp ground black pepper
2 tsp ground garlic powder
1 tsp ground onion powder
2 tsp red pepper flakes (optional)

Preheat oven to 375 degrees. Line shallow aluminum baking sheet(s) with aluminum foil. In large bowl combine all ingredients except chicken. Stir to combine. Add chicken and stir until chicken is coated (either with a wooden spoon or hands). Place chicken in one layer on baking sheet. If the chicken is frozen the coating may not stick as well, so you may need to spread it on chicken after placing pieces on baking sheets. Place in oven and back for 45 – 60 minutes, until juices running from chicken are clear. Remove from oven and let sit for five minutes before serving. May be dipped in the sauce/dressing of your choice, but are wonderful without.


Whipped Lotion

patchouli whipped coconut

This was the hardest and easiest toiletries replacement I have made. It is very easy to make and use. It has been a little bit hard to stop using the commercial lotions. I still have some left and enjoy their scent. I have to say, though, this whipped lotion does a better job of moisturizing than the commercial stuff. The commercial scent is stronger, but that could be resolved with more oils  in this creamy stuff. I will continue to experiment with amping up the scent in my lotion potion. It is very soothing, almost instantly softens and moisturizes my skin. It may take a little extra time to soak in than other stuff, but the results are very much an improvement, and the extra rubbing in time ends up being a self massage!

Whipped Lotion

1/2 cup coconut oil
10 drops essential oill (I use patchouli or sandalwood)

Place oils in a medium bowl. Using a hand whisk or blender whisk attachment, whip for about two minutes, until fluffy and about doubled in size. Transfer to airtight container. Store at room temperature. To use, scoop out a small amount (about 1/4 of what you would pump out of a typical lotion bottle). Rub lotion between hands to warm. Rub on dry skin and massage until absorbed.

Bacon Muffins

bacon egg muffins

These eggs were so good Big D inhaled three, then went to stare at the leftovers, wishing he had belly room to eat more. I know the ingredients are the traditional stuff you may find in a breakfast, only the convenience of having it all together in a little ball makes them taste oh so much better! Depending on my mood I may add garlic powder, parsley, chili powder….whatever is sprinkled on top mixes nicely with the egg and cheese to give them even more character. They also travel well, for those mornings when we run late and breakfast is in the car! If you like crispy bacon line the cups with the meaty side up (the pictured egg in the foreground). If you like softer bacon line the cups with fat edge up (eggs in the background). Another nice thing about these eggs is breakfast prep time drops exponentially. A typical bacon and eggs breakfast requires me to stand over crackling bacon and gently fondling eggs for 20 minutes or so, while sometimes taking special orders for soft bacon or easy over eggs. With this dish I did five minutes of prep then sat down and read some Harry Potter to Little B until the oven timer went off. Always looking for more cuddle time! And she insisted they be called Bacon Muffins when I started suggesting other names. Sometimes it is wise not to argue.

Bacon Muffins

2 Tbsp butter, cut into 12 pieces
12 slices bacon
12 eggs
1 cup shredded cheese
Sea salt and coarse ground black pepper to taste

Preheat oven to 350 degrees. In a muffin tin that holds twelve muffins, line each cup with a piece of bacon. For crispier bacon stand the meaty side up in the pan; for less crispy bacon stand the bacon fat side up. Drop a piece of butter in the bottom. Crack an egg into each cup. Sprinkle salt and pepper (or other seasonings to your liking) on top of the egg. Sprinkle cheese equally among the twelve cups. Bake 18 minutes for soft, and up to 21 minutes for firm eggs. Remove from oven and let sit for a few minutes to cool, then serve.


King Cheesecake

king cheesecakeIn past years I have created a myriad of different King Cake-themed treats. This year I almost passed up creating a new treat, but then Big D opened his mouth. I do admit that most times when he does that the result is positive. Other times, not so much. This time when he got a look on his face and was about to talk I held my breath. Really? We don’t have enough possibilties to choose from? Really?! Well, after he finished sharing his idea (aka closed his mouth) I was sold. Really, we don’t have enough. More more more! This here treat is a wonderful combination of past creations – the limey cheesecake, the Unholy King Cake and King Cakelettes.  I officially say, Big D, here and now, you were right…this time. The cheesecake is, as always, extremely creamy and satisfying. The crumbly, nutty topping reminds me of the spicy middle of a traditional King Cake, and the colored frosting provides for the traditional colors of Mardi Gras – green, gold and purple. I do wish the colored frosting was more vibrant in the picture, for I had to make a choice while waging a gentle battle. Today, being a gymnastics workshop day, Little B ran and flipped and tumbled pretty much nonstop for four hours. This means that her temperament, and mine, were at a bare minimum. After promising her for days she could help with this treat I could not refuse her here at the end. There was no margin for adjusting color or hue when mixing the three little bowls, so what you see is our wondrous treat with a pastel version of our dream. The good thing is she helped and looks forward to ending our feast tomorrow with a big slice. The bad thing is the decor is about four shades darker than planned. A small price to pay for some fun time with my little chef! Laissez les bon temps rouler!!!!! I hope you all have a wonder Fat Tuesday celebration tomorrow and are properly somber (whether from absinthe or faith or both) on Wednesday!

King Cheesecake

Crust
2 cups finely ground almond flour
2 Tbsp coconut flour
2 Tbsp butter, melted
1 tsp Stevita granulated sweetener
1 tsp ground cinnamon
1/4 tsp ground nutmeg
1/4 ground ginger
1 egg white, whisked (save yolk for filling)

Filling
16 ounces cream cheese, room temperature
1/3 cup sour cream
2 large eggs and 1 egg yolk, room temperature
3 Tbsp butter, room temperature
2 Tbsp heavy whipping cream, room temperature
1/3 cup Stevita, granular sweetener
2 large limes, zested and juice separated from meat (use less for milder lime tang)
1 tsp vanilla extract

Topping
1/2 cup raw pecans
1/2 cup raw walnuts
1 Tbsp ground cinnamon
2 tsp Stevita granulated sweetener
1/4 cup butter, melted
Dash sea salt

Frosting
4 ounces cream cheese, room temperature
3 ounces butter, room temperature
1 Tbsp Stevita
Food coloring (green, yellow, purple – made with one part blue and three parts red)

Make the Topping. Preheat oven to 350 degrees. Spread raw walnuts and pecans in one layer on a shallow, metal baking sheet. Place in oven for about five to eight minutes, until they begin to darken. Remove from oven, and set aside to cool. In a microwavable bowl add the butter. Melt on medium power, checking every 30 seconds, until completely melted. In food processor grind toasted nuts until they are a consistency of a rough meal. Add to the butter the ground nuts, cinnamon, Stevita and salt. Stir until well combined. Set aside.

Make the Cake. Preheat oven to 325 degrees. In 9″ pie dish cut a round of parchment paper that fits the bottom of the dish. In medium bowl stir together all dry crust ingredients. Add the butter and stir until the ingredients clump. Add the egg white mix until well combined. Crust will still be crumbly. Press crust into dish until bottom and sides are covered.For the filling add to a large bowl the cream cheese and sour cream. Whisk together until completely smooth. Add butter and stir again until smooth. Add eggs and yolk, stirring to incorporate and until smooth. Add sweetener, lime zest, lime juice and vanilla. Beat until well combined and smooth (see a pattern?). Pour filling into crust and gently smooth surface. Place cheesecake in oven. Bake for 20 minutes, until filling sets. Remove cake from oven and sprinkle topping on top – either evenly over the the entire top of the cheesecake, or Just along the edges, leaving a 2″ diameter space the middle uncovered, like the hole in the middle of a traditional King Cake. Return cake to oven for 10 more minutes. Turn off heat without opening oven door. Leave cake in the oven until mostly cooled, about two hours.

Make Frosting and Decorate. Whisk together cream cheese, butter and sweetener until well combined and smooth. Divide mixture into three separate bowls. Using green, yellow and purple food coloring, color the mixture in the different bowls until the desired tint is achieved. Using a spoon for each color drizzle the frosting over the top of the cheesecake – if you left the middle of the cheesecake clear of topping, I suggest you continue the theme of leaving the middle plain and drizzle the frosting over the portions with the topping. If the frosting is too firm to spread randomly you have two choices: 1) scoop frosting onto the bottom of a spoon and run it over the top of the cake, allowing it to catch on the pieces of topping, or 2) heat the frosting in the microwave at half power for 15-30 seconds until it is runny, then drizzle it over the top of the cake. If the topping was spread over the top of the entire cheesecake, then use any pattern you choose to apply the frosting.

Chill finished cheesecake at least one hour before serving.


Fennel and Olives

photo (2)

I was at a loss for words. The frondy green topped vegetables with the fat white bases? What the heck are they called? Why can’t I remember? I rushed to the store after work to begin the hunt. Yes, I could look it up online and get an immediate answer, but was enjoying the wonder and the wait. After getting to the store my eyes were hungrily searching the mass of green in the produce department. There they were! And they were actually labeled! Ahhh. Satisfaction – fennel! My mind was sated and my mouth was watering. We were making some crispy oven chicken for dinner and could do with a strong side dish. The fennel, with it’s hint of anise I thought would go well with some tapenade and cheese. The more subtle taste of the chicken went well with the powerful fennel with briny olives.

Fennel and Olives

2 large fennel
2 Tbsp avocado oil
Salt and pepper, to taste
1/2 cup tapenade
2 Tbsp parmesan cheese

Remove green stalks from fennel bulbs. Slice bulbs in a large julienne. In a medium sauté pan over medium high heat add the oil. When oil is hot add the fennel. Sprinkle with salt and pepper. Toss every two minutes until fennel is browned and softening. Add tapenade and cheese, stirring until it coats the fennel. Cover pan and lower heat to medium. Cook for another five minutes, until preferred tenderness. Remove from pan and serve immediately.

Conditioner

conditioner

A little while ago I shared a recipe for shampoo. I love using it because it does not weigh down my naturally curly hair like many store bought shampoos. Depending on the weather wherever I am, I also need conditioner in addition to the shampoo. I am sharing two different types of conditioner, which I alternate. The vinegar rinse is more of a deep conditioner I use while in the shower once or twice a week. Vinegar, you ask? Yep! The stuff does a great job balancing the ph in hair, and after the rinsing with water and getting out of the shower you will not smell the vinegar on you. I certainly would not walk around smelling like vinegar, considering all the lovelier smells in the world. The creamy version I use when needed as a leave-in conditioner, either right after a shower or when styling/taming my hair. Disclaimer: these are personal recipes that work for me and my family. Proportions may need to vary for other people and hair types, but I think it is worth the experimentation to rid ourselves of strange chemicals and things that do not need to be in our home…

Creamy Leave-In Conditioner

1/4 – 1/3 cup full fat coconut milk
1 Tbsp avocado oil
1 cup water

Combine milk and oil into a pump spray bottle. Add water so the mixture is about 1/2 inch from the top of the container, then shake until combined. Shake before every use. To apply, spray a light mist to the ends of your hair, working it into your hair with your fingers. Add more conditioner higher up on your head, if needed. Store in the refrigerator if you don’t plan on using the entire batch within one week.

Deep Conditioning Rinse

1/4 cup apple cider vinegar
1 cup warm water

Pour vinegar into a cup that holds at least 12 ounces. Take it into the shower with you. When you are ready to condition your hair* add one cup of warm water from your shower. Pour the mixture over your hair slowly as you move the cup from the top of your head to the back. Gently massage your head and scalp. Rinse with warm water.

*On days I use this rinse I don’t actually shampoo my hair, just wet it well with warm water before applying. If you use store bought shampoo this rinse will still work well after shampooing, and help reduce build up from the shampoo.

Post Navigation