Any Kitchen Will Do

Give me a kitchen and I will cook.

Archive for the category “tomato”

Red Eggs

red poached egg

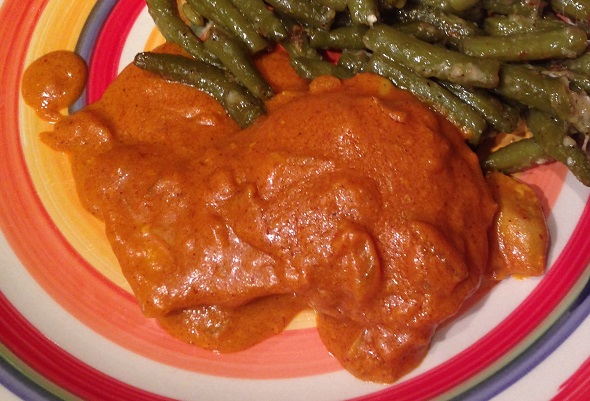
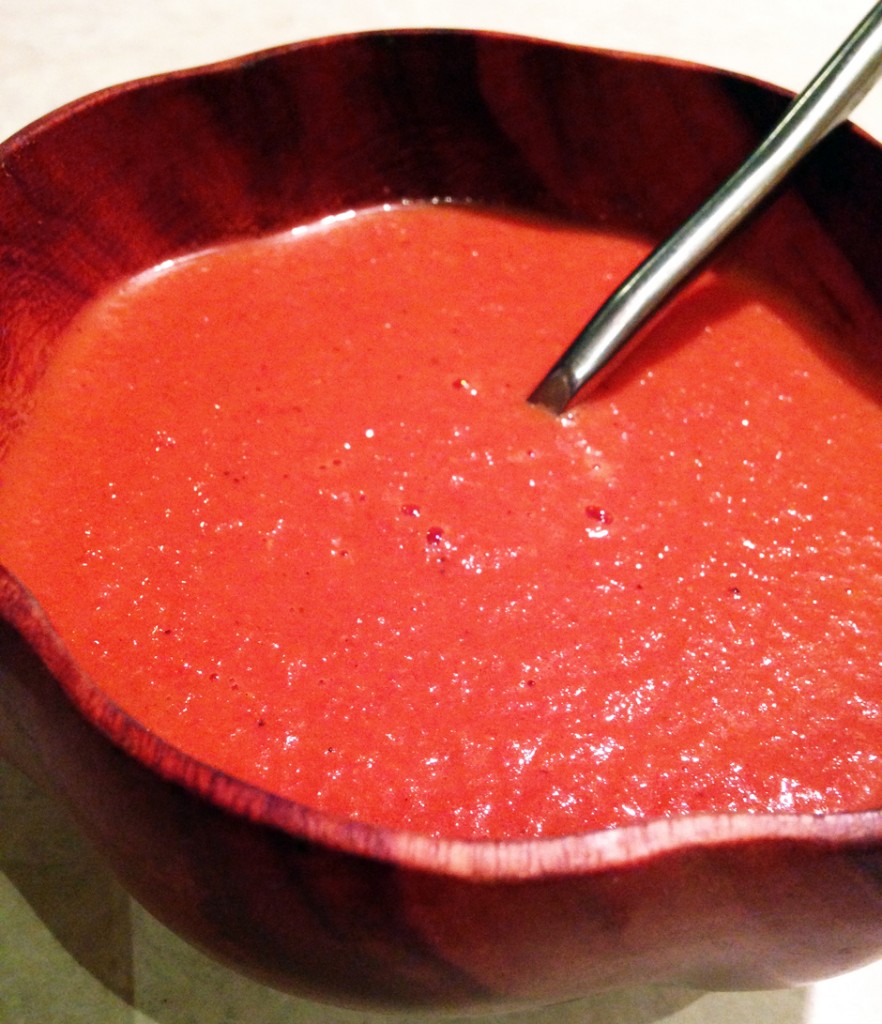
We had leftover sauce! My aptly named Red Chicken was delish, and left us with some sauce that was taunting us from the fridge the other morning. I was reminded of the simple egg bake I posted about a few years ago. It is also reminiscent of Indian shakshuka or Mexican huevos rancheros, which have a bit more than smooth sauce and eggs, but the concept sounded really good, easy and filling.

We were in the middle of a significant effort to reduce our worldly belongings and using up stuff from our food stores before moving. Such a process is pretty emotionally draining. More so than I ever expected. Not the use of food stores, but the reduction of belongings. I would think that getting rid of sweaters not worn in years would be easy, but remembering wearing them when spending time with family and friends brought a bunch of memories to the forefront,  good and bad. After the sweaters were done I shifted over to sorting other stuff. The same type of memories rise, everywhere from who gifted them to me to remembering all the places I wore them. If I was doing the process over the span of months is one thing, but we were doing this type of sorting day after day for a week. Although most of the time was spent sitting or standing and sorting, we were all exhausted at the end of the day. We were all doing it (me, Big D and Little B) and all felt the energy drain.

red poached egg plated
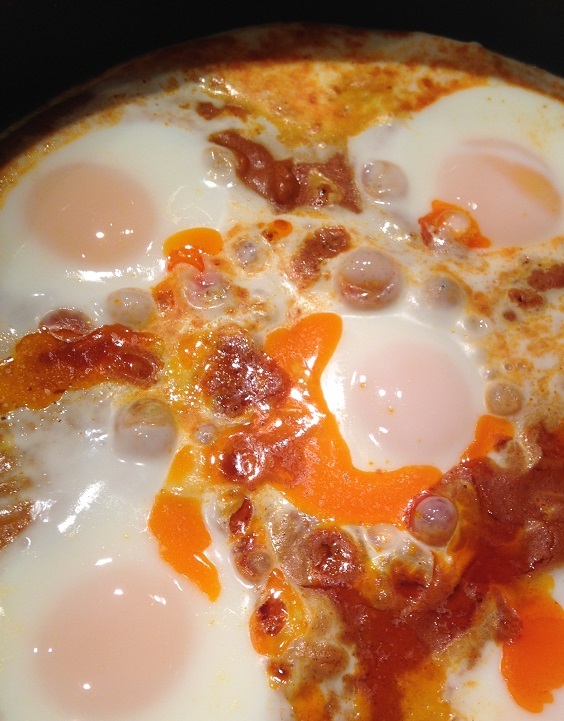
The cooking during this week of great purging helped us relax and talk about our goal – keep the things that serve us and we cherish, not being tempted by keeping stuff just because we always did before. We successfully got through the grand project and winnowed down our stuff to the amount we agreed to (two pick up trucks worth of bins, etc). We make no promises of avoiding the rut of collecting things again, but I think the experience will make us think twice before nonchalantly filling the cart at the big box stores. Keeping things simple provides clarity and encourages creativity – things we can never have too much of. On another note, we are so very proud of Little B. It would have been easy to send her off to a friend’s house and quietly sort through her stuff in absentia, but since we consider her a little person, we thought it important to take her through the process with us. It was not easy, but we took the time to work with her about what she used, what she had outgrown, what she had not touched in a year, and what she cherished. Of course, she is looking forward to more stuff as her interests change in the future, so she leapt in with both feet and made very thoughtful decisions, way beyond her five years on this earth. We surrounded ourselves with comforting food as we moved forward with the purge, including these eggs. Fortunately I did not step away from the pan at the wrong minute, so the poachiness of the eggs was pretty darned perfect. They helped us move on and gave us a new go to dish.

Red Eggs

2 Tbsp butter
1/2 white onion finely chopped
4 cloves garlic, finely chopped
1/2 cup natural peanut butter
15 ounces tomato sauce
1/2 cup lemon juice
2 Tbsp ground turmeric
2 tsp ground ginger
1 tsp ground cinnamon
1 Tbsp cayenne pepper
1 tsp sea salt
1tsp ground black pepper
8 ounces full fat coconut milk
4 – 6 eggs

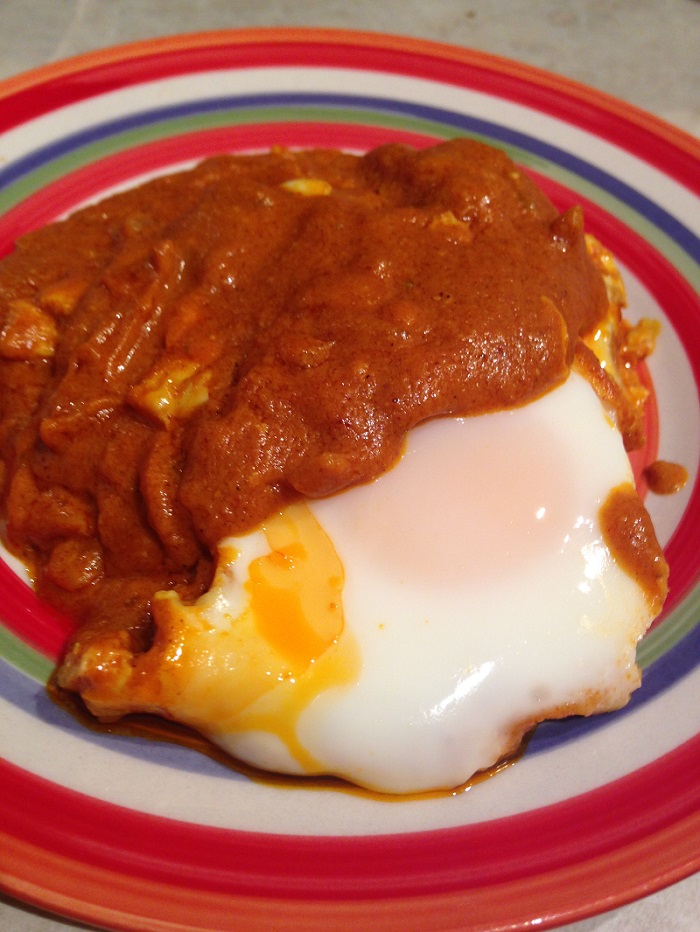
In medium saute pan over medium high heat melt butter. Add the onion and garlic, cooking until browning begins. Add remaining ingredients except for coconut milk. Stir until all ingredients are combined, turning down heat to low. Stir in coconut milk and simmer until steam is rising from sauce. With the back of a spoon make a divet along the edge of the sauce in the pan. Drop a raw egg into the divet. Repeat with remaining eggs, evenly distributing them in the sauce. Cover pan and let simmer until eggs are cooked to desired doneness – about five minutes for soft. Serve immediately by scooping egg(s) onto a place and drizzle sauce on top.


Red Chicken

photo 1
A while back my brother lived in an apartment complex. Not one of those little ones with just a few units, but a huge corporate monstrosity with dozens of buildings. It was not the most interesting place he has ever lived – the house on a hill in Austin with a concrete bathroom holds that honor – but it was convenient to his work and reasonably priced. There was not much around it but his office and a few local markets, all of which had a common theme – Indian food. We did not do much Indian cooking when we were younger, but the convenience and variety of ingredients, as well as the opportunity to learn from his neighbors, resulted into a foray of curries, colorful sauces and a little (or a lot of) heat. He has since moved into his own house, but carried with him the Indian food immersion from his apartment days. We are having a long visit with him, and I am looking forward to learning a bit from his experience. I am looking to play around with traditional ingredients and flavors, not necessarily copying specific dishes. Here is my first gander at being inspired by a Northern Indian dish called Butter Chicken. It is far from accurate, so I am not even trying to use butter in the title. It was great. On top of everything else, today is the eleventh wedding anniversary for me and Big D. My ongoing quest to find chicken dishes he likes has spanned the entirety of the eleven years. He is a beefy kind of guy, begrudgingly consuming chicken if absolutely necessary. He gushed with joy and satisfaction upon tasting this dish. I definitely added it to the ‘like’ category for him. Little be was not as impressed with the dish, but still ate her fill, including the green beans I cooked up to go with them. You should see what we do with the leftover sauce!
Red Chicken2 Tbsp butter
6-8 sinless boneless chicken thighs
1/2 white onion finely chopped
4 cloves garlic, finely chopped
1/2 cup natural peanut butter
15 ounces tomato sauce
1/2 cup lemon juice
2 Tbsp ground turmeric
2 tsp ground ginger
1 tsp ground cinnamon
1 Tbsp cayenne pepper
1 tsp sea salt
1tsp ground black pepper
8 ounces full fat coconut milk

In medium saute pan over medium high heat melt butter. Add chicken and partially cook, about five minutes. Remove chicken from pan and set aside. Add to the the chicken juices the onion and garlic, cooking until browning begins. Add remaining ingredients except for coconut milk. Stir until all ingredients are combined, turning down heat to medium low, and simmering for about ten minutes until hot and bubbly. Add coconut milk and stir again until combined. Add chicken and simmer until cooked through, about ten more minutes. Serve immediately.


Antipasto Salad

antipasto salad

During the past few years I have posted Irish themed dished leading up to St. Patrick’s Day. Things like colcannon, shepherd’s pie, corned beef and cabbage (which I must mention is not actually Irish), and even a traditional Irish breakfast! This year I did not quite ramp up to the day in such a thematic day. I did do some bright, green leeks recently, but that is far as it went. This year we are enjoying some of my past creations instead of new ones. I guess in a way I am reaching back part of the roots of Ireland’s history, just not the most recent – the Gauls! Their influence spread across not only Ireland, but France, Swithzerland, Netherlands, Spain, Italy and Greece. Yes, I am stretching it, but it is fun! In spite of the name, antipasto does not mean it does not like pasta, or that it is after pasta, but it HAS no pasta, and it comes BEFORE pasta. Just the way we like it. We recently had a Greek kick and did some dishes I posted a few year ago, including dolmas, tzatziki and some Greek burgers. We needed a salad to go along with it, because there was a gap on the plate. Hoping that the Greeks and Italians would cooperate, we mixed up some traditionally Italian non-pasta, savory elements, with some Greek, and boy did they go well! The leftovers were great, too, after hanging out in the dressing. I think the Gauls would enjoy it.

Antipasto Salad

1 cup mixed green, black and kalamata olives, pitted
1 cup pepperocini peppers, chopped
1/2 cup crumbled feta cheese
1/2 cup marinated artichoke  hearts, diced
3 plum tomatoes, seeds removed and diced
1/4 yellow or white onion, finely diced
4 ounces thin sliced salami, diced
1/3 cup Greek salad dressing or other vinaigrette

Roughly chop olives so they are of similar size. Place olives in medium bowl. Add peppers, cheese, artichoke hearts, tomatoes, onion and salami. Lightly toss. Add dressing and stir until well coated. Let sit for about 15 minutes then toss again and serve. The salad can also be made a day in advance and chilled until time to serve.

Vegetable Cheese Soup

veg cheese soup

The other day for lunch Big D wanted cheese soup and Little B wanted vegetable soup. We rarely find a canned soup to our liking, much less wheat free, so if we want it we make it. The good thing is we keep a fridge full of cheese and vegetables. The bad news is I did not feel like being a short order cook, so I came up with a one pot wonder. Seeing that there were about three spoonfuls of leftovers, I think they did not mind the merger I came up with. While the sky outside was spitting a mix of rain and snow we filled our bellies with simple warm goodness from scratch. The beer kept us warm too!

Vegetable Cheese Soup

14.5 ounces beef broth
1 cup beer (I used red ale)
2 cups finely chopped broccoli
1 cup finely chopped cauliflower
1/2 cup finely chopped carrots
1/2 cup finely chopped yellow onion
1 plum tomato, finely chopped
4 cloves garlic, finely chopped
2 cups grated mix of cheddar, Monterrey and mozzarella cheese
1/2 cup heavy whipping cream
Salt and pepper to taste

In a medium pot over medium high heat add the broth and beer. When it is starting to boil add the broccoli, cauliflower, carrots, tomato, garlic and onion. Cook for about five minutes, until the vegetables start to soften and soup is hot. Add 1/2 cup of cheese, stirring until combined and the soup is hot again (after it got cooled off from adding the cheese). Continue adding and stirring in cheese 1/2 cup at a time and reheating soup in between until it is all incorporated. Add cream and stir to combine. Cover and let simmer on low for about ten minutes. Serve.


Rebellious Ratattouille

image

I think this is ratatouille but some people may find it lacking. What I love about it is the combination of flavors I get from the alternating, thinly sliced vegetables in a single bite. I like bell peppers in general, which are usually included in this dish, but I don’t like the taste and texture they add to the other veggies used here, so I left them out. Look at me being a ratattouille rebel. A neat thing about this recipe is it can be doubled and tripled easily by adding more sliced vegetables and a larger pan. It also makes for a lovely presentation in a serving dish or on your plate.
Rebellious Ratattouille
1 medium zucchini
1 medium yellow squash
1 medium onion
3 large Roma tomatoes
1 14.5 ounce can diced tomatoes
2 cloves garlic, crushed
1 Tbsp dried oregano leaves
1 Tbsp dried parsley leaves
1/2 tsp sea salt
1/4 tsp ground black pepper
In a medium pot over medium heat add the canned tomatoes, garlic, oregano, parsley, salt and pepper. Simmer for about ten minutes, until heated through and bubbly. Remove from heat to let cool. Preheat oven to 375 degrees. While sauce simmers prepare the vegetables by slicing them thinly, less than 1/8 inch thick. Sprinkle slices with salt and pepper. Removing seeds from tomatoes is optional. Using a stand or stick blender purée the tomatoes ito a smooth sauce. In a loaf pan pour a thin layer of tomato sauce (you will probably have leftover sauce). Alternate the slices of zucchini, yellow squash, tomatoes and onion, placing them in two long rows in the pan. Bake for 30 minutes, cover pan with foil and bake for an additional 15 minutes. Remove from oven and let sit for 5 minutes before serving.

Bacon Wrapped Scallops

bacon wrapped scallops

Big D is going to be so pissed that I did this while he was out of town. I just could not wait! There is a local restaurant that makes something similar, and I had a serious craving. The restaurant appears to wrap the scallops with bacon and pierce with toothpicks, then deep fry them and serve with hollandaise sauce. Their sauce is a bit subtle – it may be the version of sauce they make, but I have longed for something tangier when we have ordered and inhaled them as an appetizer. Not one to deep fry things, I decided to broil, since scallops are easy to overcook and quick cooking works well with the broiler. I was tempted to do more seasoning, but decided to keep it simple. I was not disappointed. These were so easy to make at home and delicious! I promise I will make them again sweetie and after you get home!

Bacon Wrapped Scallops

8 large scallops (about 1″ diameter raw)
4 slices bacon, cut in half
8 round toothpicks
Salt and pepper to taste

Spicy Cocktail Sauce

1 Tbsp tomato paste
1 1/2 Tbsp raw horseradish, grated
1/4 cup lemon juice

Preheat oven on low broil. Lightly sprinkle scallops with salt and pepper. Wrap a piece of bacon around a scallop, overlapping the edges. Secure the bacon with a toothpick, pushing it through both sides of the scallop. Repeat with all scallops. Place scallops on a shallow baking pan. Position oven rack about 8 inches below broiler. Place scallops in oven. Broil for about ten minutes, making sure not to overcook the scallops. If you only have one broiler setting assume it is high and reduce cooking time to 5-7 minutes, watching carefully – a few more minutes may be needed, depending on broiler heat. The bacon may smoke a bit. While the scallops cook make the spicy cocktail sauce: whisk together the paste, horseradish and juice until well blended. Sprinkle sauce on serving dish. Place scallops on plate and serve immediately after removing from the oven.

Tomato Soup

tomato soup

In the past I have talked about gazpacho and tomato artichoke soup, but this one is smoother and just as simple. There is a Little B story behind it. Kid menus in restaurants are horrible, for the most part. Hey kids! Have some wheat bread, some wheat pasta, some breaded stuff and some candy! Oh joy. Just what I want my daughter to consume and ping from for hours. True, there are some places that have good options (some steak houses actually have kid steaks – go figure!). We usually end up ordering vegetable sides or soups for Little B when we eat out. That, or share food we order jointly to share. No problem really, and agreeing on a dish with Little B always comes with negotiations. All of these possibilities work, and heavy reliance on servers who can actually take orders. One of Little B’s favorite restaurant soups is tomato. There are a few places in town that offer it regularly, so she often seeks it out. When we cannot find it we figure something out at the restaurant, then when she still yearns for it, I will whip up a batch of tomato soup at home. I often vary it a bit, depending what is in the fridge, but this is the basic tasty recipe, including bunches of veggies and some cream for fat. She slurps it up and always gives me a big thank you smile. The greatest thing ever.

Tomato Soup

3 14.5 ounce cans diced tomatoes
1/4 cup red wine
2 cloves garlic, crushed
1/4 cup chopped onion
1 stalk celery, chopped
1/2 tsp sea salt
Dash ground black pepper
1/4 tsp turmeric
1/4 cup heavy whipping cream

In medium pot over medium-high heat add all ingredients except cream. Cover and cook until bubbly. Stir, reduce heat to low and cover. Simmer for 30 minutes, until onions and celery are soft. Turn off heat and let cool for about ten minutes. Add cream and stir. Using a stick blender puree the soup until smooth. Alternately, put soup in a blender and puree until smooth. Serve immediately, or reheat but do not boil.


Beef and Cheese Enchiladas

lc beef enchiladasThis pan of melted cheese may not look like much, but it represents an exciting success for us. It is another one of those comfort foods we abandoned a while back when we focused on low carb eating. Except for those silly little carby tortillas needed to roll up an enchilada, the traditional ingredients are friendly to our diet. Now, I am sure you already think us crazy for following a restrictive diet. Remember when eggs were bad for you, then red wine were good for you, then maybe not, then….you get the idea. The pros and cons of all kinds of diets in American society fluctuates constantly, so I no longer worry too much about what other people think is ‘good’ or ‘bad’ for us. We feel good, are losing excess weight, and trying to be good examples for our daughter, who we hope can avoid the overweight challenges we currently face. To make us even more crazy we added to a new element to our eating habits. Big D addresses it here very well, so I won’t go into details about intermittent fasting. One side effect of the fasting is that we very much appreciate and value what we eat and look forward to our food-making sessions even more. Some of our sessions resulted in Big D figuring out tortillas recently. We almost immediately decided that a good use of them was experimenting with enchiladas, using the thinnest ones he made. This recipe was enough to fill us up and sate our longing for that South Texas comfort food. Served up with some guacamole and some roasted vegetables, they are so very very good, especially right before a fasting period. I still have not figured out a substitute for refried beans, but give me some time.

Beef and Cheese Enchiladas

4 large tortillas
2 cups taco meat or leftover shredded roast
4 cups shredded colby jack cheese
1 14.5 ounce can diced tomatoes and chiles, drained
Salt and pepper to taste

Preheat oven to 350 degrees. Lay out tortillas on a flat surface. Place 1/2 cup of taco meat and 1/2 cup of cheese on each. Sprinkle with salt and pepper. Make ready a deep, rectangular loaf pan. Roll a filled tortilla until the opposite edges overlap. Place it snugly in the pan. Repeat with the remaining tortillas and fit them closely in the pan, ensuring they don’t unravel when the pan is full. Spread tomatoes and chiles over the top of the enchiladas. Top with the remaining cheese. Bake for 35 – 45 minutes, until cheese is melted and edges are browning and crispy. Remove from oven and let sit for five minutes before serving.

Almond Pizza Crust

no flaxseed pizza crust

A long time ago Big D and I started a tradition of pizzabeer. No, that is not a typo. We would go to a spot – whether it was in Alaska, Virginia, Nevada, Texas…wherever we were, we would sit and eat pizza, drink beer and have long, winding talks about where we were going together. Sometimes they were about short term goals, other times they were longer term. Regardless, they were talks over food and beverage. Without some effort it is difficult to have wheat free pizzabeer. When making pizza these days we do it at home and we regularly use a wheat free crust figured out a couple of years ago. It is delicious, but includes flaxseed meal and coconut flour, which gives it a nuttier taste than what we like for some pizzas. This version of a wheat free crust is made by relying on almond meal and cheese. It makes for a crust that can hold the excess of toppings we are wont to use, while not adding a ton of strong flavor. Just think about it – when you eat pizza are you tasting the crust, or is it the toppings? I realized when I was pondering pizza that what I missed most was the toppings, not the crust taste, and the ability to pick up a piece of pizza and take a big bite. There was a simple concept I realized a few years ago when trying to eat healthier – if I am craving a food it was important to figure out what I craved – was it taste, texture, occasion or appearance? The craving focus varies by dish, but it was easy to identify for pizza. Other examples include the creamy of ice cream, the crunch of chips, the heaviness and nuttiness of a piece of bread. Now, back to the crust. We stumbled upon this more subtle tasting version one night when we wanted pizza and were woefully short of coconut flour and flaxseed meal. Necessity is the mother of invention, right? Oh, and look at my new pretty! Big D got me a new pizza stone! It is all fancy with an enamel finish that does not stick and gets crazy hot. Works as well as the more porous versions I have had in the past, but much more versatile.

Almond Pizza Crust

4 cups shredded mozzarella cheese
6 Tbsp almond flour
1 tsp baking soda
2 tsp dried parsley flakes
1 tsp dried basil
1 tsp garlic powder
1/2 tsp onion powder
1 tsp sea salt
2 eggs, beaten

Toppings (Used in the picture)

1/2 cup pizza sauce or tomato paste
1 cup mozzarella cheese and cheddar cheese, grated and mixed
20-24 pepperoni slices
1/2 cup black olives, chopped
Sprinkling of finely chopped basil and oregano

Preheat oven to 450 degrees (if using a pizza stone prepare as directed). Combine together in a medium bowl all ingredients except the eggs. When well combined add the eggs and stir with a fork until a moist dough forms. Spread enough dough onto the pizza stone or baking dish to have a layer about 1/4 inch deep. The pizza stone in the picture needs about 1/2 the dough, and since it is preheated the dough begins to soften as soon as it touches the surface. A stone without an enamel finish may not work with this crust. Bake the crust for no more than five minutes, allowing it to set and just begin to brown. Lower oven temperature to 425 degrees. Remove crust from oven and add sauce, toppings and cheese. Return to oven and bake for 10 – 15 minutes, until top is browning. Let cool for about ten minutes, allowing crust to set and toppings to cool. Slice and serve.

Rolled Chicken Breasts

stuffed chicken rolls

Big D does not prefer fowl white meat. Whether it is turkey or chicken or other, more exotic birds, he goes for the dark meat as much as possible. He will eat the white stuff, but only out of necessity. When he has to resort to a chicken topped salad when dining out he will eat it, but begrudgingly and with thoughts of thighs dancing in his head.  I have similar preferences, but they do not run as deep, so when I was visiting my mom I took advantage of white fowl connoisseurs and made a recipe I have long pondered. Besides the satisfaction of pounding flesh into oblivion, the balance of flavors was supreme, with the mildness of white chicken meat and kick of the stuffing. Since the chicken was thin, the cooking time was kept short and the dish was moist, in a good way. Never hesitate to pound the meat just a little bit more, for it won’t hurt the chicken, and it can’t help but release anything lingering and seething in you. I almost called this recipe ‘stuffed’, but since I did such a good job of pounding the ‘rolled’ version of the name seemed appropriate. I served the rolls with some baked spaghetti squash and viola! Dinner!

Rolled Chicken Breasts

6 boneless chicken breasts
2 cups baby spinach leaves
1 1/2 cup crumbled feta cheese
6 pieces bacon, cooked crisp
1 tsp dried basil leaves
2 cups mozzarella, shredded
4 ounces tomato sauce
12.5 ounces diced tomatoes
1 tsp garlic powder
1 tsp onion powder
Salt and pepper to taste

Preheat oven to 350 degrees. Pound chicken breasts with kitchen mallet until no thicker than 1/4 inch. Chop spinach finely, crumble bacon and combine them with feta and basil in medium bowl. Season both sides of chicken with salt and pepper. Lay a breast flat on your work surface with the longest section going left to right. Place 1/4 to 1/3 cup (divided equally among the breasts) of filling in the middle of the flat meat. Starting from the left or right carefully roll the breast until it overlaps with the chicken on the opposite side of the filling. Place stuffed breast in a 9×9 (snugly) or 10x 10 (close but not so snug) or similar sized baking dish. Repeat with the other five breasts and place them in the dish. Place in preheated oven, covered. Bake for about 20 minutes. While chicken is baking combine tomatoes, tomato sauce, garlic powder and onion powder in a medium sauce pan over medium high heat. When the mixture begins to bubble turn the heat down and summer uncovered for about 15 minutes. Add salt to sauce if needed. When chicken finishes cooking for 20 minutes remove it from the oven. Sprinkle half the cheese on the chicken, top with the tomato sauce and then the rest of the cheese. Return the pan to the oven uncovered and cook for 15 – 20 more minutes, until the edges begin to brown. Remove from oven and let sit for five minutes before serving.

Post Navigation